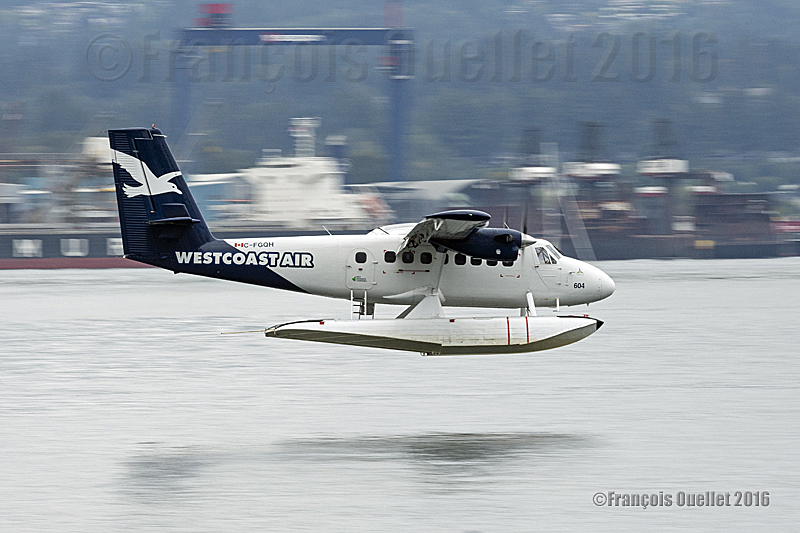
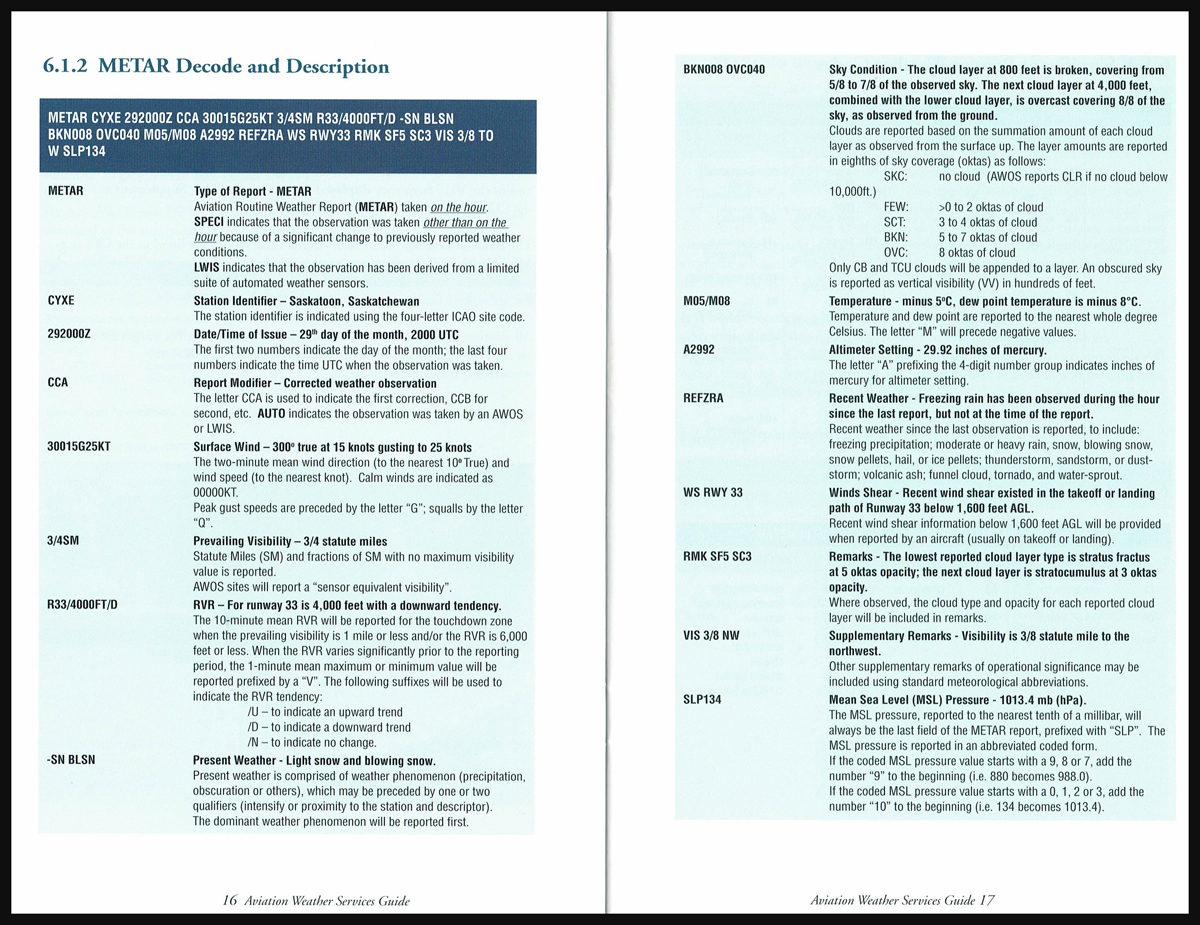
Westcoast Air Twin Otter floatplane C-FGQH arriving in Vancouver Harbour, in British-Columbia, during Summer 2016. The photo was taken with a Canon 5DSR camera.
The picture above was taken in British Columbia, during summer 2016, with a Canon 5DSR full-frame camera equipped with a Canon 70-200 f2.8L IS II USM telephoto lens.
A Westcoast Air (C-FGQH) Twin Otter floatplane (DHC-6) was about to land in the Vancouver Harbour. It is obvious that adjusting the shutter speed to 1/1200 would have given enough speed to obtain a clear image. But this would have taken away any movement sensation by freezing the propellers and background.
The shutter speed had to be slow enough to allow the rotation of propellers. It is clear that an aircraft’s propeller rotates more slowly on final for landing than during take-off. So the camera had to be adjusted for a shutter speed varying between 1/40 and 1/125.
A slower shutter speed increases the risk of getting a blurred photo, especially when the photograph must move with the camera to obtain the desired effect of movement. The fact that a telephoto lens is used also increases the possibility of a blurred picture. It is thus imperative to activate the stabilizer and horizontal panning function of the telephoto lens.
To obtain a background without any precise details, the camera is panning and follows exactly the aircraft’s movement. This requires a progressive acceleration of the panning, according to the aircraft’s position from the photographer.
When the Twin Otter gets closer, things get a bit more complicated as everything speeds up. It is necessary to already have positioned the feet in the appropriate direction in order to avoid a major switch in the body’s posture. The slightest useless or brisk movement would immediately be visible on the photo.
With a bit of practice, a photographer will achieve success by respecting the following elements: a shutter speed between 1/40 and 1/125, an appropriate position of the feet, no brisk movement while pivoting and a progressive acceleration of the body’s rotation aligned with the aircraft’s speed. A slower shutter speed will enhance the aircraft movement. But expect more blurred pictures when working with speeds between 1/40 and 1/60.
A last detail: as soon as the aircraft’s floats touch the water, the deceleration starts. The photographer’s pivoting speed must immediately slow down otherwise the photo will be blurred.
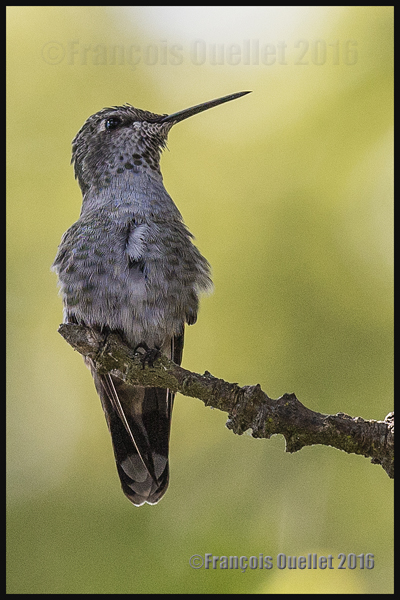
Hummingbird photographed with a Canon 5DSR DSLR camera in Victoria, British-Columbia, in 2016
The 50.6 megapixels full frame sensor in the Canon 5DSR camera is of great help when comes the time for bird photography. It allows major cropping of an image without any loss in quality.
With a little patience, it was possible to take a picture of a hummingbird in a public park in Victoria, British Columbia after the bird finally rested on a branch for a few seconds. Without cropping and a powerful 500mm telephoto lens, it would have been difficult to produce a sufficiently large and clear image of a five centimeter bird.
I used a Canon 5DSR equipped with a Canon EF 70-200 f2.8L II USM telephoto lens. The camera was adjusted on APERTURE mode. The telephoto lens stabilizer was activated. The autofocus was set on the SERVO mode to insure the image sharpness in the event that the subject started to move.
But the hummingbird was so small that the autofocus constantly whizzed between the bird and the leaves. I had to switch to manual focus and use Liveview.
Once the picture was taken and cropping was done, few contrast and luminosity corrections were necessary in order to enhance the bird’s plumage which happened to be backlighted. RAW files facilitated the edition in Photoshop.
Likewise, the background intensity of the colours was corrected to avoid distracting from the principal subject. The initial picture, in landscape format, was later changed in the portrait format, which allowed the exclusion of several branches around the bird which were imposing and diverting attention.
Naturally, the chosen depth-of-field blurred the background, helping the hummingbird to stand-out.
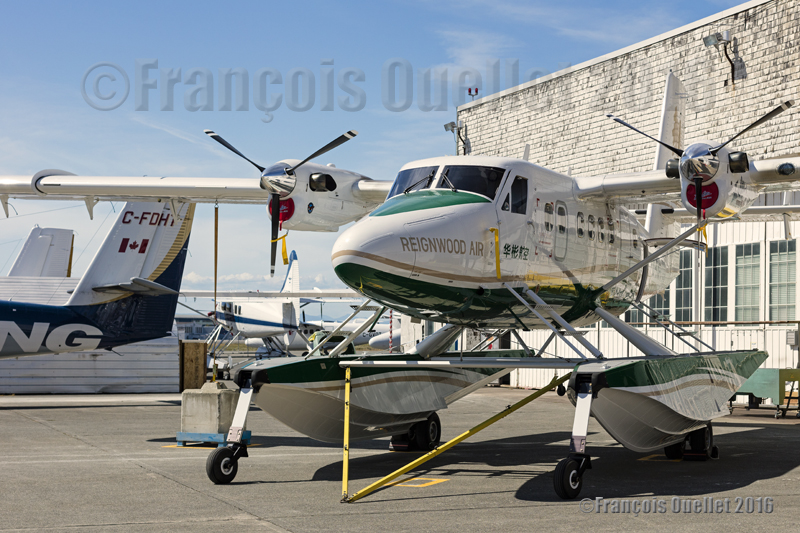
Twin Otter Series 400 parked in Victoria, British-Columbia, in 2016
Knowing I would spend some time in Victoria in 2016, I planned a visit of the Viking Air Ltd installations, the Canadian company who now builds the famous Twin Otter Series 400. This company is unknown from a majority of Canadians since its production is essentially exported. Out of one hundred aircrafts produced so far, only two were bought by a Canadian company. Viking also offers maintenance service for the Twin Otter Series 100 to 300 in activity around the world.
In the foreground, a Twin Otter Series 400 built by Viking in Victoria, British-Columbia. In the background, a CL-215 water bomber recently acquired by Viking. It will possibly be modified into the more powerful CL-415 version .
In the beginning of 2016, Bombardier and Viking sealed a commercial deal that now makes Viking the new owner of the patents and designs for the CL-215 and CL-415 water bombers. Viking not only services the existing Twin Otters but is evaluating the possibility of restarting the production of the CL-415 water bombers. All is resting on the demand. But with more extreme meteorological conditions fueling a growing number of major forest fires, one can expect that within the next few years Viking will reactivate the production.
In Victoria, a Twin Otter Series 400 on floats built by Viking has been bought by Reignwood Air. It is ready for delivery to China (2016).
With the on-going regulatory changes actually taking place in China, Viking is confident to see an increase in its orders for the Twin Otter Series 400 on floats. The company will receive, at their Victoria installations in 2016, the first flight simulator essentially dedicated to training pilots on the Twin Otter on floats.
A Viking’s Twin Otter Series 400 in Victoria ready for delivery to Russia
For now, Russia is Viking’s most important customer despite the ups and downs linked to the political crisis between that country and Ukraine combined with a ruble devaluation that have forced a slowdown in the production of aircrafts destined to Russian companies. With the recent stabilization in the political situation, Viking has been able to hire back numerous workers which now brings the count to at least 350 employees, if my memory does not fail me.
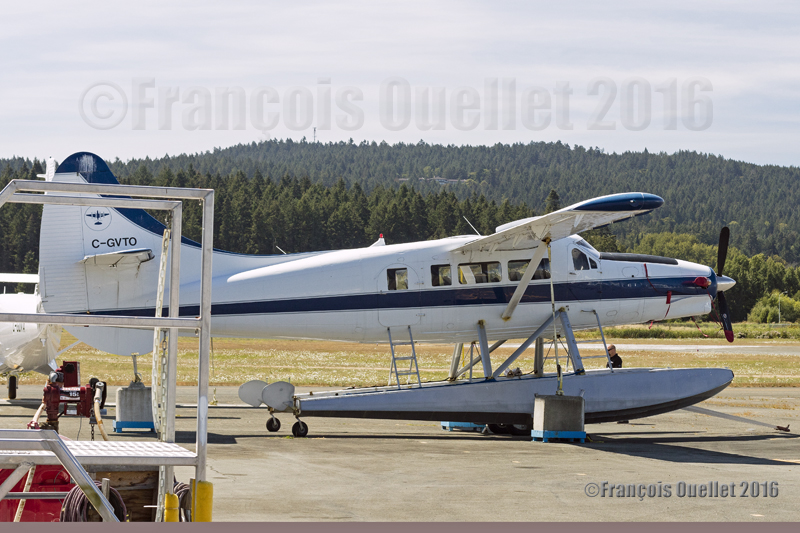
Turbo Otter DHC-3T C-GVTO in Victoria, Canada, in 2016
Nowadays, most Canadians ignore that a Canadian company has restarted the production of the Twin Otters and is evaluating the possibility of also relaunching the production of the CL-415 water bombers. In the meantime, some CL-215s recently acquired by Viking will possibly be transformed into the more powerful CL-415 version. The only thing now missing for Viking is an important order from a Canadian company: that would make its name as well-known as Bombardier or De Havilland.
For other articles on aviation and photography, click on the following link: Aviation photography
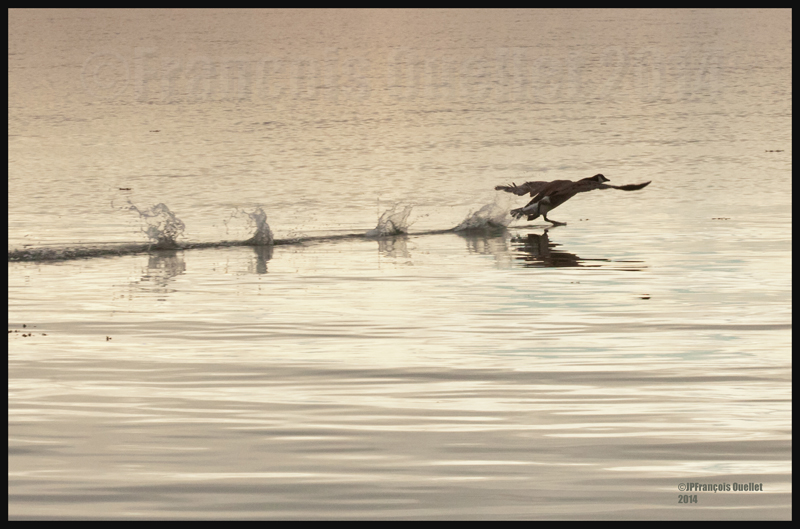
A Canada goose about to take off from Oak Bay, Victoria, British-Columbia in 2014
Obviously, the Canon 5D MKII is not the ideal camera for sport photography, but it still can offer very good results with its full frame sensor. You don’t get a high number of frames per second, but you get the benefit of a bigger image than one produced with an APS-C sensor. I was thus able to capture the full take-off run of this Canada goose in Victoria, British Columbia, while leaving enough space on the right side of the frame, which was essential for a balanced photographic composition.
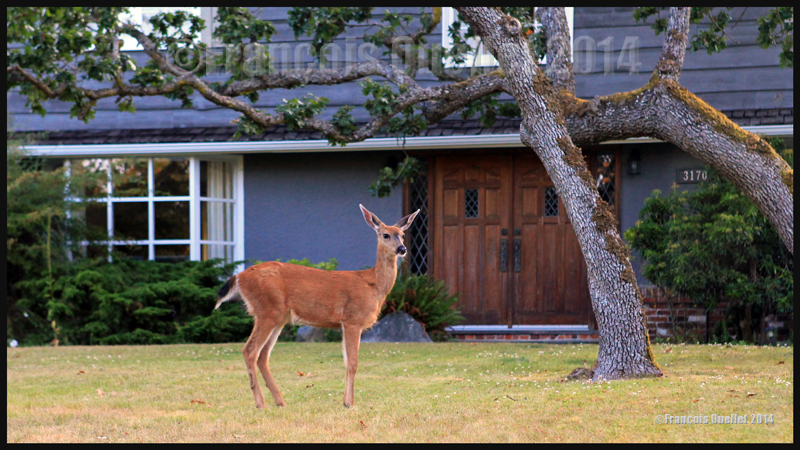
Deer on a private property in Uplands, Victoria, British-Columbia in 2014
Deer move freely in Victoria’s Uplands sector and you can easily find them on private property lots. Since they are so numerous and have no natural enemies, the city has imposed new regulations to control their ever growing number. The picture above was taken from my vehicle: it was only necessary to slow down and proceed quickly to capture the animal while it was looking at the car.
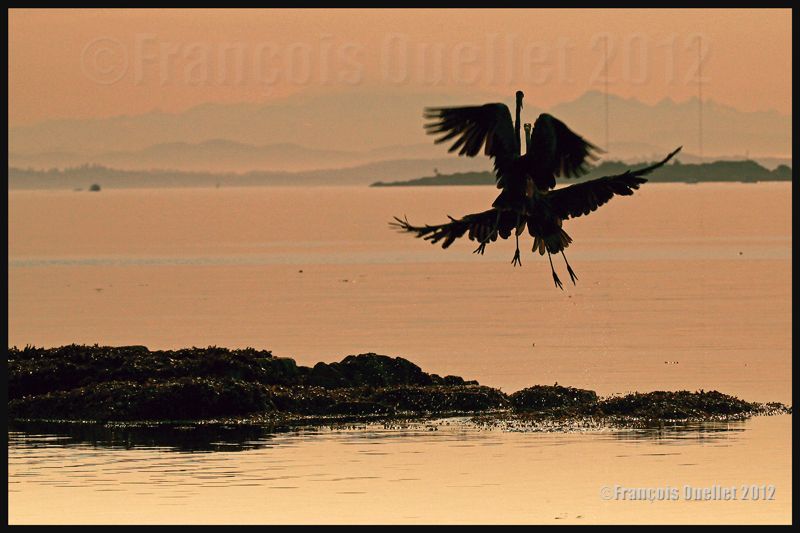
Heron in flight in Oak Bay, Victoria, British-Columbia 2012
There are numerous herons in Victoria’s Oak Bay sector. This picture was taken very early in the morning, while there was a mixture of mist and low clouds and the rising sun was still blocked by some low clouds. The wind was calm. A graduated filter was nonetheless necessary to tone down the contrasts caused by a horizontal light.
Fighting herons in Oak Bay, Victoria, British-Columbia in 2012
Every bird has to fight for its own territory and those two herons are no exception.
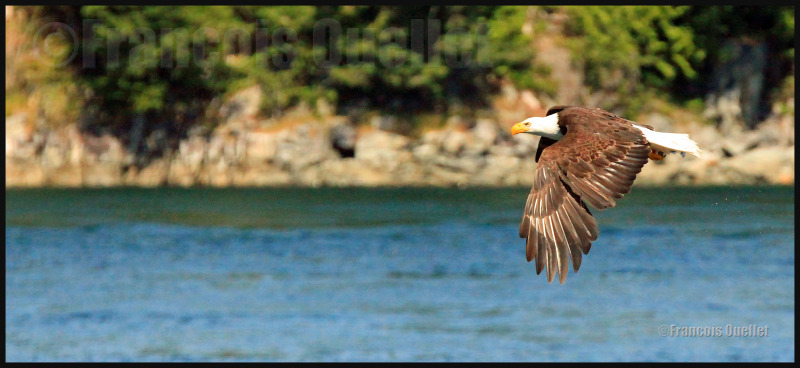
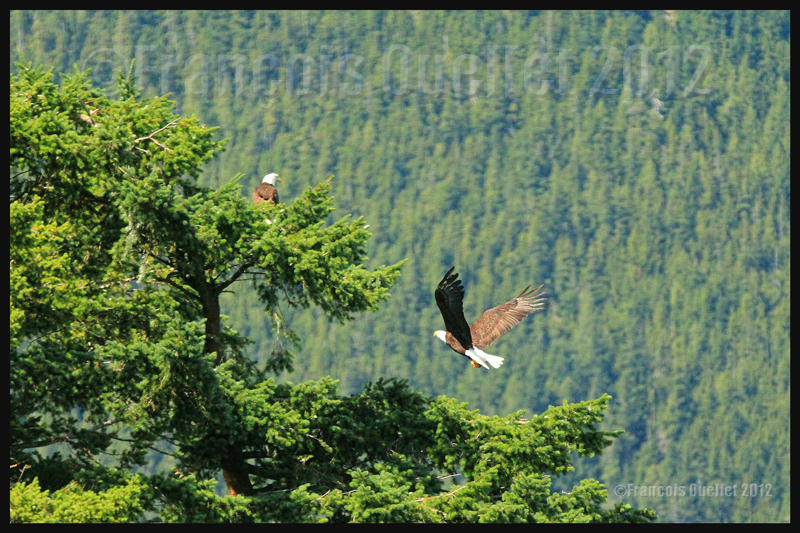
Eagle observed in the Campbell River region, British-Columbia, Canada. Summer 2012.
While taking a little scenic cruise in British-Columbia’s Campbell River area, we were able to see numerous eagles diving to catch fishes then climbing back up in high trees to deliver the catch of the day. Pictures were hard to take since the captain had to keep the boat at a good distance from the eagles to respect their hunting territory. Moreover, it was windy and the boat was constantly moving.
Two eagles near Campbell River, British-Columbia, Canada in 2012
The two pictures of eagles were taken with a Canon 5D MKII equipped with a Canon 70-200 f2.8L IS II USM telephoto lens. An extender (2X) was also added to increase the focal distance to 400mm. Even then, I had to crop quite a lot to bring the birds to an acceptable distance, which increased the digital noise. A quality APS-C equipped camera (like the Canon 7D MKII) would have been very useful here (10 frames per second and a reduced amount of cropping, if you are ready to compromise on the size of the image).
A full frame camera like the Canon 5DSr would have also been appropriate, with its 50.6 MP resolution, as long as a high shutter speed is selected. Due to all those pixels crammed on a regular full frame sensor (not a medium format), the slightest camera movement is recorded. But if you succeed in totally freezing a long distance shot, the exceptional resolution of the Canon 5DSr would allow you to greatly increase the size of the bird while protecting the sharpness of the image, especially now that the low pass filter has been neutralized in the model R.
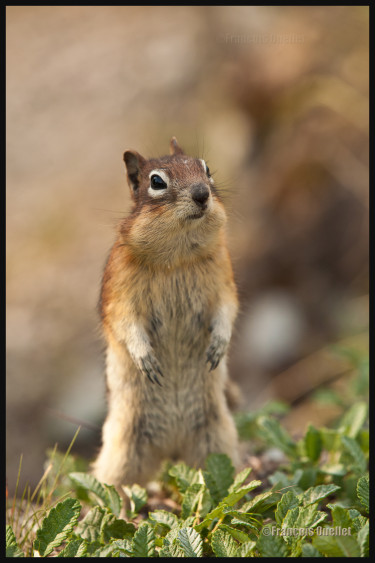
Chipmunk near highway 93 towards Jasper, Alberta
On the car ride between Lake Louise and Jasper, we had to stop on numerous occasions to take pictures in the fantastic Jasper National Park. At one point, a little chipmunk, familiar with rest areas, paid us a visit hoping to add something new to his diet. The picture’s depth-of-field has deliberately been adjusted to make sure the chipmunk would be easily visible, since both animal and background had the same colours.
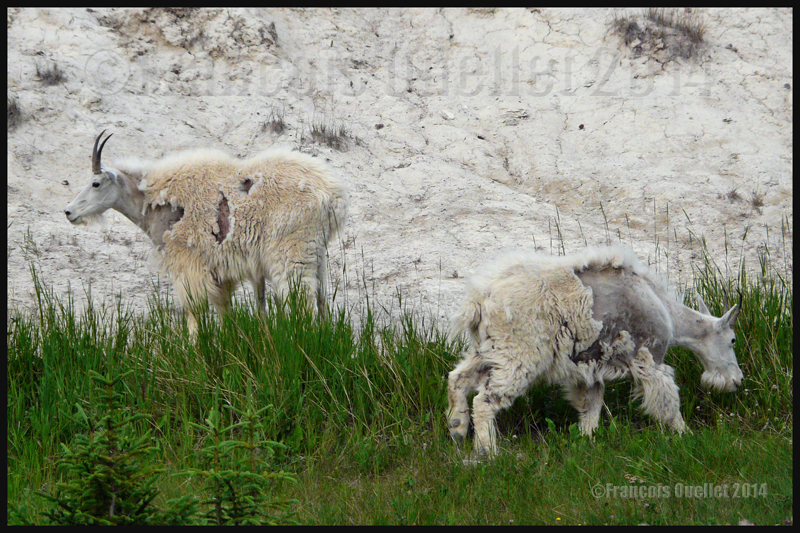
Mountain goats in the Jasper National Park, Alberta, Canada in 2014
It was hot, very hot, during summer 2014 in the Jasper National Park. The car’s thermometer was recording 38C between Lake Louise and Jasper. Numerous forest fires were raging. So much so that we had to delay our trip towards Jasper by 24 hours since Highway 93 had been closed by authorities. Mountain goats nonetheless had to endure part of their winter fur in that very high heat…
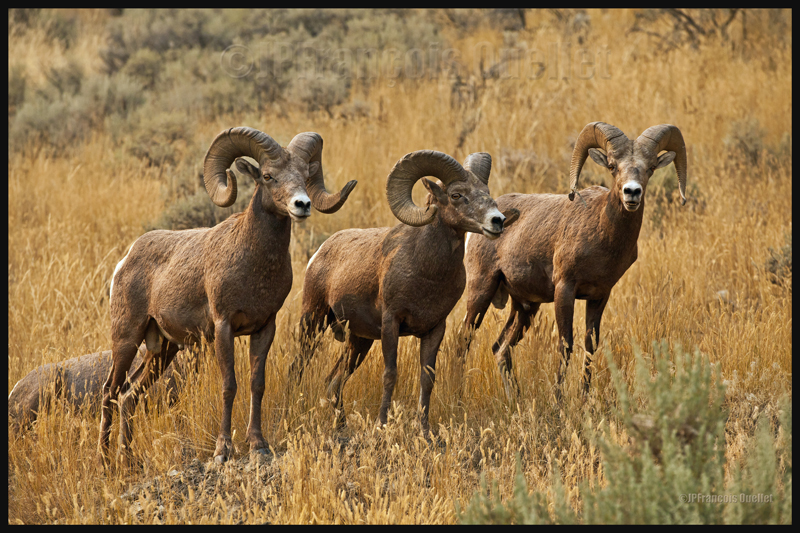
Canadian bighorns near Kamloops, Alberta, Canada in 2014
Near Kamloops, in Alberta, we were able to observe about twenty Canadian bighorns coming down from the surrounding mountains to help themselves from the cultivated lands in the valley. The picture above was taken with a Canon 70-200 f2.8L IS II USM telephoto lens, almost without cropping, the bighorns being close enough.
Brown bear near the Yellowhead Highway, Alberta, Canada in 2014
The picture above was taken alongside the Yellowhead Highway in Alberta. We saw the bear in a field and when he detected our presence, he changed direction and started moving toward us. Here, everything is about moderation and although I love photography, comes a time when a bear is big enough in the viewfinder to indicate that it is time to retreat…
Other pictures on Western Canada will be available in the coming months…
For more articles in the category « Photos of Canada », click on the following link : Photos of Canada
Cumuliform clouds add energy to any photo. Even photos in black and white benefit from them largely, whether it is for a normal or an HDR photo.
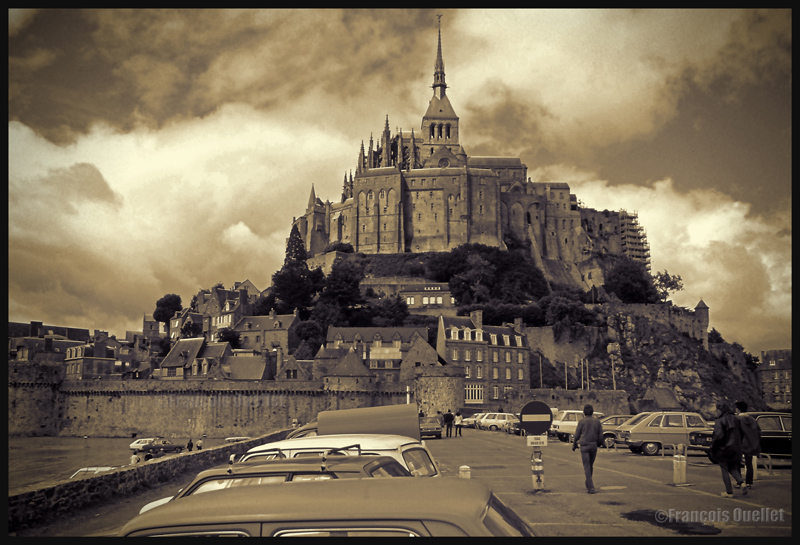
Cumuliform clouds add dynamism to this Abbaye du Mont St-Michel scenery. France (1978)
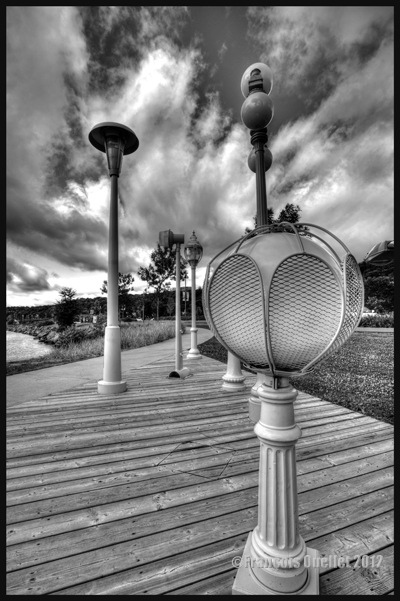
Black and white HDR picture of lamp posts installed along the St-Lawrence, Quebec City 2012.
The stratiform clouds add to the tranquillity and the stability of a photo.
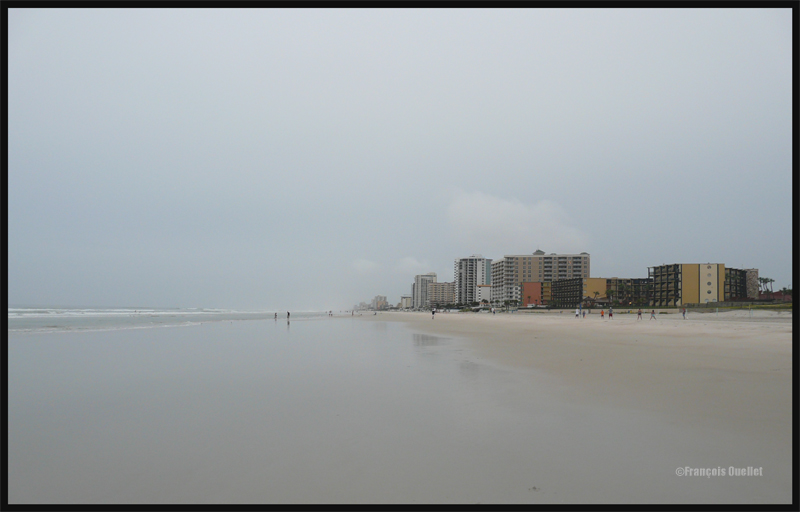
Daytona Beach under stratus clouds in 2011. The end of the afternoon allows the fresh air from the sea to move over the heated land, which helps create few cumulus fractus, visible near the buildings.
Clouds including a stratiform and cumuliform components (stratocumulus) produce an effect that is more energizing than the simple stratus, while avoiding the explosion of energy of the cumuliform clouds.
A stratocumulus adds to this otherwise peaceful scenery captured on board the Lyria train between Paris and Geneva in 2013.
The cold front
The approach of a cold front enhances the possibility of interesting photos. If it is a fast moving cold front of moist and unstable air, the photos will probably be more spectacular, as some thunderstorms will be associated with the system. A dew point of more than 15 C indicates the presence of a lot of water vapor which can be transformed into precipitation, thus releasing a lot of energy. When these conditions are combined with a really strong contrast between the new air mass which approaches and the one which goes away, the produced meteorological phenomena will certainly be intense.
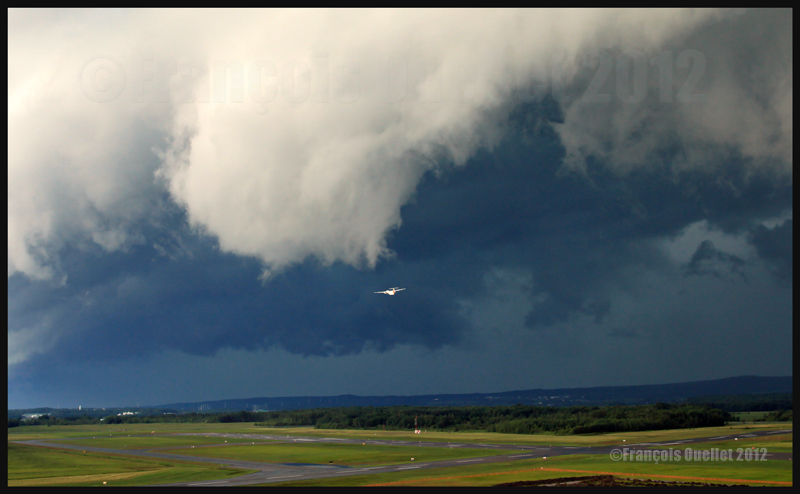
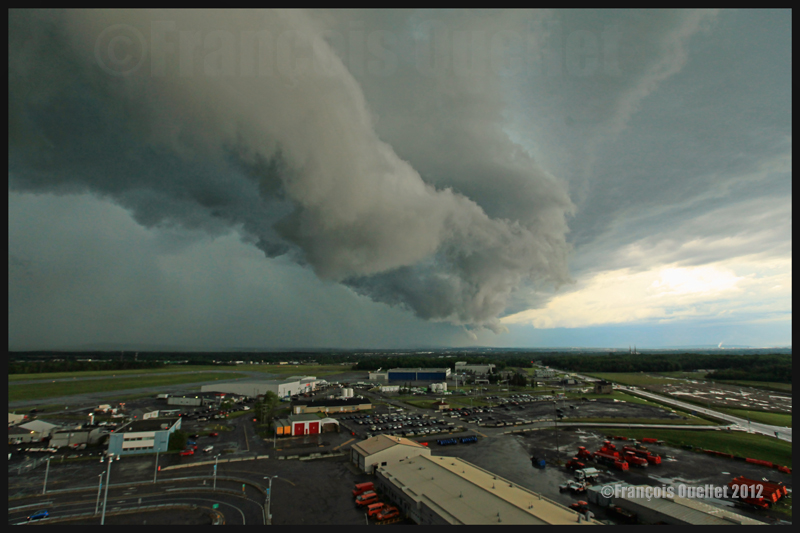
In the photos below, the meteorological system approaching the Quebec Jean-Lesage international airport also had to cross a small mountain range.
A roll arcus cloud in development ahead of a thunderstorm approaching the Quebec Jean-Lesage airport in 2012.
A roll arcus cloud in development ahead of a thunderstorm approaching the Quebec Jean-Lesage airport in 2012.
View under a developing arcus cloud at the Quebec Jean-Lesage international airport (2012)
An arcus cloud ahead of a thunderstorm approaching the Quebec Jean-Lesage airport in 2012
A roll arcus cloud ahead of a thunderstorm heading for Quebec City in 2012
The morning fog
The morning fog offers many opportunities for interesting photos. You can choose an isolated tree and capture the combined effects of the morning sun and fog. Or you may choose a cluster of trees, for a completely different effect. Both photos below were taken in Domaine Cataraqui, Quebec City.
Trees in fog at Domaine Cataraqui, Quebec City 2009
Sun and fog provide for a special atmosphere at the Domaine Cataraqui, Quebec City 2009
A morning fog resulting from a cold cloudless night will persist for hours if there is no wind. The cold morning air, motionless over a slightly hotter stretch of water, creates a fog that will finally disappear just before noon, when the atmosphere has been heated enough. If there had been an overcast sky during the night, chances are that the air over the water would have remained at a higher temperature, preventing the formation of fog.
The opportunities for more interesting photos arise when you witness the first holes in the fog layer.
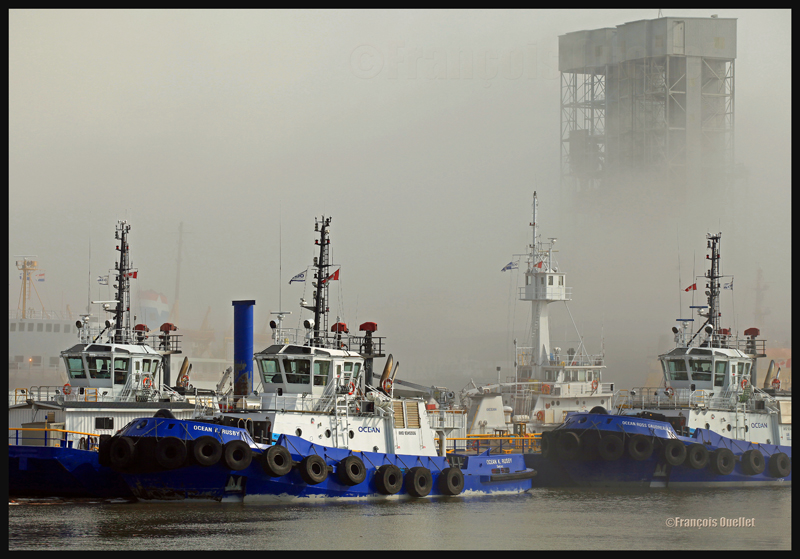
The Ocean tugboats during a dense fog in the Bassin Louise in Quebec (2012).
We can take into account the season to estimate the speed of the diurnal reheating of the lower atmosphere. A morning fog will need more time to dissipate from late autumn to early spring: that leaves more time for the photographer to prepare. The forecasts can announce the disappearance of fog while it will not be the case if, over your sector, there is an invading layer of stratocumulus preventing the morning sun from reaching the ground.
To determine if the fog is going to dissipate as expected or will remain and possibly intensify, watch the difference between the temperature and the dew point on the hourly meteorological observations issued by weather stations near your place of residence. If the temperature and dew point spread increases, the fog is going to lift. If the difference between those two decreases, the fog is going to persist and possibly intensify.
The mist
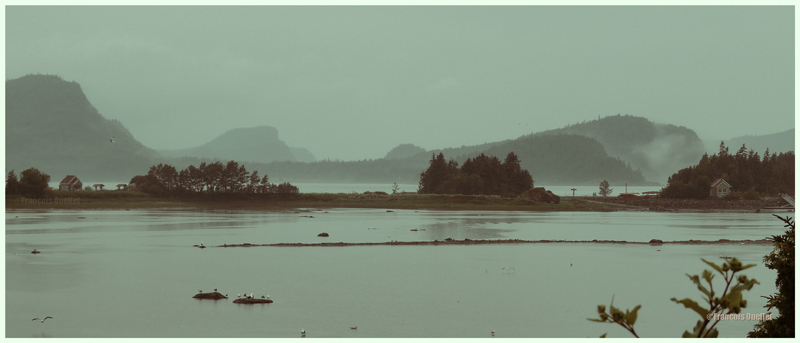
The mist can be qualified as such when the visibility is superior to ½ mile, but do not exceed 6 miles for an observer on the ground. If the visibility is of ½ mile or less, it is called fog. This photo of the Bic National Park, near Rimouski, shows the interesting effect that the mist adds to a beautiful landscape.
Mist in the Bic National Park, Province of Quebec (2009)
Hot and unstable air in winter
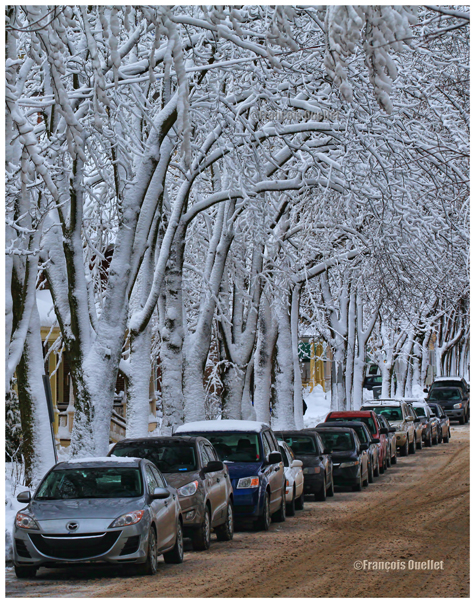
When there is a warm and unstable air advection (about 0 degrees) while winter has already settled, there are good opportunities for photos. A moderately developed cumulus produces significant snow showers and this snow sticks on all the surrounding objects. All that snow would have begun to melt on contact of objects if the latter had had a temperature superior to zero degree. But, the winter being already settled, the snow persists. It gives enough time to capture some souvenirs.
A Quebec City street after a snow shower
The local effects
A photographer might benefit from learning about the meteorological local effects influencing the regions he intends to visit. The local effects are often simple to understand and they repeat themselves regularly, according to wind and season changes. The knowledge of these effects allows the photographer to be ready and position himself even before the phenomenon occurs. It limits the comments like: “If I had known that it would occur, I would have settled down here one hour earlier!“
The local terrain as well as large size bodies of water produce predictable meteorological phenomenon that can be used by a well prepared photographer. It can consist of persistent fog, repetitive snowstorms over a small sector, strong winds, cumuliform clouds alongside the mountain summits, etc. By being positioned at the right place, at the right time, the desired photo can be realized.
A change in the wind direction
A change in the wind direction suddenly increases the opportunities of interesting photos. It might announce the approach of a cold front, a warm front, a sea or land breeze, etc. In the photo below, a bit of fresher air suddenly began crossing the St-Lawrence seaway at the end of the day, thanks to the approach of a weak cold front. The water was still relatively warm and the moisture which was present over the surface became visible due to the cool air supply. The conditions were now ideal for a short-term thin fog, as long as the wind speed would not increase. Just in time for a photo.
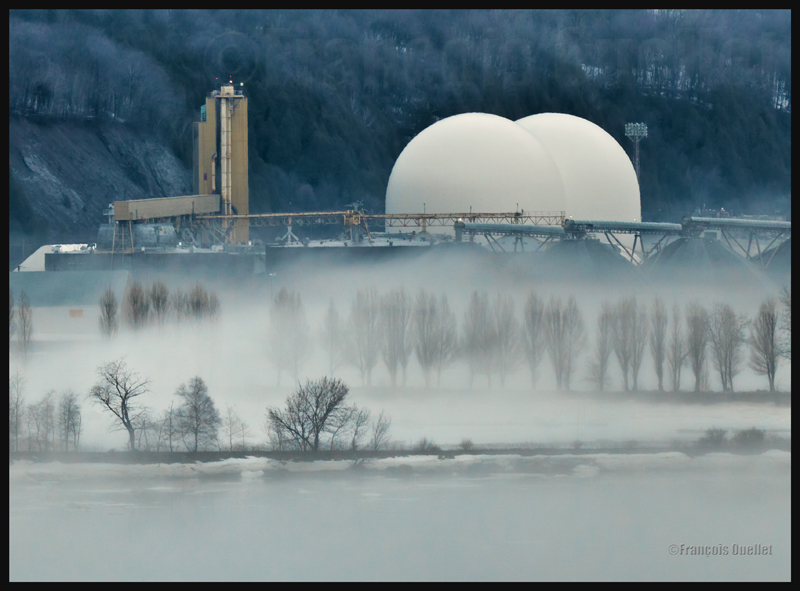
The new wood pellets silos in Anse au Foulon in Quebec City en 2014
Familiarization with weather radars
It can be useful to get acquainted with weather radars which, for the needs of photography, remain simple to interpret. Multiple echoes of small dimension with a steep gradient of various colors indicate precipitation resulting from cumuliform clouds. The showers associated with these clouds are often moderated or strong and will be the result of approaching towering cumulus or cumulonimbus (thunderstorms). A towering cumulus presents a dark base and a white summit to the photographer. At sunset, their vertical development can be used to emphasize the last rays of light.
The side of a towering cumulus (TCU) is benefiting from the remaining sunlight over Quebec
Large echo areas of similar colors of low intensity indicate a relatively stable air generally producing steady light rain or drizzle. This should be understood as a possibility of increased humidity limiting the visibility through mist or fog.
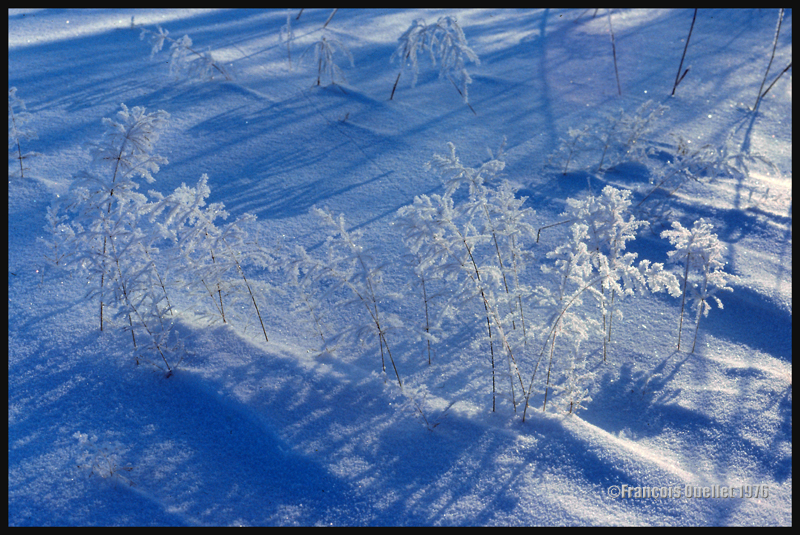
Hoar frost
Hoar frost is a short-term phenomenon. It is thus necessary to capture the scene before the sun melts everything. The photo below shows some small twigs on which hoar frost has settled. It was taken at the beginning of the seventies. Although the quality of the photo is not exceptional, the meteorological phenomenon is well demonstrated.
A combination of snow and hoar frost observed on a Quebec field in 1976.
Forest fires
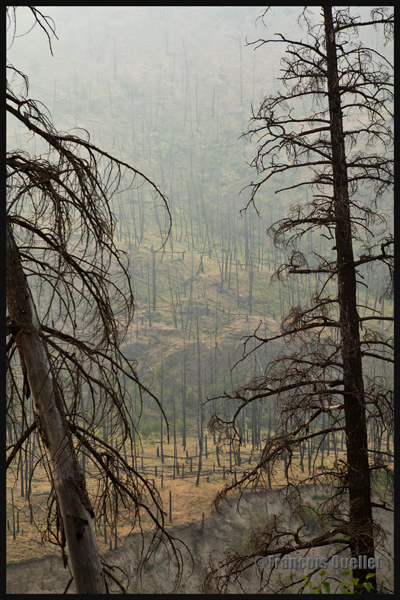
Wishing to make photos of western Canada during summer 2014, I came up against a season where hundreds of forest fires were raging. The smoke was covering some parts of Alberta and British Columbia. Some fires were important enough to require the closure of the sole highway connecting Lake Louise to Jasper. I thus decided to include the effects of those fires in the holiday souvenirs.
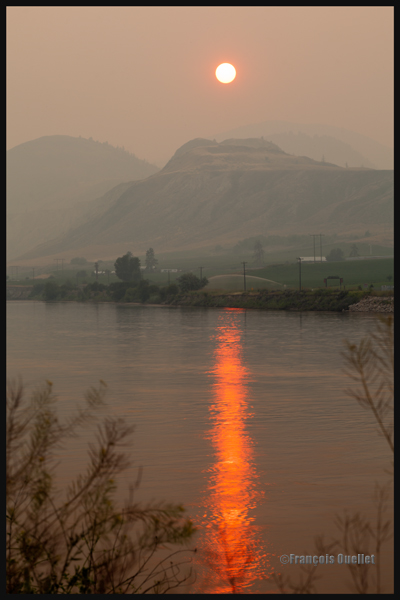
A visibility reduced in forest fire smoke allows a photographer to obtain, without special editing, sunsets with interesting colors.
Sunset and smoke from forest fires in Kamloops in 2014
The smoke also produces an effect similar as fog, but a fog which would be impossible to obtain at the end of a summer afternoon while the sun shines and there is a 38 degrees Celsius temperature.
An area near Kamloops, Canada, that was touched by forest fires in 2014
At dusk, the residual smoke is visible near tree tops while the setting sun strikes the mountain side. The effect is of two horizontal lines of complementary colors, blue and orange.
Forest fire smoke and sunset combined in Lake Louise, Alberta en 2014
Facing a field of flowers, a photographer has to choose among many possibilities. Here are just a few:
1) He can choose a really beautiful flower and make it the sole point of attraction. In that case, he must decide if the background will be free of any distractions.
A rose from the English Garden in Geneva, 2013.
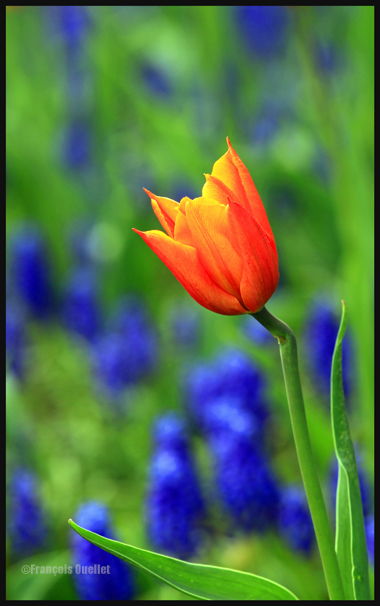
2) He can profit from a blurred background that is of a color dramatically opposed to the color of the chosen flower.
A tulip in the Bois-de-Coulonge, Québec City.
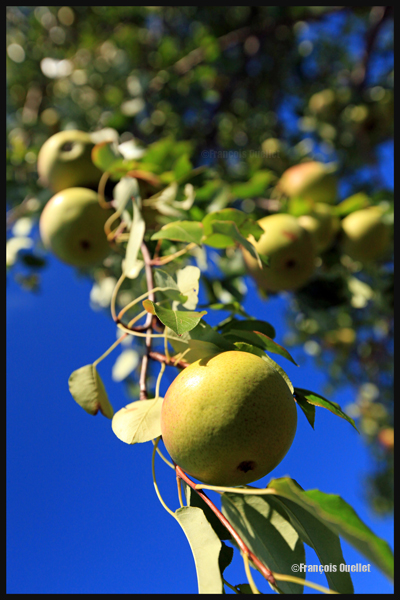
3) He might favor an overhead or a low angle shot. As this choice of the angle of view does not apply only to flowers, I found in my archives a low angle shot of a pear tree located in St-Nicolas, Québec. Here it is, so that you can see what kind of effect can be obtained.
Pears from Saint-Nicolas, Québec.
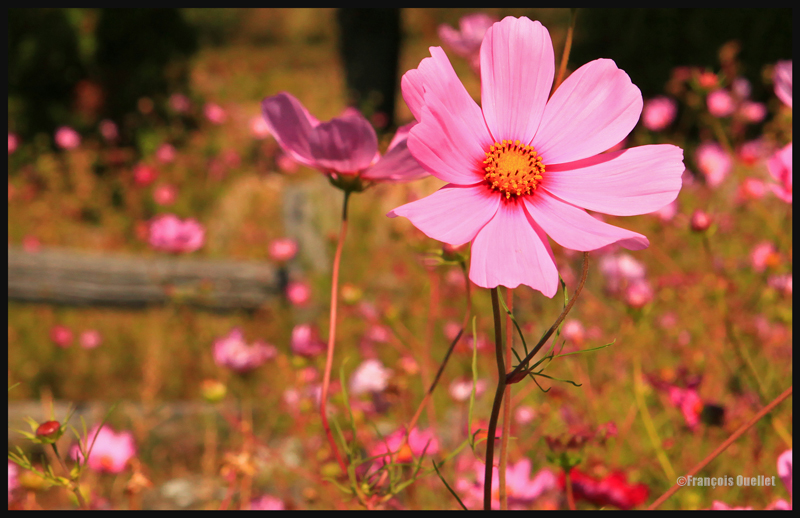
4) He can decide to show many flowers on the same picture, considering the interesting impact produced by all the color dots.
A field of flowers in Saint-Nicolas, Québec.
5) He might also use the flowers as accessories to direct the eye of the viewer to another point of interest like, for example, a building with special architectural characteristics.
Industrielle Alliance building, Quebec City, 2012
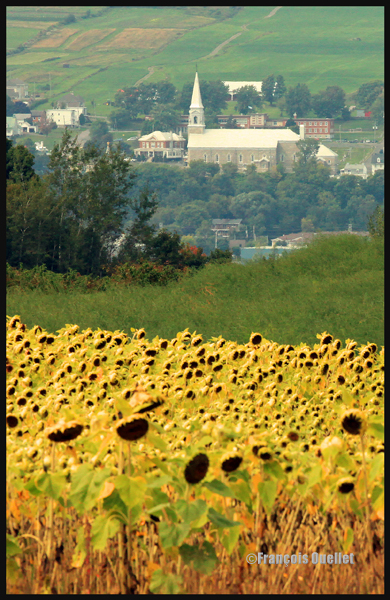
Flowers as accessories to improve a beautiful landscape in the background.
Sunflowers on Île d’Orléans
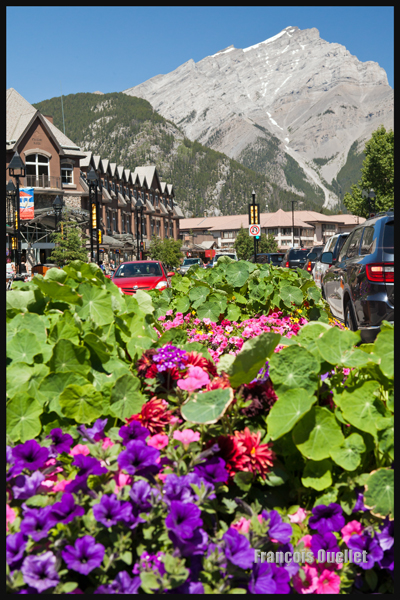
Photo of a part of Banff downtown, Alberta, Canada 2014
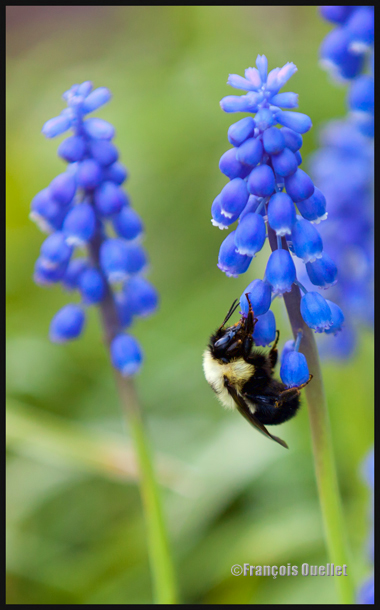
The flowers and the bumblebee are two interesting subjects; they complement each other in this picture. It would be hard for me to decide which one I prefer.
Bumblebee on a flower in the Parc du Bois-de-Coulonge, Québec City
Unless there is no other possibility, it is better to avoid shooting flowers under full sun as there will be considerable reflection on their petals. If you have no choice, use a polarizing filter, well adjusted, to reduce the undesirable effects of direct sunlight.
The ideal day to get out and take pictures of flowers is a day without wind, where there is a bright light but dimmed by an overcast sky.
The quality of colors and contrasts will be maximized if the pictures are taken during the morning or at the end of the afternoon.
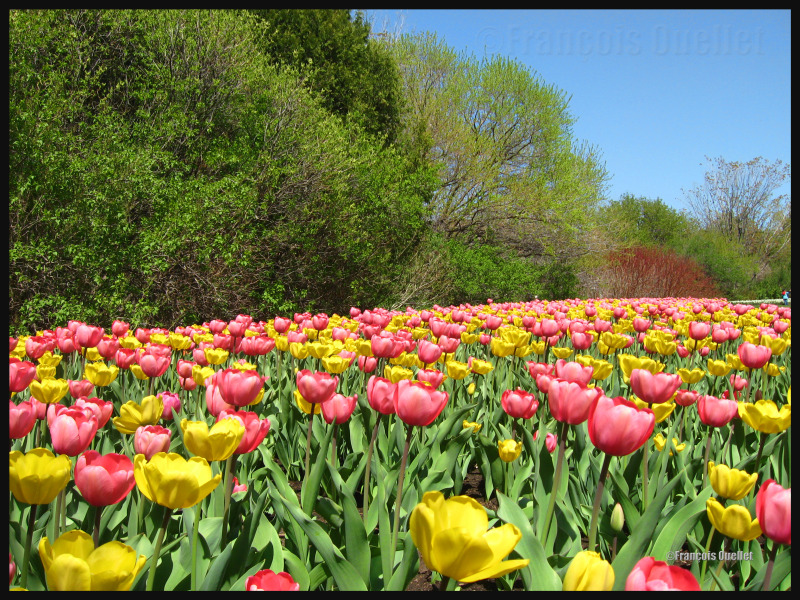
Aperture has a definite impact on the final result. With a wide aperture (smaller numbers like F2.8 or F4.0) you will get a sharp subject with everything blurred around it. This will make your flower stand out. With a small aperture (bigger numbers like F14, F16), both foreground and background will be sharper, with an even better result using a wide-angle lens. Your flower will lose a bit of its impact as all the elements in the picture will now shine. Below is a picture taken in Ontario, during the Ottawa Tulip Festival.
Macrophotography:
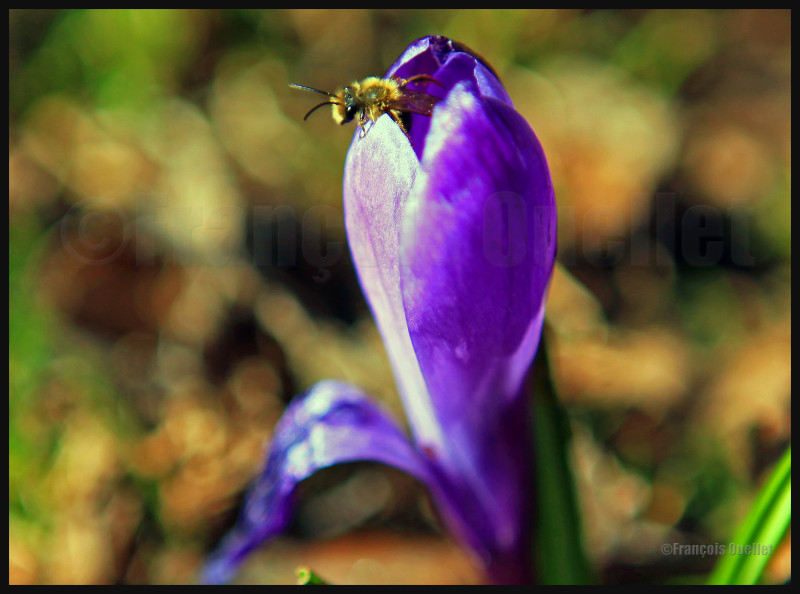
April 2012 on the Plains of Abraham: A bee makes its way out of a crocus.
1) Remove any dirt from the plant you want to capture and choose a plant whose petals are in perfect condition.
2) Use a tripod, a remote control release and the mirror lock-up (MLU) function for better results.
3) The camera should ideally be used with manual focus, for improved sharpness. In order to verify if the picture will be in focus, look at the LCD screen and enlarge the picture (5X or 10X). You will immediately see if a minor adjustment is needed to get a sharp photo or to improve the depth-of-field.
The histogram should be checked upon taking the picture to immediately compensate for the necessary amount of light.
You can use a flash to reduce aperture. You must adjust it so that it’s not shooting at full power otherwise there will be too much reflection and you will lose all the delicate nuances of colors and contrasts.
A method that will produce surprising results is called “zoom burst”. You slowly move the zoom of a lens on all its focal length while the shutter remains open during the process. You must select a speed that is slow enough to accommodate the full deflection of the zoom. You should know that many shots are normally needed before you get a satisfying image.
Every lens offers different possibilities:
1) The macro lens is useful if you wish to capture very precise details on the flower. To add an interesting effect, you can even spray the flower lightly with water so that a few droplets remain on the petals.
2) The wide-angle lens allows you to transform an image and give it an original perspective. The effect will be more important if you shoot the flower from a special angle like, for example, from the ground up. If you must lie on the ground, use a little carpet to keep yourself clean and dry. I bought a right-angle finder to ease the workload when shooting under complicated angles. This could be a potentially interesting addition to your equipment.
3) Finally, the telephoto allows you to pick a particular flower and, because of compressed perspective, offers you a background filled with multiple colors.
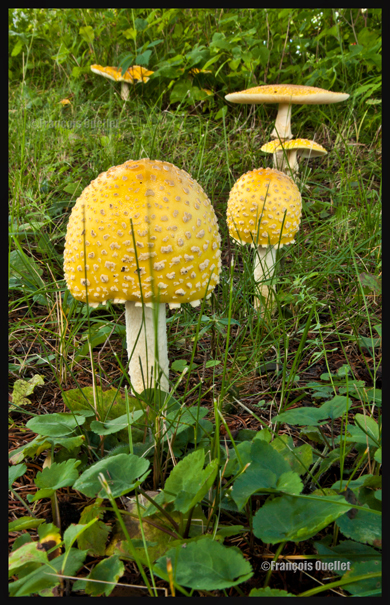
Let’s end this section with a mushroom picture. The same principles apply with regards to simplicity, settings and angles of views. I could have chosen to show only an oversize shot of a mushroom, or take only part of it, but I preferred an approach that would allow me to show the radically different shapes of the specimens found at the Laurentian Forestry Center in Québec.
Mushrooms around the Canadian Forestry Service building , Québec 2014.
Empress Hotel at dusk, Victoria Harbor, Canada 2014
1. Ensure you bring : tripod, remote cable, flashlight and timer.
2. Use of RAW (.TIFF) is highly recommended. There is a greater potential for corrections afterward, if something is not according to your taste.
3. Noise reduction activated on the camera.
4. If the winds are calm: ISO between 50 and 200.
5. If there are strong winds: ISO 400 might be useful to avoid a blurred picture caused by the continual small vibrations of the tripod due to a long exposure. That is why a heavy tripod is always preferable.
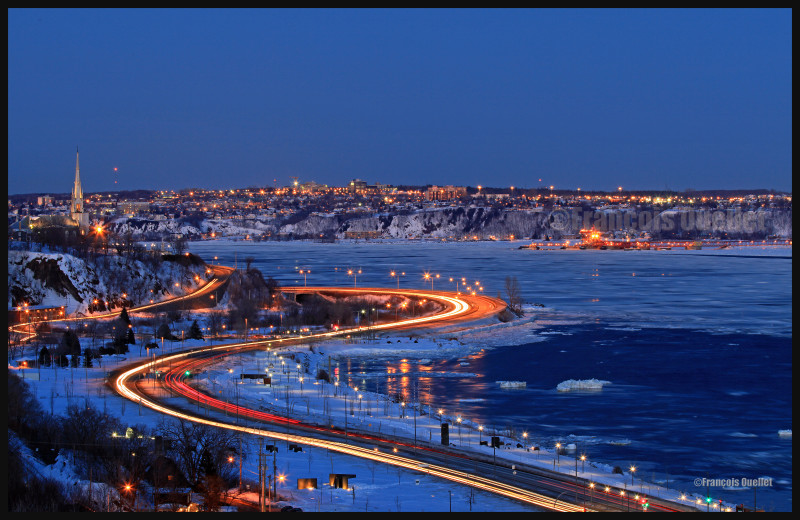
Trailing lights on boulevard Champlain, Quebec City
6. If you wish to take a picture of people moving at a normal pace, and you have access to quality lenses, it will often be necessary to use ISO 800 to get a clear shot. This setting could allow the shutter speed to be adjusted at about 1/200 which is plenty to obtain a picture that is not blurred; that is unless you are not using a long focal like 200mm or more.
7. For people shots, it is better to have your back to the remaining light on the horizon, unless your goal is to capture a silhouette.
8. For extended exposure, use the autofocus “one shot” setting until it stops working due to insufficient light. Then use manual focus. Or use manual focus all along, with Liveview, if you prefer it that way, for extra precision.
9. Mirror lock-up function must be activated to avoid vibrations caused by the shutter action.
10. Use a remote cable when taking the picture to avoid useless vibrations.
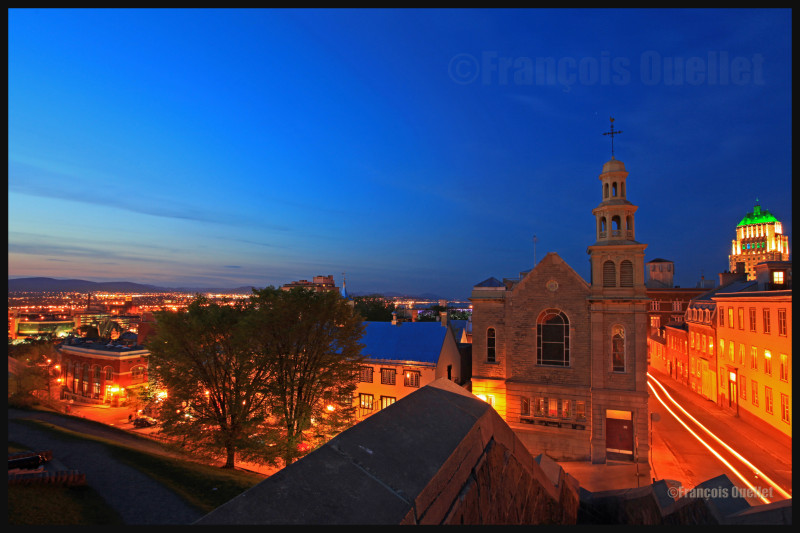
Old Québec at dusk.
11. If you wish, you might think of selecting a specific AF point to ensure a better focus if there is a small area that matters the most to you in the picture.
12. Do not use the FULL AUTO mode during night photography.
13. The three most important modes are 1. Aperture (taking care of slightly overexposing for surrounding lights) 2. Speed 3. Manual. There is one more reason to overexpose a bit if you work with the RAW format: there is more data information in light than in shadow, so once the picture is taken you have access to more data to play with to adjust the dark sections of the picture.
14. If you expect an exposure longer than 30 seconds, use BULB mode.
15. Night pictures are best taken using the camera bracketing funtion (-1,0,+1) and this, every two minutes.
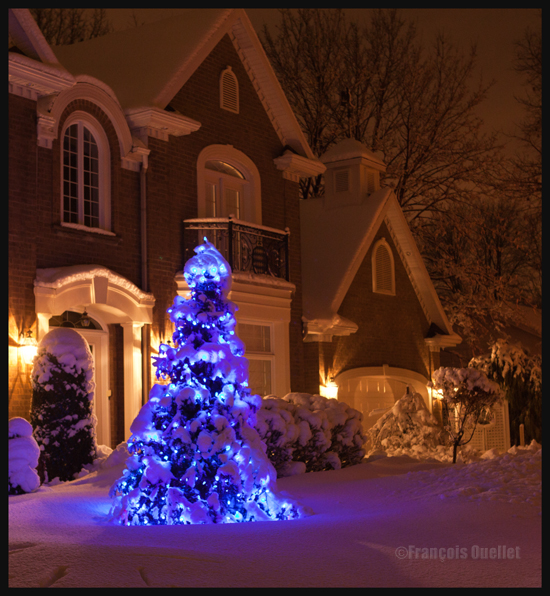
A Christmas tree in Sillery
16. The best period for night shots is 15 minutes after sunset, until official night time, which you can find on the internet. As this period is quite short, it is important that you know in advance what is of interest to you and where you will position yourself when comes the time for the picture.
17. Total darkness is not what is the most favourable in night photography. But you can certainly obtain interesting results using black and white.
18. Beware of surrounding light reflection in your lens.
19. Histogram has to be reviewed to ensure that there is no serious overexposure.
20. It is preferable to choose an aperture between F11 and F16 for maximum sharpness as well as an adequate depth-of-field.
21. If shooting a subject against the remaining light over the horizon, there might be quite a contrast in lighting between where you stand and where your subject is positioned. You might think of using grad filters (3-6-9-10) to help correct this huge light difference, or you can transform the standard photo session into an HDR one. Or both! There are also filters specifically designed for sunrise and sunset periods that can improve your shots.
You must decide the ideal combination between the following: aperture, speed and ISO. All three are interrelated and choosing one has a direct influence on the other two.
You are facing a beautiful landscape in which you want everything to be in focus: you decide that the aperture is what matters the most. Choosing aperture as the priority is a very popular choice. Let’s consider that you choose F16, which should give you a very interesting depth-of-field but will demand a lot of light. You have to compensate somewhere. If there is not much movement in the scene, and you have access to a tripod, you might decide to choose a slow speed, which allows more time for the light to enter the camera. Doing so, you won’t need to crank the ISO and you will avoid adding useless noise to your picture.
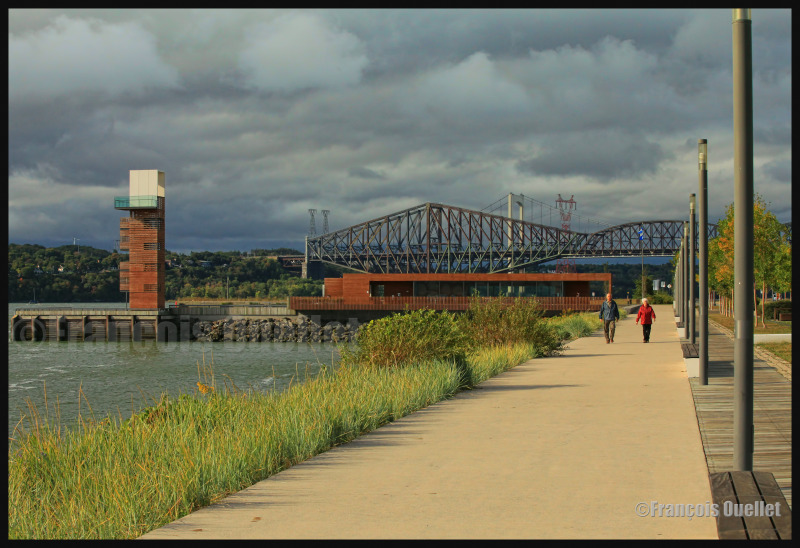
In the picture below, aperture is set at F16. The vegetation in the left corner draws the viewer’s eye toward the pedestrians, and then progressively to the quai des Cageux. We finally see the Quebec bridge, the longest cantilever bridge in the world.
Quai des Cageux, Québec 2012.
If you decide that speed is a priority, you will have to compromise ISO or aperture. ISO will have to be increased to improve light sensibility, but doing so will increase the size of the grain in the picture. Depth-of-field will have to be adjusted as well since a higher speed does not let much light enter the camera. You won’t be able to pick F16 this time. So you will eventually find that there are some out of focus areas in your picture. With a bit of practice, you can be less demanding on the speed, providing you can follow the subject with your camera (it is like if you were slowing down the subject, so less speed is required).
The picture below was a bit particular: it was taken when I was on a boat rocked by waves. The eagle was far away and was traveling in the opposite direction, thus increasing the relative speed of the subject. The Canon 5D MKII was hand held and 400mm focal was necessary. Speed was crancked at 1/1600 and the ISO required was set at 5000. Naturally, the grain in the picture being larger, slightly diminishes the quality. This was a necessary compromise if the eagle was to be taken in flight.
Eagle observed in the Campbell River region. Summer 2012.
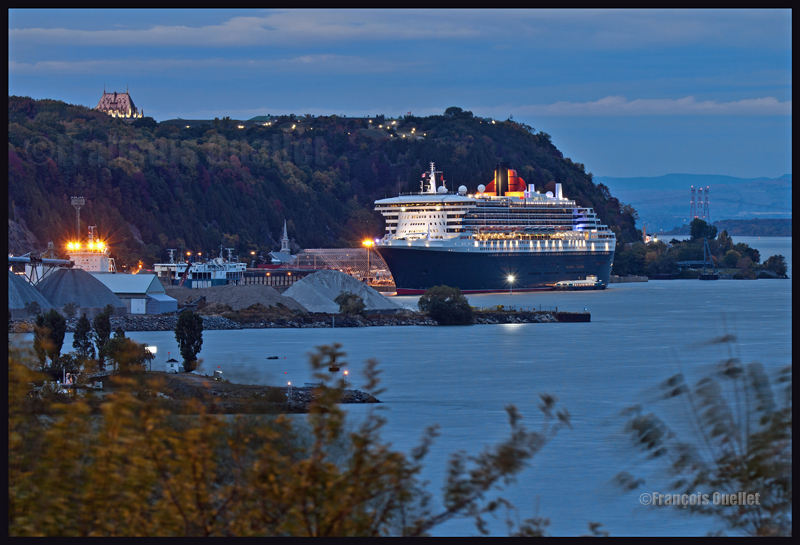
It is getting dark and you want a photo with absolutely no noise and you decide that the aperture is what matters the most. You make no compromise and choose ISO 50. This setting requires a lot of light, because the lower the ISO, the higher the demand for light. In order to make sure that your picture will not be blurred, a tripod will be necessary, since there will be an extended exposition time. In the picture below, the shutter has been opened for ten seconds, with a 9.0 aperture, 200mm focal and 50 ISO. Only the small branches in the foreground are blurred.
Note: in general, it is better to use a tripod as often as possible, even in daylight, in order to optimize quality. Choose a heavy enough tripod to prevent vibrations under windy conditions. A light tripod is easy to carry but does not allow for acceptable pictures in adverse weather. It’s obvious that this Queen Mary II photo would not have been as precise if a light tripod had been used. In this case, it would have meant that continual vibrations would have been recorded during 10 seconds. The boat would have been totally blurred.
Here is a quick update regarding some additions of the last few weeks. Of course I continue to publish “the real stories as pilot and FSS” (so far 7 have been published out of 80). The most improved section is the photo gallery of the Canadian provinces (at least 30 pictures have been added). In the virtual flights section, I’ve added a flight with a glider (in the standard flights) and a flight with an helicopter landing on a cruise ship (challenging flights section). Coming soon, a little review on a surprising book: “The basic laws of human stupidity”. Here are three of the recently added pictures. Have a good visit!
Empress Hotel at dusk, Victoria Harbor, Canada 2014
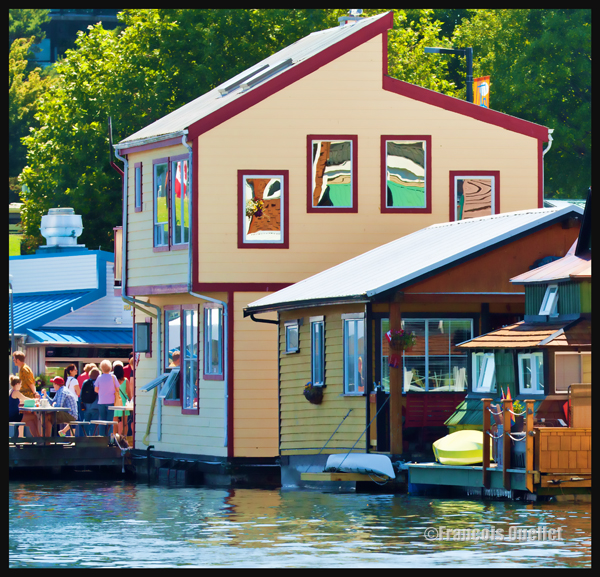
Photoshop edition of a house, Fisherman’s Wharf, Victoria, Canada 2014
Photo of a part of Banff downtown, Alberta, Canada 2014
The content of the “photography” section is now similar in both languages of the site. The same applies for the virtual links of the “flight simulation” section. This picture, taken during the summer of 2014 in Victoria, British Columbia, is now part of a collection that will increase progressively.
Tripod,16-35mm lens and polarizing filter were necessary in order to take this picture.