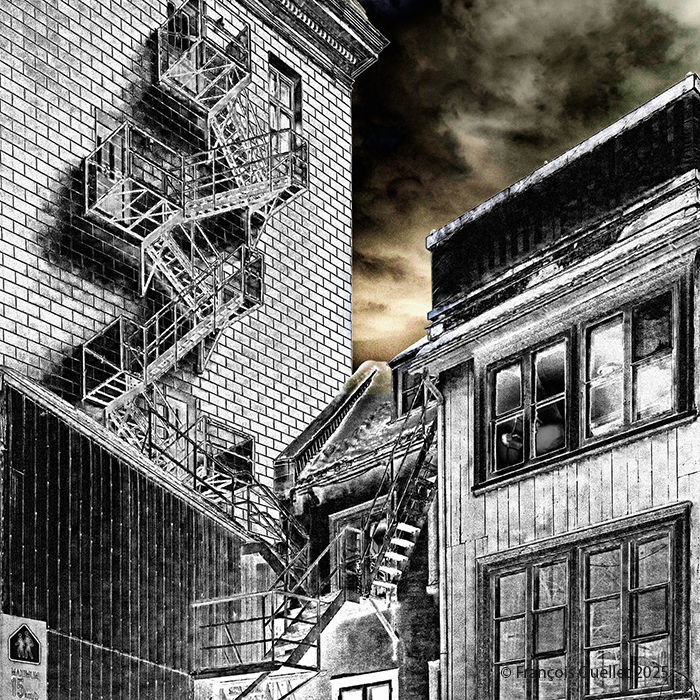
Between dream and reality in Old Québec. Inspired by authoritarian governments around the planet.
The photo above is the result of a recent outing in Old Québec. Why is the photo displaying such a bizarre mood? Well, the actions of authoritarian governments around the world were enough to change my photographic perception for a moment. A montage was therefore necessary to let the emotion flow through on that day.
Photography Theory
The collection of buildings in this part of the city is of interest, but to produce a special effect, I used considerable cropping. The square format leaves out unnecessary details from the original image. I didn’t want any distractions, just the essentials.
I also imagined a threatening sky over the old constructions of Québec City. But how to express this danger without retouching a normal photo? Indeed, the sky is often too beautiful or too banal to convey a sufficient impression of discomfort.
Editing the sky from a RAW file remained the solution. After digital processing, I achieved a combination of mismatched colours that disrupted the scene. The semblance of a face appeared in the clouds, an effect I hadn’t intended. But I kept it. The whole thing takes us back to a world somewhere between dream and reality.
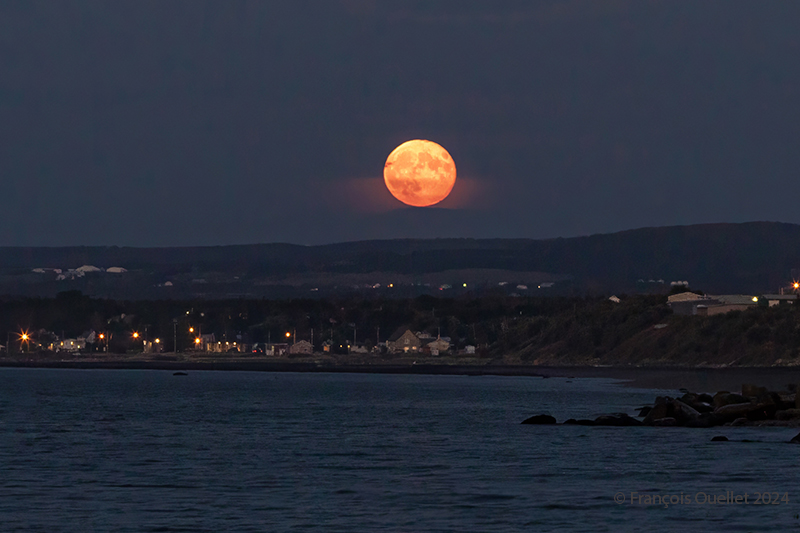
The full harvest moon rises in the Matane sky in September 2024.
The photo above was taken in Matane, Quebec, in September 2024. It’s more a matter of chance than planning. I was on the beach photographing the sunset, and when the sky got too dark, I turned around to see if there was anything interesting left to capture. And I came across this full harvest moon rising in the firmament.
Photographing a full moon is a good challenge. We often capture only an almost white, very bright disk, losing the nuances of colour and the details of the lunar geography.
The advice available on the Internet on how to successfully shoot a full moon with a normal camera goes in all directions. But one thing’s for sure: to improve your chances of success, it’s best not to wait until nightfall, because then the very high luminosity of the star becomes impossible to attenuate while still retaining a view of the planetary topography.
Most of the time, the choice is between an excellent photo of a full moon, but a very dark surrounding earth relief where nothing is discernible, or a visible earth relief of acceptable quality, but a moon that represents nothing more than a large, white circle of light.
The method that works for the photo above is as follows: you have to be on the spot at the right time, i.e., during the blue hour and not the whole night. So, in my case, I was lucky because it wasn’t planned.
You need a tripod and an extension cable. There are two reasons to avoid long exposures: firstly, the moon is a moving object. The longer the exposure, the more the disk moves. You end up with an oval rather than a round moon. A long exposure also picks up more light, and the moon’s disk turns completely white.
Full harvest moon rising in Matane, Québec 2024
Compromises become necessary. Trying to get a perfect moon and foreground at exactly the right brightness is quite a challenge. By the time every attempt has been made to achieve a flawless result, the moon is already too high in the sky. We have to act quickly.
We’re advised to lower the ISO to 200, but if I do that, I’m increasing the exposure time and introducing too much light into the camera. Instead, I use a higher ISO to reduce exposure, and use all the camera functions likely to reduce the amount of light entering the camera: higher shutter speed, if necessary, strong negative exposure compensation, and so on.
By not overdoing the settings and using RAW files, there’s still enough flexibility to bring out the foreground, in this case the houses lining Matane’s beaches and the surrounding lights.
In short, shoot during the blue hour, act quickly, accept compromises, limit exposure time in every way possible and use RAW files to facilitate post-production work.
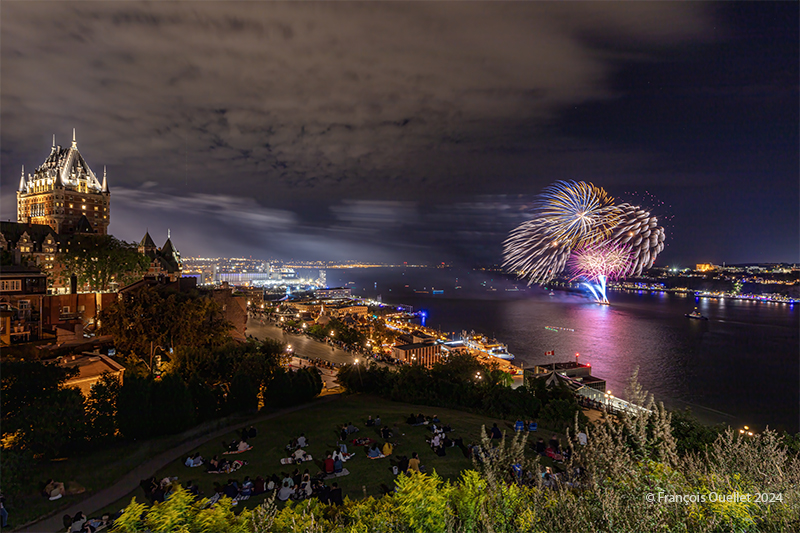
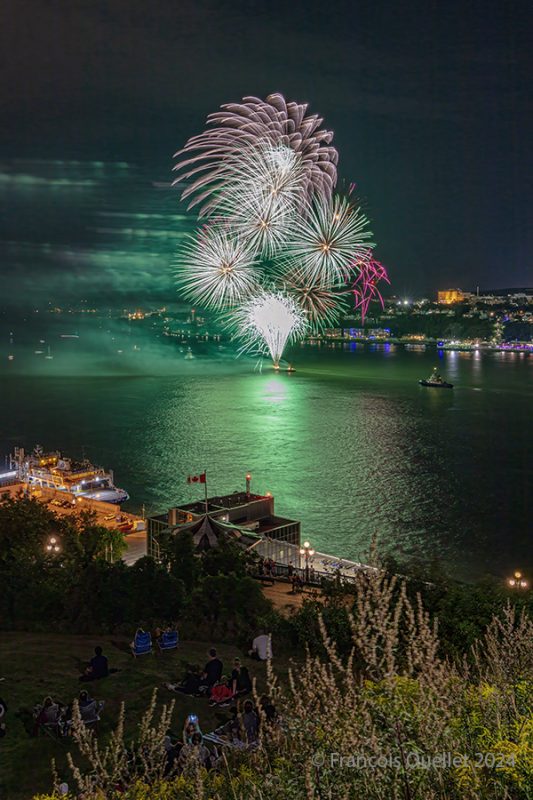
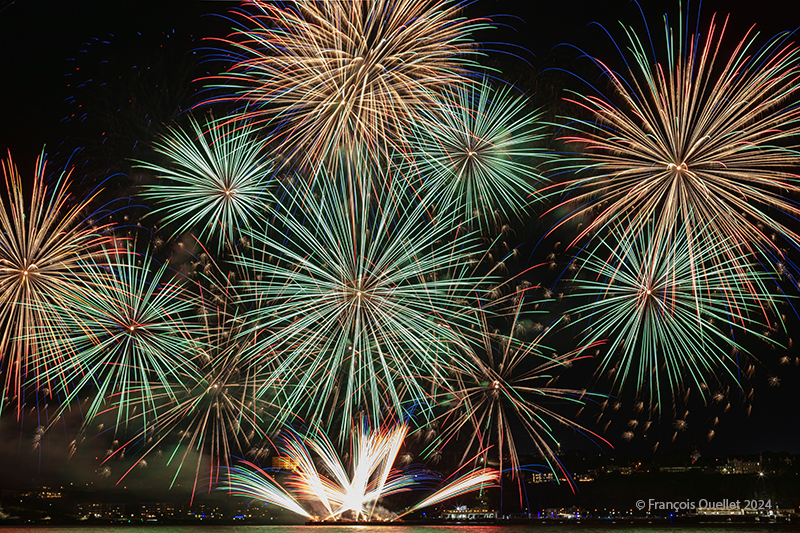
This year, the Grands Feux Loto-Québec are lit from a barge in the middle of the St. Lawrence River, between Lévis and Quebec City. A tugboat from the Ocean Group company secures the barge with a cable for the duration of the event.
I took the above shot with a Canon 5DSr full-frame camera equipped with a remote shutter release and a tripod-mounted Canon EF 11-24 mm F/4L lens. The super-wide-angle lens can capture both the Château Frontenac and the lights and city of Lévis across the river.
The BULB mode lets you set your own exposure time and take creative initiatives. The brilliant path from launch to explosion is captured in a single photo.
As soon as the bursts begin, you try a five-second exposure and observe the result. Then adjust by stretching the exposure time until good effects are achieved.
One mistake to avoid is leaving the shutter open for too long. When this happens, flashes of light build up on top of each other, and all you see in the final photo is blurry, glowing white.
Working with a RAW file offers much greater flexibility than with a JPEG file when processing the image on the computer.
ISO 200 seems the best option here for several reasons: even if the activity takes place in full darkness, we want to avoid significant digital noise. A low ISO will also lengthen the exposure time and allow us to capture beautiful streaks at the moment of the explosions.
What’s more, the lights will illuminate the scene, reducing exposure time to a reasonable length. Finally, a layer of altocumulus cloud above the Château Frontenac serves today as an artificial light reflector in the photo above.
Grands Feux Loto-Québec, August 2024
A depth of field between 8 and 13 ensures sufficiently accurate light at a reasonable distance.
Whether to focus manually or automatically remains a matter of taste. It should be noted that darkness can cause problems for autofocus. However, trial and error can sometimes produce interesting effects.
If you’re using manual focus, use the camera’s backlit screen to magnify the scene as much as possible and adjust the focus as required. You then return to the normal size display for the duration of the fireworks, taking care not to inadvertently touch the focus adjustment ring when changing the zoom.
Fireworks at the Grands Feux Loto-Québec 2024
Consider using a heavy tripod. In windy conditions, it will better resist vibrations during long exposures.
A final word of advice: fireworks attract a lot of people, some of whom are content with a fairly limited personal space, if they have one at all. Protecting your photographic area becomes an important objective, to avoid the tripod getting snagged or someone moving in front of you when enthusiasm takes over. So, arrive well in advance to choose the best location for you to work in, while protecting your work area.
For example, for the photos above, I had set up between a ramp fixed on a steep slope in front of me and a bush at the rear. No one could stand in front of me and no one could pass behind me because of the bush. I thus had only the sides to worry about. It sounds like an unnecessary concern, but these days everyone is filming fireworks and continually repositioning themselves without regard to their neighbors. Make life easier for yourself by making the necessary arrangements before the show.
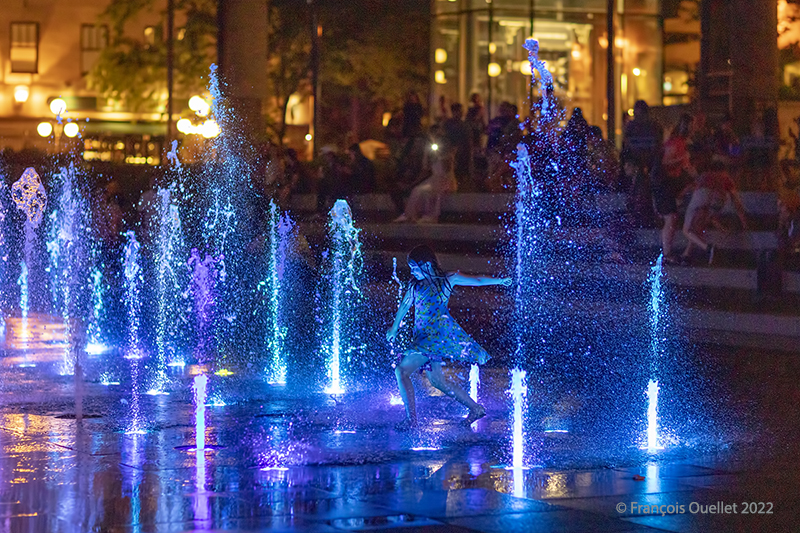
A young girl dances through the water jets near Quebec City’s city hall.
The water fountains near the Quebec City’s City Hall Gardens attract crowds during the summer season. The changing colors of the lights offer many opportunities for night photography.
Patience becomes the first rule when it comes to capturing the scene that will stand out. Usually, children run indiscriminately left and right. But there are exceptions, like that evening when a young girl started dancing through the programmable fountains. She moved quickly, adding more dynamism to the scene. I had to take a chance with a night photo.
As far as the photography technique is concerned, the challenge was interesting. I wanted to capture the feeling of movement in her dance. But this demanded a high shutter speed to avoid too much motion blur. On the other hand, the low ambient light called for a slow shutter speed. Those two requirements were completely opposite.
A Canon EF 85mm f/1.2L II USM lens mounted on a Canon 5DSR camera was part of the solution. A recycling garbage can positioned near the scene also served as a support for the portable tripod. Both Canon lens and tripod allowed for more light to be captured while avoiding unnecessary vibrations.
However, those two actions would not have been enough to allow the scene to stand out. There were still too many contrasts between light and shadow. A digital image processing software facilitated the use of the essential data included in the RAW file of the photo, revitalizing the background while diminishing the foreground’s highlights of the water jets.
Some purists lose sleep over the idea that contemporary photographers use digital processing software to get a better picture. When a RAW file contains 50 million megapixels and you refuse to use its data on principle, it’s a bit like Charles Leclerc deciding to drive his Formula 1 car using only the settings of the ’60s, for nostalgia’s sake.
Click on the link for more night photos on my blog.
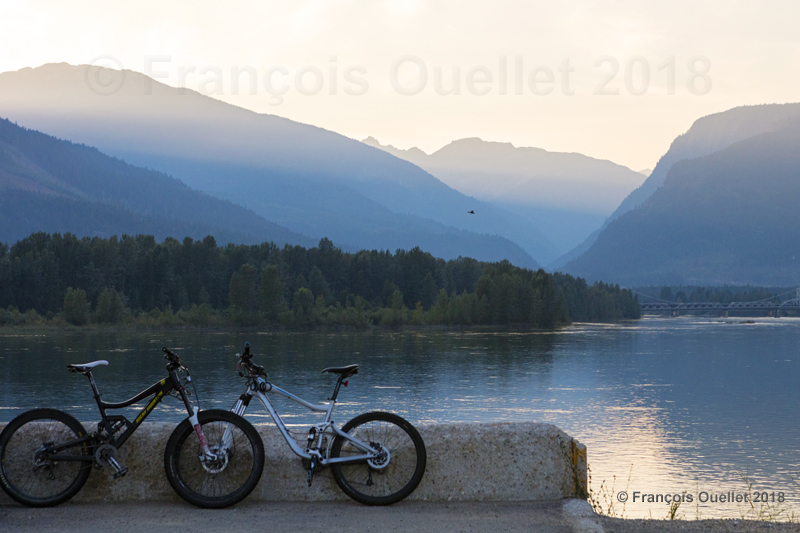
A view of the Columbia river near Revelstoke, Alberta 2018.
While passing by Revelstoke, in British Columbia,walking along the pathways near Columbia River is a must. The surrounding mountains offer a very interesting view and the changing colors provide great photo opportunities.
In the picture above, I thought appropriate to add a touch of life by waiting for a duck to reach the center of the frame and by including the two bikes in the foreground.
Since I was not walking with a tripod, I adjusted the shutter speed to 1/250 and the ISO to 2000. The aperture was set to 9.0 and the exposure modified to + 1/3 to compensate for a bright background. The 50.6 megapixel RAW file allowed for further adjustments with Photoshop.
A Canon 5DSR full frame camera was used, coupled with a Canon EF 24-70mm f/2.8L USM lens. The chosen focal length was 70mm.
For other pictures of Canada, click on the following links
of my blog :
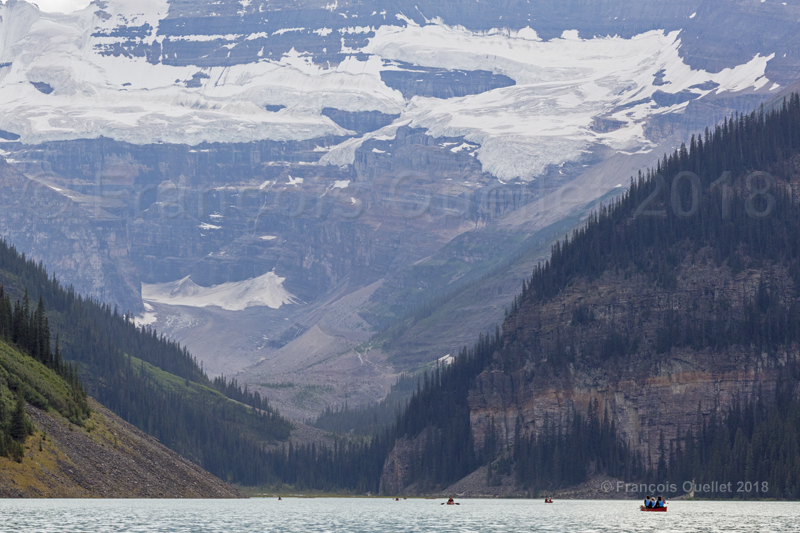
If you are spending some time around Lake Louise, in Alberta, a very interesting outdoor activity is to go hiking on the 10 km trail that leads to the Big Beehive. You start from the Fairmont Lake Louise and slowly walk up to the Lake Agnes Tea House. There, you can get a simple meal and rest before walking around Mirror Lake and heading for the Big Beehive trail. The view on top is absolutely superb.
I have included a link that provides you with commentaries and informations from people who actually did the trail:Alltrails.com
Once you have tried the Big Beehive trail and are ready for a more relaxing activity, you might consider renting a canoe at the Fermont Lake Louise Hotel facility and head for the lake for an hour. The color of the Lake Louise water is amazing and the view stupendous.
Canoers profit from the beautiful surroundings of Lake Louise, Alberta, in 2018.
The pictures above have been taken with a Canon 5DSR full frame camera. I carried a tripod and some equipment up the mountain as it was obvious that there would be great photo opportunities. Using RAW files helped a lot when came the time to work with different levels of luminosity.
For other pictures of Canada, click on the following links
of my blog :
The photography book « Full Frame », by David Noton, was written in 2010 but the content is still totally pertinent today. It’s possibly the best photography book I’ve ever read. The images are fantastic and the text is loaded with practical and accessible information.
Photography book “Full Frame” by David Noton
The author is known as one of the best landscape photographer in the world. Every page of his book is divided in three sections: before, during, after. This means that you read about everything that the author had to deal with as he travelled around the world with his wife to capture landscapes: the preparation, technique, priorities, obstacles, successes, etc.
All along the book, I had the feeling that a friend was writing me since the text is written with a light and humoristic approach in mind, and certainly without pretend. Here are some of his remarks and advices:
“Luck is where preparation and opportunity combine.” (p.38) This certainly applies to everything we do in life.
“Stick with the full frame quality and crop as when required, keeping all the [sensor’s megapixels] information in reserve”.
“Sometimes a new lens or format will serve as a catalyst for a whole new way of looking. It’s all part of the evolutionary process.” (p.64)
Sharpen all digital images. Pictures are made of square pixels and need microadjustments.
To choose among your interesting similar photos which one is the best, start with a very good one and compare it with each other photo, one at a time, throwing away the ones that are inferior. You will save a lot of time.
A bit of blinking in the highlights is not terrible since RAW files can easily be adjusted. Don’t forget that the camera’s monitor shows an histogram adjusted for JPEG files.
Use a grad filter to control the contrasts only, not to add mood or create an artificial contrast.
There is no need to always show the tops of mountains.
“The best pictures are the simplest. Composition is the art of knowing what to leave out.” (p.71)
“Be flexible and strive to extract the most from seemingly adverse conditions.” (p.77)
“For wide angle views on the world, a full-frame sensor is imperative.” (p.93)
Back cover of the photography book “Full Frame” by David Noton
“Scout the location, analyse the options in different lighting situations, previsualize the image, plan the shoot then keep returning until it’s nailed.” (p.113)
“Location finding is everything; the photography is the easy bit.” (p.125)
“Don’t be afraid of “blinkies” in the brightest part of the sky where the sun shines through […]. We don’t expect to see detail there.” (p.138)
“Using movement is an essential technique in a photographer’s repertoire.” (p.143)
“The classic, golden rule of thirds is a good starting point, but it’s only a guideline to ignore at will.” (p.149)
“A camera’s sensor is not a linear device so the right half of the histogram contains far more information than the left. Those apparently overexposed images, when processed with the brightness brought back to the desired density, will have richer tones and less noise than a frame exposed to the left.” (p.153)
“We photographers can only continue to improve if we keep pushing ourselves.” (p.187)
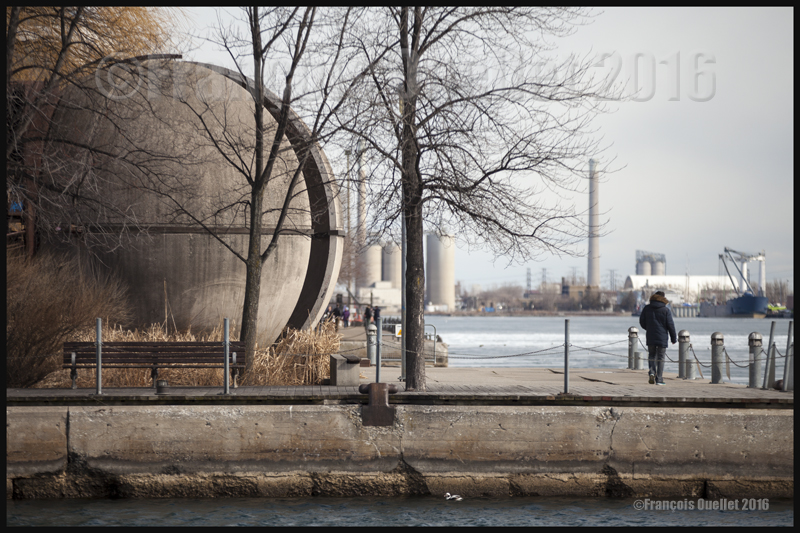
Here are some photos of Toronto that were taken in February 2016 with a Canon 5D MKII DSLR camera. The photos were all saved in RAW and JPEG files to facilitate any additional work that could have been required with an image editing software.
Architecture and photography both offering unlimited possibilities, I did not impose any limitations. The primary goal was to profit from any opportunity that would arise while profiting from the softer light offered by the winter season.
Toronto Harbourfront, Winter 2016
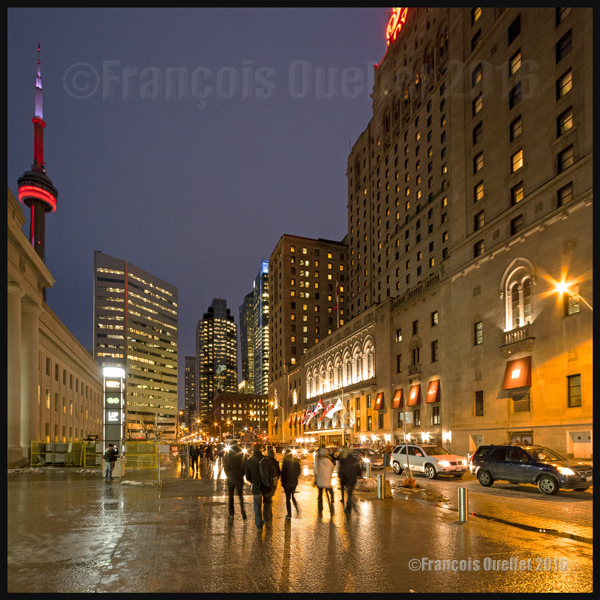
The first article with regards to photography in Toronto that was published on my website showed only one subject: the CN Tower. It was published during Winter 2016:
In the present article, I develop other angles of Toronto which is a city in constant evolution and where you can find multiple styles of architecture. In the picture below, a recent rain shower helped to add unexpected reflections.
Toronto and CN tower by night. Winter 2016
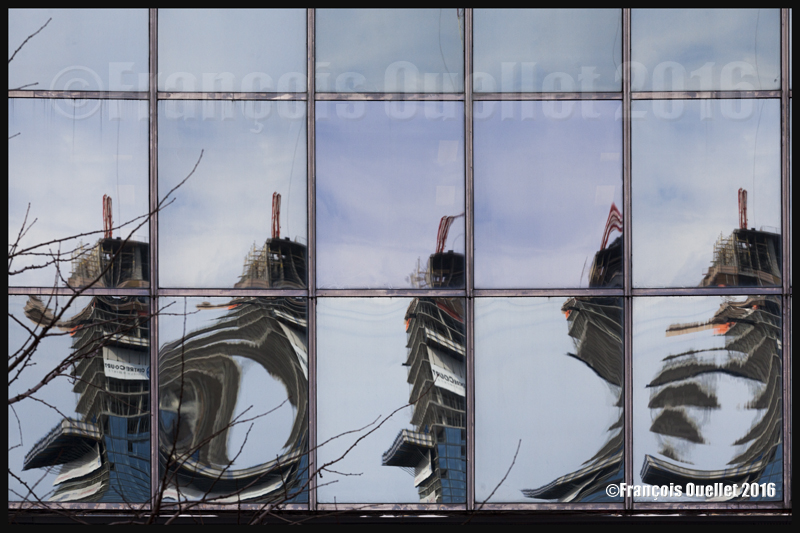
Some architectural subjects are naturally imposing. This is the case when all you have to do is look straight ahead, enjoy what you see and immediately try to compose an interesting photo.
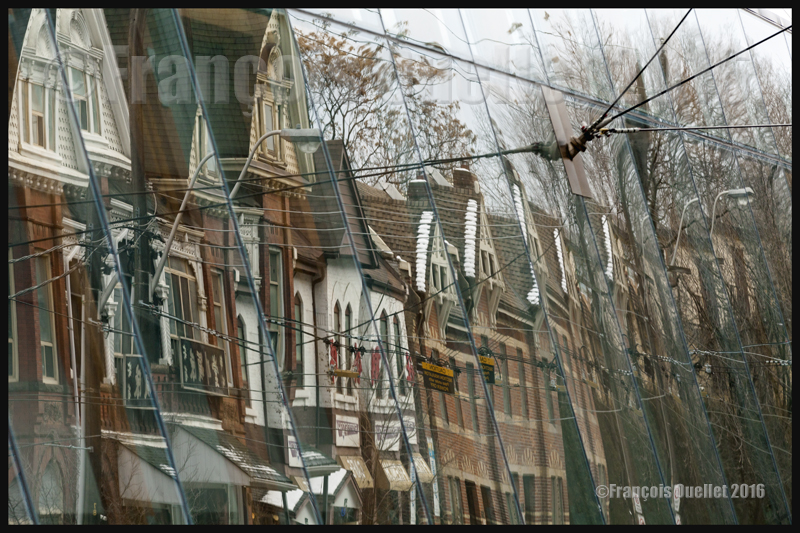
A good example is the interesting reflected shapes that can be seen on the windows of a building. I could not help to take the picture below as I was surprised that a windowed building could send back images that were so totally different from each other. I am curious why there is so much distortion between the windows…
Toronto building reflections (2016)
Instead of taking pictures of the newly designed Art Gallery of Ontario, I used its reflective properties to capture something a lot older, which was the design of the row of older houses on the other side of the street.
Some houses are reflecting on the Art Gallery of Ontario (2016)
It is also possible to add variety and fun to a photo session by looking for special shapes, angles or contrasts that are not already obvious.
As I was walking downtown, I passed by the Brookfield head office. The architecture of this relatively new building is quite interesting. The architects were able to preserve the facades of older surrounding buildings by integrating them and assigning each one a role inside the new construction, possibly because the city required their protection in case of any new development.
But it is only once I was leaving the sky rise that I found the idea for the next photo: a vertical wide-angle shot from which all lines would be straight, all this possible by using the advantages of the Canon 5D MKII full frame sensor coupled to a Canon 14mm 2.8L wide-angle fixed lens. Image sharpness was insured through manual focus, a tripod, a remote trigger and the mirror lock-up function.
Toronto sky rise, Ontario 2016
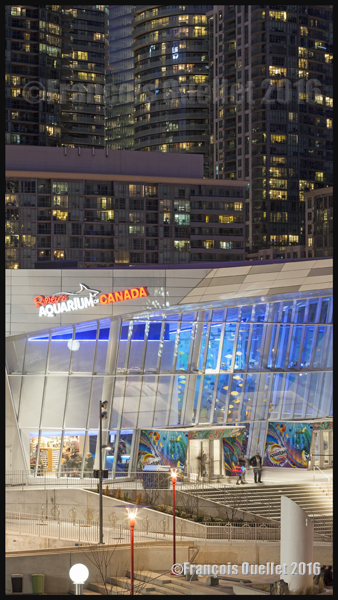
The last photo is essentially about contrasts: the colour contrasts (light and dark) and the density contrasts that one can find in different constructions of Toronto.
In the foreground, we see the aquarium, with its pale and inviting colours, as well as lots of space where only few people are visible. In the background, there is the exact opposite, with very dark high-density condo towers, very close to each other, where every inhabitant hopes to have an interesting view on the Lake Ontario. All this in a photo divided in two parts and cropped very tightly to increase the differences and eliminate any visual distractions.
Contrast between the Ripleys Aquarium of Canada and the condominiums in the background. Toronto, Ontario (2016)
For more articles in the category « Photos of Canada », click on the following link : Photos of Canada
In June 2016, I spent a few days in Montreal to look for photo opportunities in the city and in the Old Port. I had never seen so many construction projects going on at the same time in that city. We could feel that the city managers wanted everything to be perfect for the 375th anniversary of the city in 2017. Here are 2 percent of the photos that were taken during that photography session. (The files were in RAW and JPEG).
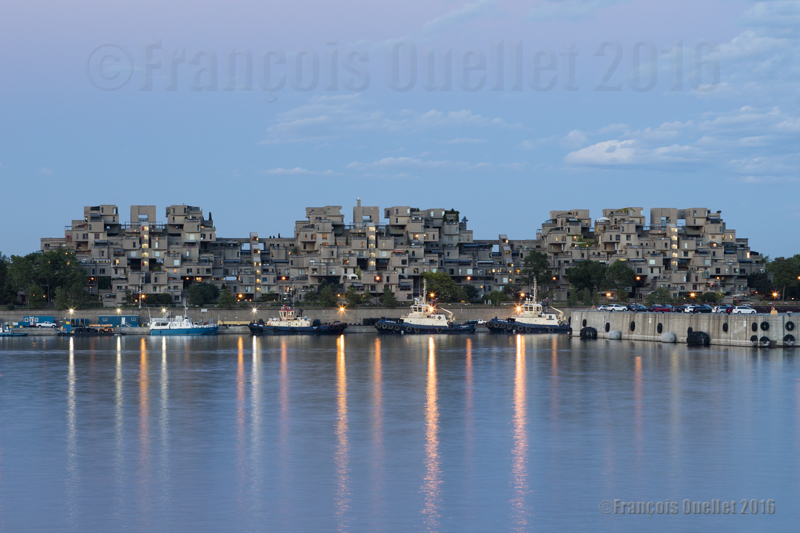
Photography and architecture. Habitat 67 in Montreal
The picture above represents Habitat 67, created in time for the 1967 Universal Exhibition by the architect Moshe Safdie. You can click on the following link if you wish to obtain supplementary details in regards to the conception and construction of Habitat 67: Moshe Safdie and Habitat 67
To take the photos, it was better to wait for the evening, a few minutes before nightime, in order to benefit from a better luminosity and prioritize the reflection of light sources on the water. Several boats passed by while I was taking the pictures and it momentarily diminished the quality of the light reflections. Eventually, after several trials, I benefited from a flat water surface. With ISO at minimum, I was able to limit the digital noise that would unavoidably become visible after cropping the images.
Habitat 67 Montreal
A photographic exposure lasting a few seconds helped to flatten the water surface and emphasize the light reflections. I made sure to keep the tugboats in front of the buildings since I consider that they added some dynamism to the scene. As usual, the use of a tripod, remote trigger and mirror lock-up helped to reduce the camera vibrations. Liveview was activated and the focus was done manually to ensure optimal image sharpness.
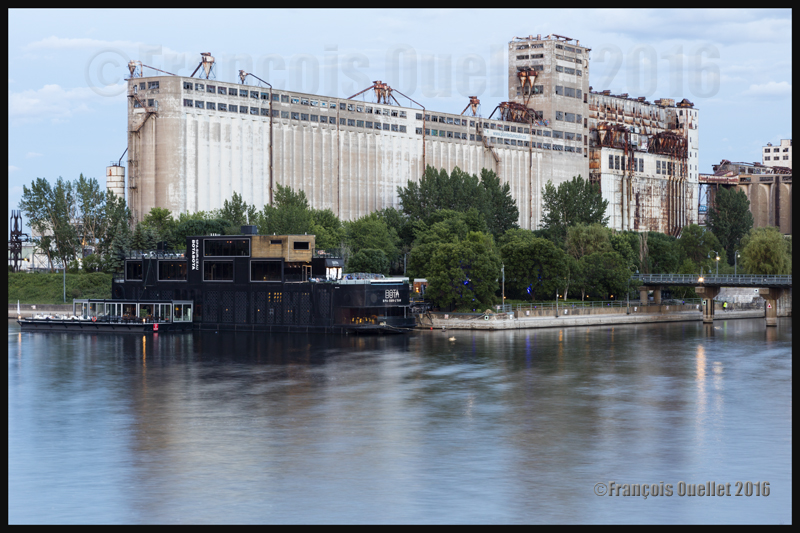
The picture below shows the abandoned grain silos in the Old Port of Montreal. They are protected since 1996 and will possibly be given a new role next year, just in time for Montreal 375th anniversary.
Grain silos in the Old Port of Montreal in 2016. Photo taken with a Canon 5DSR.
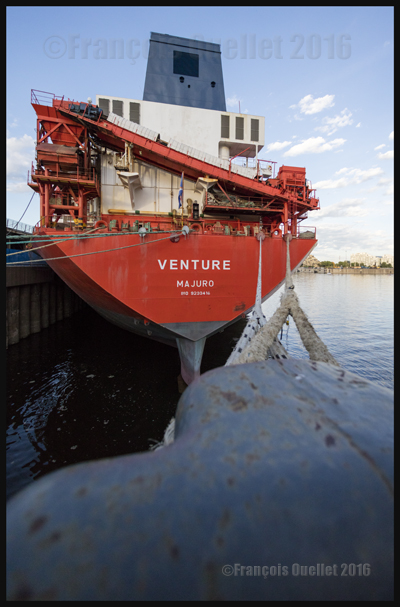
The bulk carrier Venture (formerly called Balder), built in 2002 and belonging to the CSL company, was docked in the Old Port. I tried a few shots, among them one with a telephoto lens Canon 14 mm 2.8L.
The Bulk Carrier Venture (CSL) in Montreal in 2016
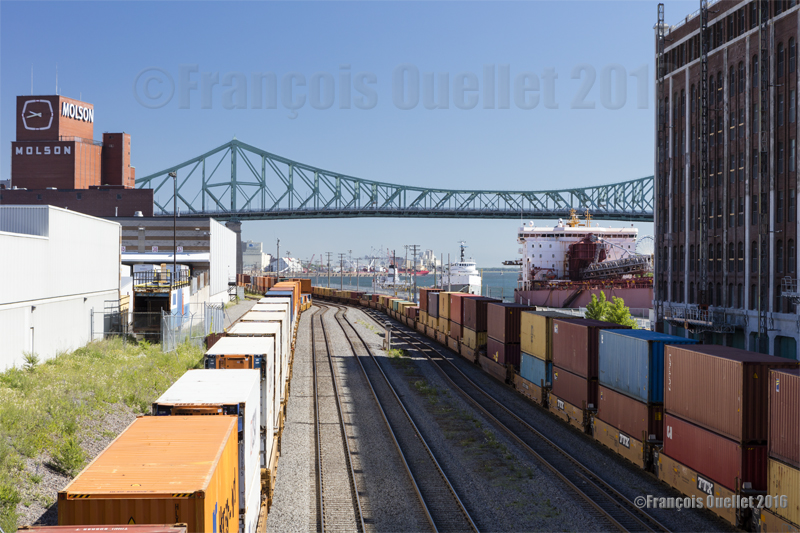
To get a privileged access to the harbor installations, where all the loading and unloading operations are performed, would have been really interesting, but, since it was not the case, I had to try to capture an idea of the Port activities from a distance. I wanted to include the wagons loaded with containers and the ships. The use of a polarizing filter allowed the enhancement of the colours of the wagons. I thought necessary to include the venerable Molson Brewery building in one of the shots.
View of the Montreal Harbor, Molson Brewery and the Jacques-Cartier bridge in 2016
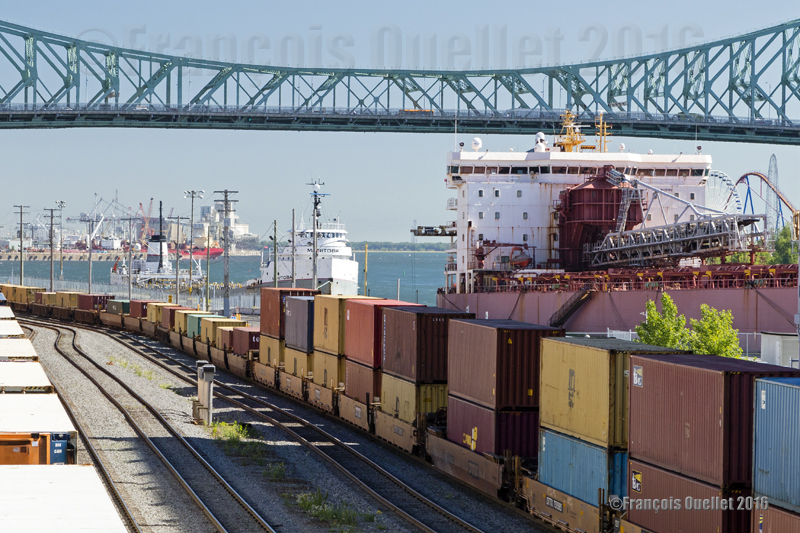
Then, profiting from the cancellation of the low pass filter in the Canon 5DSR DSLR, as well as the impressive enlarging capacities offered by the 50.6 megapixels full frame sensor, it was possible to capture a bit of the Port activities by cropping the photo later on, without any loss in quality, using an image editing software. The picture was taken with a telephoto lens Canon EF 24-70 mm f/2.8L USM at 70 mm.
Port of Montreal with ships and containers. Photo taken with a Canon 5DSR in 2016
For other photos on the province of Quebec and also Quebec City, click on the following links from my blog:
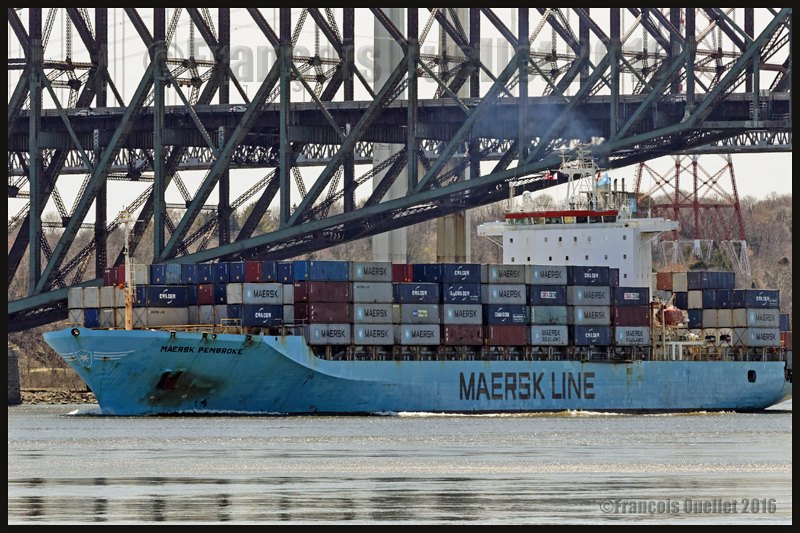
The container ship Maersk Pembroke under the Quebec Bridge, May 2016
Choosing what is important in a camera
Since there is actually no camera that has everything, whatever the brand, the buyer of a new camera must make choices: the type of sensor, the number of megapixels, the weight and size of the camera, the automatic focus’s speed and ability to follow a subject, the number of images per second, the performance under low light, the possibility to greatly enlarge a picture while maintaining its quality, advanced video functions, electronic communications with other devices, an extensive choice of lenses, etc. The list can be quite long…
The Canon 5DS(R): a specialized camera
A photographer happy with the Canon 5DS or 5DSR is one who needs a specialized camera offering both sharp images and the possibility of greatly enlarging the pictures it takes while maintaining the initial quality. This camera allows for more creativity as the possibility of extreme cropping beats, for now, everything that is on the market in the DSLR format.
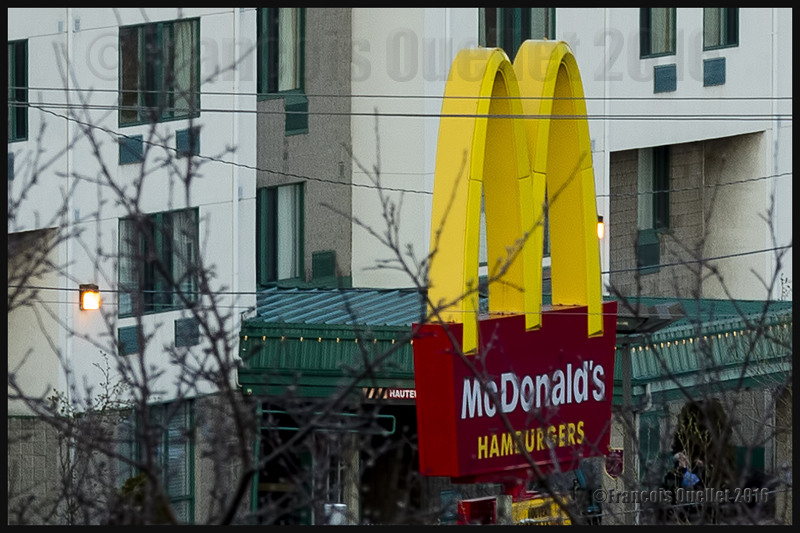
Testing the potential of the Canon 5DSR when it comes to enlarging a picture
Here is an example of what this means: the photo below shows the yellow M of the McDonald’s restaurant photographed with a 50mm lens. Not easily visible…
Mc Donald’s restaurant’s yellow M captured with a 50 mm lens. Hard to see, of course!
Then the next photo was taken with a Canon EF 70-200mm f/2.8L IS II USM telephoto lens set at a 200mm focal length.
Testing the Canon 5DSR: the Mc Donald’s restaurant’s yellow M enlarged through a Canon EF 70-200mm f/2.8L IS II USM telephoto lens. Focal length used: 200mm.
But the picture can be enlarged a lot more using the amazing resolution of the Canon 5DSR. The following picture shows the result after cropping the 200mm image: the yellow M now takes the whole vertical space available in the picture without any loss in quality.
The Mc Donald’s restaurant’s yellow M, after having been enlarged (focal 200mm) and cropped within the Canon 5DSR.
From my position on the hill, the yellow M was barely visible with the naked eye. By using a 200mm focal length, followed by serious cropping, I was able to obtain the result above. So it is possible to photograph a subject that is almost invisible without a telephoto lens and transform it into the principal subject of the picture without any loss in quality.
I chose the 5DSR because the anti-aliasing filter has been neutralized in the model R to offer even sharper images, although there is a risk of occasional moire effect when there are repetitive patterns in a scene. This is the compromise that Nikon users must also have to deal with.
Rethinking photography
The 50.6 megapixel full frame sensor in the Canon 5DS or 5DSR allows a new approach of photography for those who do not have access to a much more expensive and larger medium format camera that does not necessarily give really superior pictures.
When I go outside for a photo session, it seems to me that I now carry a huge telephoto lens without the weight and the cost. A lot of what seemed to be unavailable possibilities are now accessible.
Taking pictures of people in the street is now less complicated: there are no more suspicious looks, artificial poses or people hiding their face. This is an ideal camera to capture people acting naturally without disrupting their routine. Gone is the feeling that you are bothering them in any way.
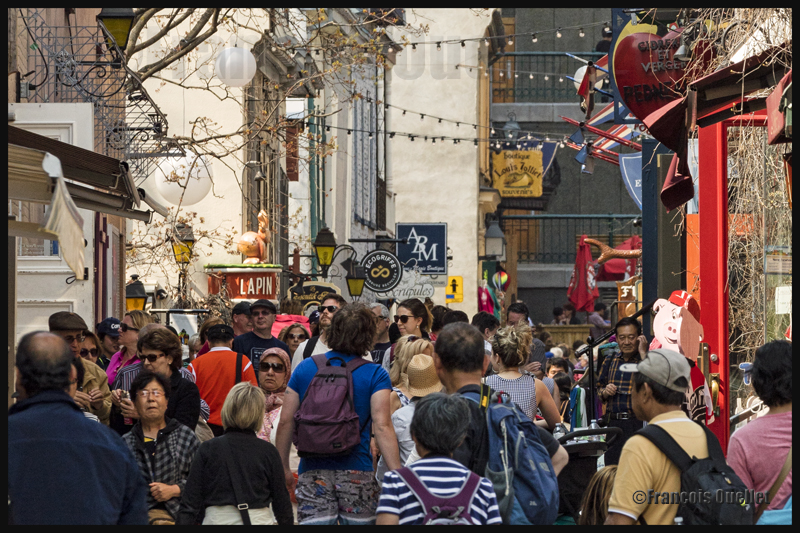
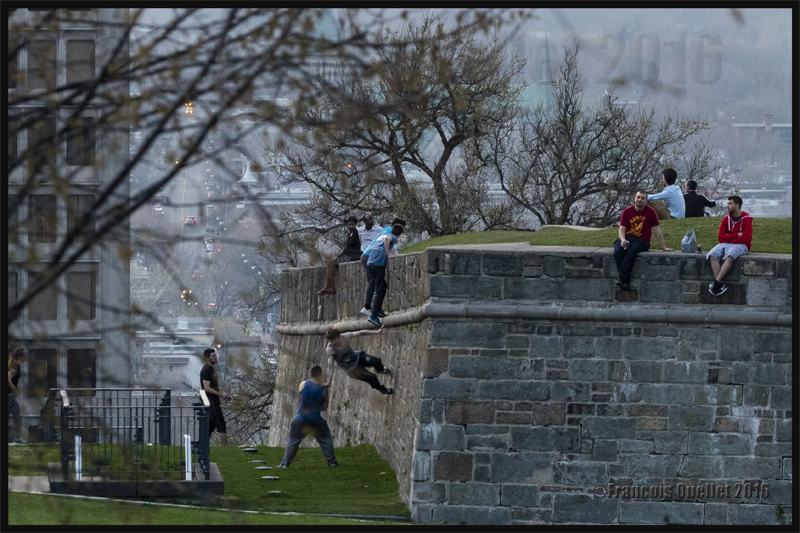
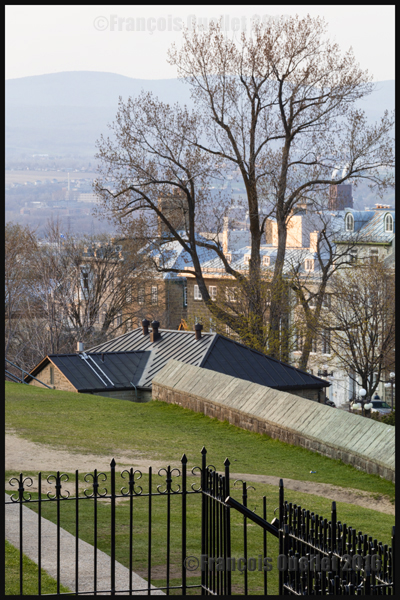
Quartier Petit-Champlain Old Quebec May 2016
The photo below was taken while I was standing at least 300 meters from the scene, just after sunset. For those who are from Quebec City, I positioned the tripod on a high wall on the other side of Chemin St-Louis, near the St. Louis Gate. I had to slightly brighten up the picture to make the details more visible, risking at the same time to increase the digital noise. It was a May 2016 warm misty evening, which is clearly visible by the lack of details in the background as we look in the distance.
Quebecers defying gravity in Old Quebec, May 2016
But those are not the only possibilities of this camera. The Canon Company, in its promotional video, explains what exactly the camera was designed for:
How can someone maximize the use of a 50.6 megapixel full frame sensor
In order to bring a subject closer to you while fully benefiting from the Canon 5DSR 50.6 megapixel full frame sensor, it is obvious that there must be absolutely no vibrations. The photographer must therefore use a tripod, a remote control release and the mirror lock-up function. This allows for a very low ISO setting while avoiding a blurred picture.
The mirror lock-up function is very well thought through, with the possibility to choose a totally automatic processus according to a timing chosen by the photographer (between 0 and 2 seconds). The system eliminates any secondary micro vibrations.
In order to ensure an even better picture, the photographer must use Liveview and set it to the 16X enlargement available on that camera (versus 10X on my Canon 5D MKII) to manually adjust the focus. It is then possible to see the slightest vibrations caused by the wind. Doing so, I realized that my camera strap, lightly swaying in the wind, was causing some minimal vibrations. Every detail taken into consideration will improve the final result.
One must then ensure to immobilize the strap and even diminish the tripod height if possible when the wind is blowing. These steps will allow an incredible enlargement of a subject while maintaining the initial quality of the image offered by a full frame sensor.
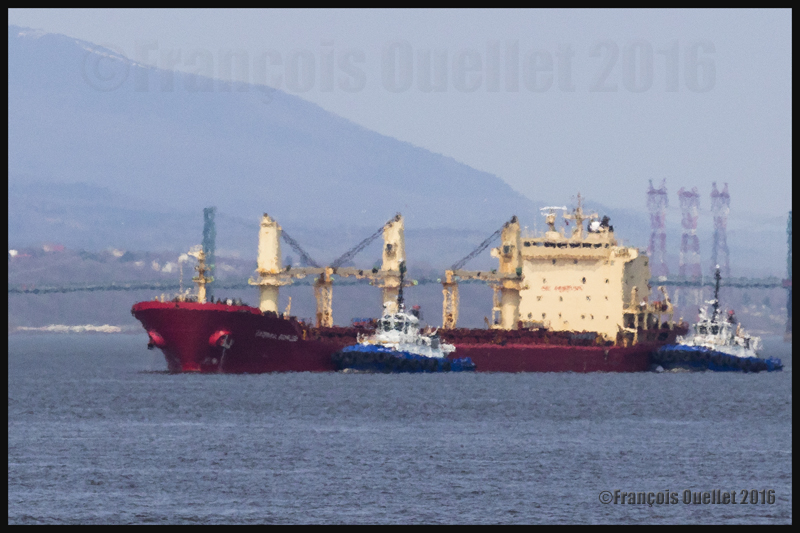
Superior mirage effect (cold mirage)
The photo below shows a ship being helped by two Ocean tugboats on its way towards the Quebec Harbour. The ship was at a good distance from the harbour; it is then possible to witness the superior mirage effect (cold mirage) resulting from a temperature inversion immediately over the water. The boats are deformed but the important close-up has not lowered the image quality. It has instead allowed to increase the atmospheric phenomenon effect.
Superior mirage (cold mirage) effect. Vessel and two Ocean tugboats on the St-Lawrence seaway heading to the Quebec Harbour, May 2016.
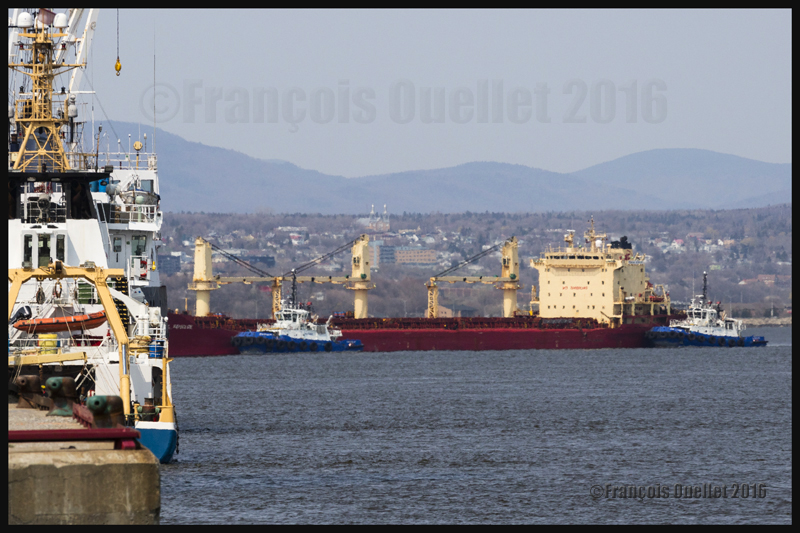
Once closer to the Quebec Harbour, the cold mirage effect decreased, as shown on the picture below:
Quebec Harbour, May 2016
The Canon 5DS or 5DSR without the use of a tripod or mirror-lock
Obviously, a tripod is not necessary if you do not intend to use a lot of cropping to enlarge a photo. You will obtain excellent results with the hand-held camera providing that you remember that this Canon DSLR is a specialized tool.
So many megapixels on a sensor of that size require that the photographer adapts his technique. But, as you can see from the picture below, it is totally possible to capture an aircraft in movement, even at dusk (May 11, 19:49), when the camera’s parameters are correctly adjusted. A higher shutter speed than normal is, in this case, absolutely mandatory.
The photo below shows an Air Canada Express Bombardier DHC-8-402NG (C-GSJZ) on final for runway 29 at the Quebec Jean-Lesage international airport (CYQB).
Bombardier DHC-8-Q-402NG (C-GSJZ — Air Canada Express) on final for the Quebec Jean-Lesage international airport, May 2016. Photo taken with a DSLR Canon 5DSR.
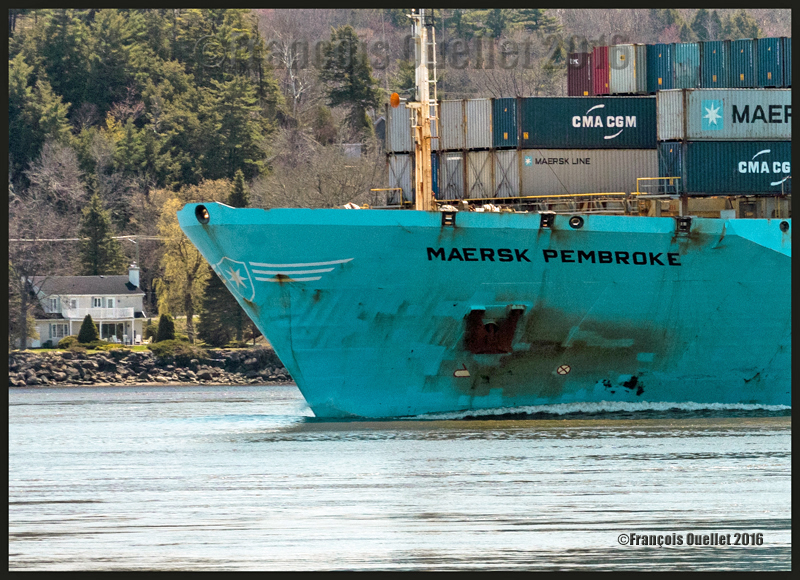
The Maersk Pembroke with the camera hand-held
The photo below shows the Maersk Pembroke container ship photographed with a hand-held camera using a Canon EF 70-200mm f/2.8L IS II USM telephoto lens during Spring 2016 near Quebec City. The focal length was only 140mm and the shutter speed 1/1000. The lens was equipped with a polarizing filter and the photo taken when the vessel was approaching the Quai des Cageux.
The Maersk Pembroke container ship on the St-Lawrence seaway near Quebec City, May 2016
The colours produced by the Canon 5DSR
The digital processing of the image and colours produced by the Canon 5DSR require different adjustments than what was necessary with the Canon 5D MKII. I am still learning how to handle the results produced by this camera so I will wait a bit before commenting.
View of Old Quebec from the St. Louis gate. Quebec City, May 2016
Night photography
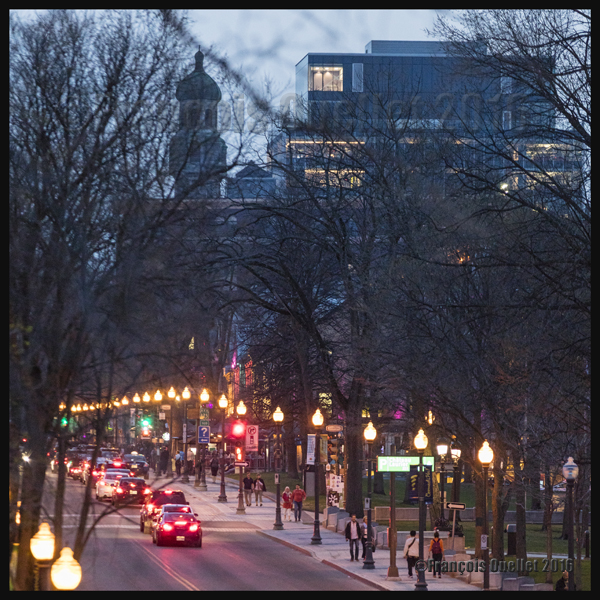
Here are two photos taken during the evening in Quebec City. The photo below required a 200mm focal, an ISO set at 4000 and a shutter speed at 1/30 in order to obtain something else than trailing lights. Luckily, the traffic was moving slowly…
Night photography, Grande-Allée avenue, Quebec City, May 2016
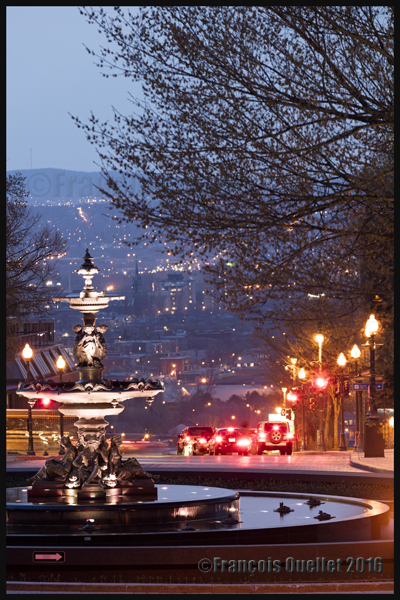
The picture below, taken with a 200 mm focal, required an exposure time a bit longer that one second with the ISO set at 800. To take the photo, I took advantage of the fact that the cars were momentarily stopped at a red light, so that they would be clearly visible.
Night photography, Tourny fountain and Quebec lower town, May 2016
The images per second of the Canon 5DS(R)
The Canon 5DSR is so far quite an impressive camera. I would have appreciated that Canon offer a higher rate of images per second (7 instead of 5) to make it more versatile.
The camera allows taking pictures with smaller formats than 50.6 MP, the two other options being 28 MP and 12 MP. If the camera can deliver five images per second with 50.6 MP RAW files, we can deduct that it is able to offer more speed for smaller formats. But the camera is blocked at 5 IMS so that it, I suppose, does not compete with other existing Canon models of the same category…
Nonetheless, Canon says that the rapid sequence of shooting lasts longer if the photographer uses the smaller files provided. So it is not faster, but it keeps on firing for a longer period. My guess is that it would only require a new firmware version to improve this camera’s number of images per second.
For other night pictures, click on the following link to my site: