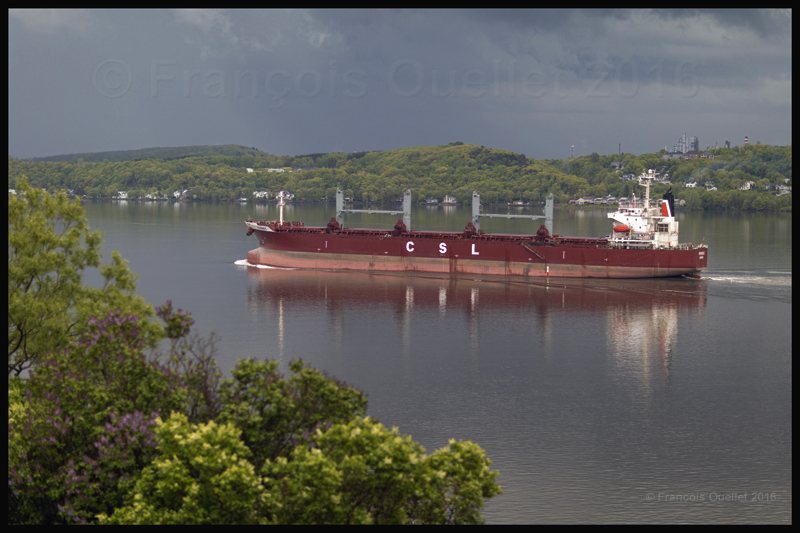
CSL Bulk Carrier vessel Ferbec passing by Quebec in May 2017
CSL Ferbec Bulk Carrier vessel in 2017
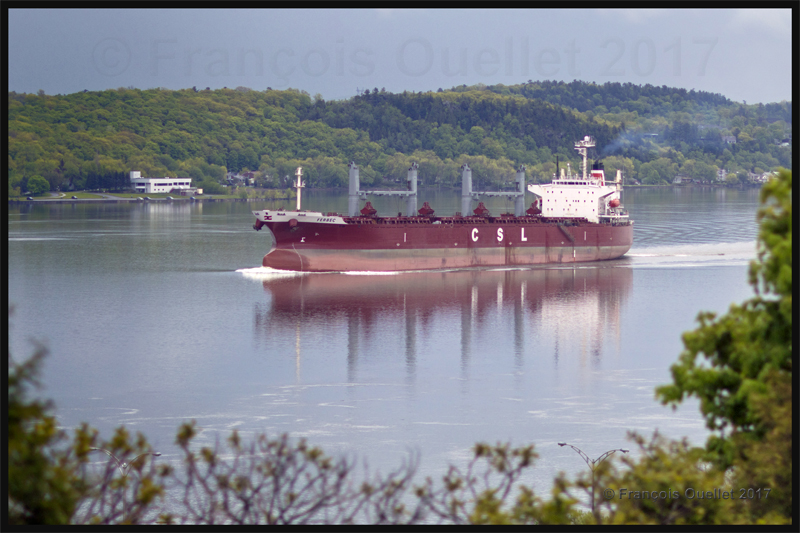
The picture above shows the Bulk Carrier Ferbec. It belongs to CSL (Canada Steamship Lines). It was built in 2002 and regularly travels between Sorel and the North Shore to carry ore. It is seen here in front of Quebec in May 2017, with Lévis in the background.
The picture was taken using a Canon 5DSR equipped with a Canon EF 85mm f/1.2L II USM fixed lens.
Instead of taking only a picture of the vessel, I thought it would be more interesting to keep it at a distance and capture the scene when I would see, in the viewfinder of the camera, vegetation partly surrounding the ship.
Weather was quite unstable around Quebec. On the north shore, the sky was mostly covered by a thin veil of cirrus clouds while on the south shore were numerous towering cumulus with rain showers.
Since there were only thin clouds on the north shore of the seaway, a part of the sunlight directly hit the side of the ship, adding some dynamism to the scenery.
Surprisingly, there was only a very light wind directly over the seaway, which helped improve the ship’s reflection in the water. All the elements were now present to capture a souvenir shot of the Ferbec in front of Quebec City.
For other ship photos posted on my website, click on the following links:
The photography book « Full Frame », by David Noton, was written in 2010 but the content is still totally pertinent today. It’s possibly the best photography book I’ve ever read. The images are fantastic and the text is loaded with practical and accessible information.
Photography book “Full Frame” by David Noton
The author is known as one of the best landscape photographer in the world. Every page of his book is divided in three sections: before, during, after. This means that you read about everything that the author had to deal with as he travelled around the world with his wife to capture landscapes: the preparation, technique, priorities, obstacles, successes, etc.
All along the book, I had the feeling that a friend was writing me since the text is written with a light and humoristic approach in mind, and certainly without pretend. Here are some of his remarks and advices:
“Luck is where preparation and opportunity combine.” (p.38) This certainly applies to everything we do in life.
“Stick with the full frame quality and crop as when required, keeping all the [sensor’s megapixels] information in reserve”.
“Sometimes a new lens or format will serve as a catalyst for a whole new way of looking. It’s all part of the evolutionary process.” (p.64)
Sharpen all digital images. Pictures are made of square pixels and need microadjustments.
To choose among your interesting similar photos which one is the best, start with a very good one and compare it with each other photo, one at a time, throwing away the ones that are inferior. You will save a lot of time.
A bit of blinking in the highlights is not terrible since RAW files can easily be adjusted. Don’t forget that the camera’s monitor shows an histogram adjusted for JPEG files.
Use a grad filter to control the contrasts only, not to add mood or create an artificial contrast.
There is no need to always show the tops of mountains.
“The best pictures are the simplest. Composition is the art of knowing what to leave out.” (p.71)
“Be flexible and strive to extract the most from seemingly adverse conditions.” (p.77)
“For wide angle views on the world, a full-frame sensor is imperative.” (p.93)
Back cover of the photography book “Full Frame” by David Noton
“Scout the location, analyse the options in different lighting situations, previsualize the image, plan the shoot then keep returning until it’s nailed.” (p.113)
“Location finding is everything; the photography is the easy bit.” (p.125)
“Don’t be afraid of “blinkies” in the brightest part of the sky where the sun shines through […]. We don’t expect to see detail there.” (p.138)
“Using movement is an essential technique in a photographer’s repertoire.” (p.143)
“The classic, golden rule of thirds is a good starting point, but it’s only a guideline to ignore at will.” (p.149)
“A camera’s sensor is not a linear device so the right half of the histogram contains far more information than the left. Those apparently overexposed images, when processed with the brightness brought back to the desired density, will have richer tones and less noise than a frame exposed to the left.” (p.153)
“We photographers can only continue to improve if we keep pushing ourselves.” (p.187)
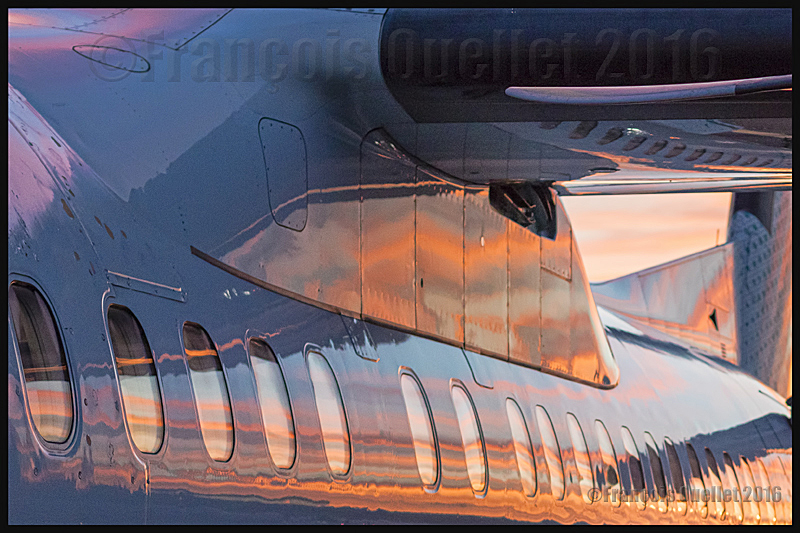
Sunset colors reflecting on an Air Canada Bombardier Q-400 in Toronto
The Air Canada Terminal installations at the Toronto Lester B. Pearson international airport are such that a voyager intending to do a flight from Toronto to Quebec has to walk outside the building to catch his plane. This has some advantages, especially when it is an evening flight and there is, at the time of boarding, a superb sunset.
But to directly photograph the sunset colors without any filter or tripod, while hand holding the camera, is a recipe for disaster. And a photographer cannot stay immobile for very long in that restricted area where security agents and passengers walking towards the DHC-8-400 demand that everyone move with the flow.
A practical method that offers very good results is to indirectly photograph the beautiful sunset colors by using the aircraft as a reflector.
First, it is better to use a camera lens that requires very little light. This will limit the grain size while allowing a shutter speed that is high enough to avoid a blurred picture. The scenery was thus captured with a Canon 5DSR full-frame camera equipped with a Canon EF 50mm f/1.4 USM lens.
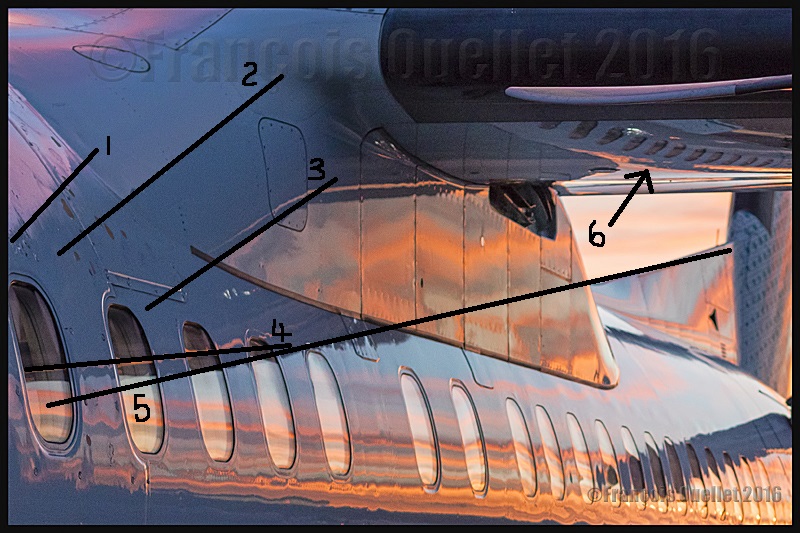
Secondly, the photographer must crop the photography using an image editing software so that all useless details are absent from the final shot. There are two objectives: 1) it is obviously necessary to keep the aircraft parts that will best show the sunset colors and 2) do the best possible use of the elements presenting graphic interests for the viewer.
If I had kept only several oversized windows in order to show the superb sunset colours, there would have been only clear bright colours, without contrasts. That would have given an uninteresting photo. The advantages of protecting the shadowy top of the aircraft are that it adds a strong luminosity contrast, allows the inclusion of the Q-400 diagonal lines (1-2-3-4-5) and a reflection of the reflections themselves (6) under the aircraft’s wing. All this is highlighted in the photo below.
Photography theory: diagonal lines on a Bombardier Q-400 photo
The Queen Mary 2 comes twice a year in the Quebec Harbour during the autumn. It obviously always attracts a lot of onlookers. The vessel carries 2620 passengers who are prompt to visit Old Quebec upon arrival.
In order to take a picture of this superb ship and the architecture of Old Quebec’s houses, it was worth waiting until evening, when the colours were more subtle. I could have chosen to do a close-up of the Queen Mary 2, but by doing so the photo would have lost some of its dynamism since the quartier Petit-Champlain’s alleys and its pedestrians would have been absent from the scene.
There is only a small portion of the sky visible in the picture and this is voluntarily since it does not present any interesting details, especially when compared with the rest of the scenery. The front of the Queen Mary 2 has wilfully been located in the superior right corner of the photo since it is toward this part of the image that the eye ends its initial inspection.
There were quite a number of viewers installed on the Dufferin Terrace, most with a portable camera, trying to capture the scene. All those onlookers and photographers constantly moving on the wooden terrace were nevertheless creating vibrations: a tripod, usually the perfect tool to prevent any shaking of the camera, was only useful here providing that there was a shorter exposure time. The ISO had to be increased accordingly to respect the shorter exposure and avoid a blurred picture at low speed.
Still, the photo taken with a Canon 5DSR full-frame camera successfully portrays the mood in Old Quebec on that evening of autumn 2016.
For other ship photos posted on my website, click on the following link:
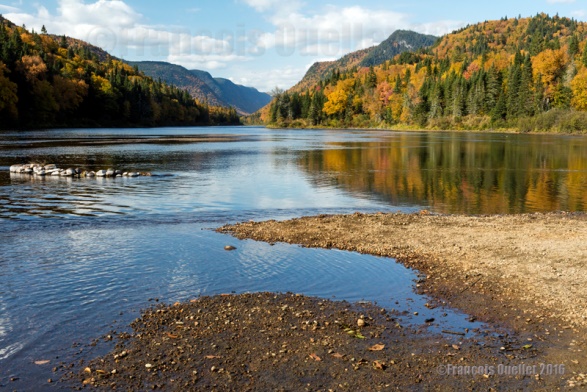
Autumn colors in the Jacques-Cartier National Park
The picture above was taken at the Jacques-Cartier National Park, in the Province of Québec, in 2016 with a Canon 5DSR full-frame camera. You can find this exact location by heading towards the “kilometer 10” inside the park, immediately behind the service center.
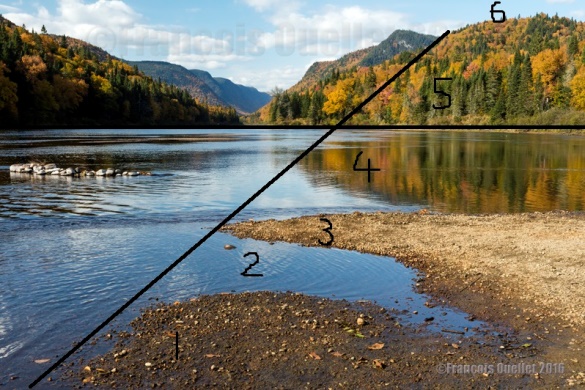
Even if the autumn colors were beautiful and would have deserved a close-up, there was also a possibility to include an interesting foreground. The natural shapes and alternance between the strips of land (1-3-5) [see the picture below] mixed with the water and sky (2-4-6) helped form a virtual diagonal that was used as a lead-in line until the eye meets the superior right corner of the photo.
The rule of thirds was easy to apply here and no compromise was necessary. I decide to cut most of the sky since the time of the day was not ideal as the light was too bright. But I also wanted to give precedence to the geometric shapes of the foreground. The skyline was relocated in the first third of the scenery, immediately at the base of the mountains. The main interest of the picture, which was the colorful forest, now rested in the upper right portion of the frame.
Jacques-Cartier National Park in the Province of Québec and photography theory
For other photos on the province of Quebec and also Quebec City, click on the following links from my blog:
Here are some photos of Toronto that were taken in February 2016 with a Canon 5D MKII DSLR camera. The photos were all saved in RAW and JPEG files to facilitate any additional work that could have been required with an image editing software.
Architecture and photography both offering unlimited possibilities, I did not impose any limitations. The primary goal was to profit from any opportunity that would arise while profiting from the softer light offered by the winter season.
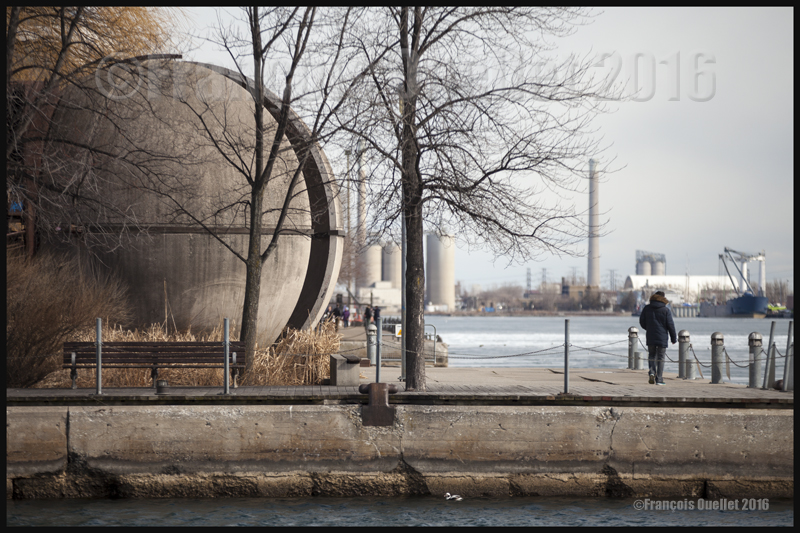
Toronto Harbourfront, Winter 2016
The first article with regards to photography in Toronto that was published on my website showed only one subject: the CN Tower. It was published during Winter 2016:
In the present article, I develop other angles of Toronto which is a city in constant evolution and where you can find multiple styles of architecture. In the picture below, a recent rain shower helped to add unexpected reflections.
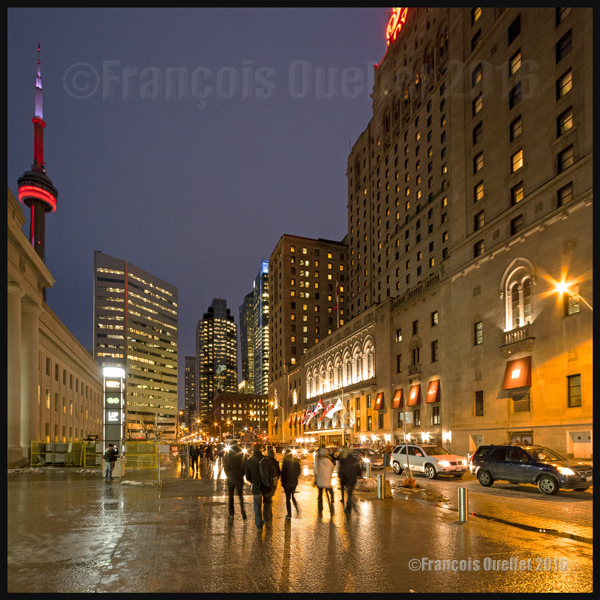
Toronto and CN tower by night. Winter 2016
Some architectural subjects are naturally imposing. This is the case when all you have to do is look straight ahead, enjoy what you see and immediately try to compose an interesting photo.
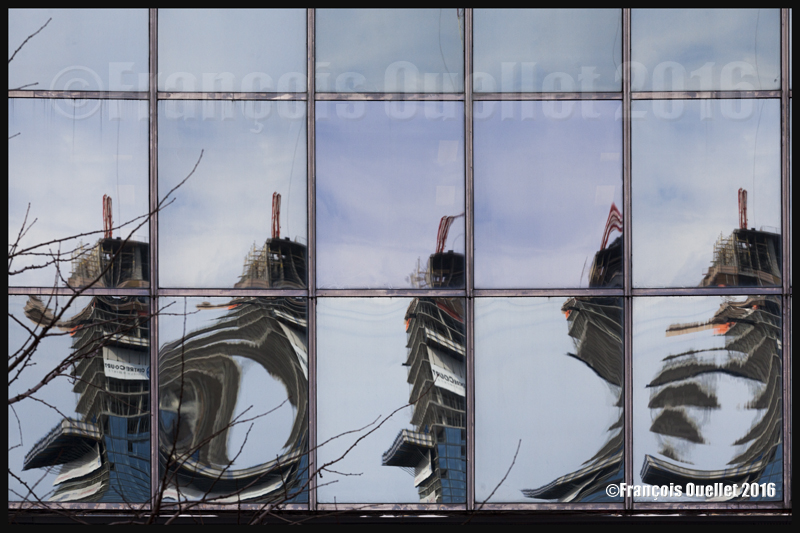
A good example is the interesting reflected shapes that can be seen on the windows of a building. I could not help to take the picture below as I was surprised that a windowed building could send back images that were so totally different from each other. I am curious why there is so much distortion between the windows…
Toronto building reflections (2016)
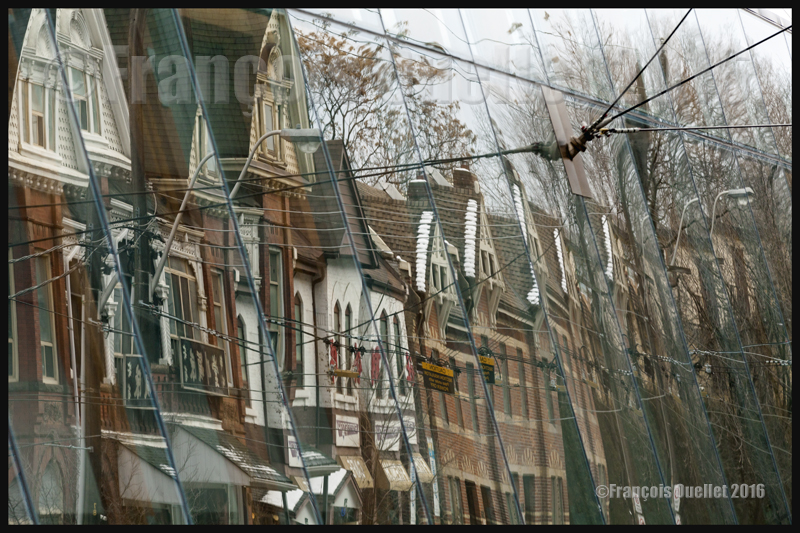
Instead of taking pictures of the newly designed Art Gallery of Ontario, I used its reflective properties to capture something a lot older, which was the design of the row of older houses on the other side of the street.
Some houses are reflecting on the Art Gallery of Ontario (2016)
It is also possible to add variety and fun to a photo session by looking for special shapes, angles or contrasts that are not already obvious.
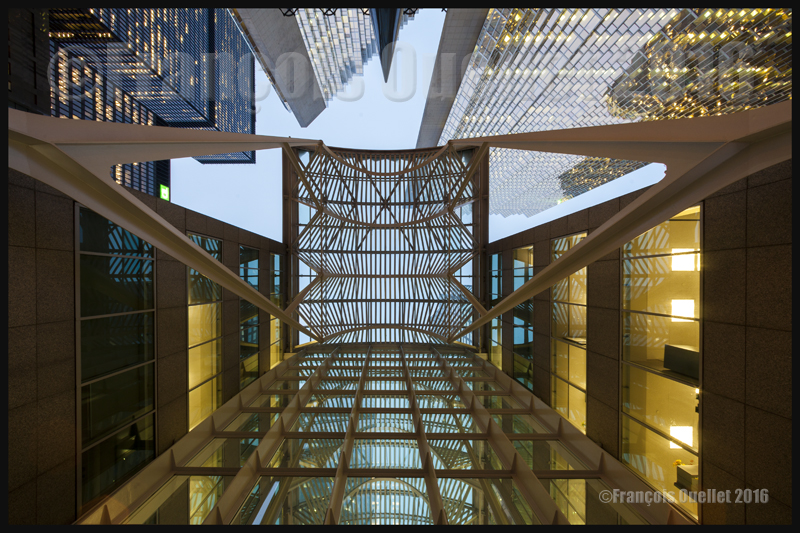
As I was walking downtown, I passed by the Brookfield head office. The architecture of this relatively new building is quite interesting. The architects were able to preserve the facades of older surrounding buildings by integrating them and assigning each one a role inside the new construction, possibly because the city required their protection in case of any new development.
But it is only once I was leaving the sky rise that I found the idea for the next photo: a vertical wide-angle shot from which all lines would be straight, all this possible by using the advantages of the Canon 5D MKII full frame sensor coupled to a Canon 14mm 2.8L wide-angle fixed lens. Image sharpness was insured through manual focus, a tripod, a remote trigger and the mirror lock-up function.
Toronto sky rise, Ontario 2016
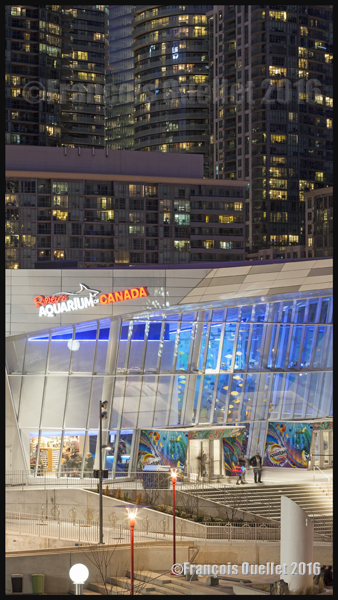
The last photo is essentially about contrasts: the colour contrasts (light and dark) and the density contrasts that one can find in different constructions of Toronto.
In the foreground, we see the aquarium, with its pale and inviting colours, as well as lots of space where only few people are visible. In the background, there is the exact opposite, with very dark high-density condo towers, very close to each other, where every inhabitant hopes to have an interesting view on the Lake Ontario. All this in a photo divided in two parts and cropped very tightly to increase the differences and eliminate any visual distractions.
Contrast between the Ripleys Aquarium of Canada and the condominiums in the background. Toronto, Ontario (2016)
For more articles in the category « Photos of Canada », click on the following link : Photos of Canada
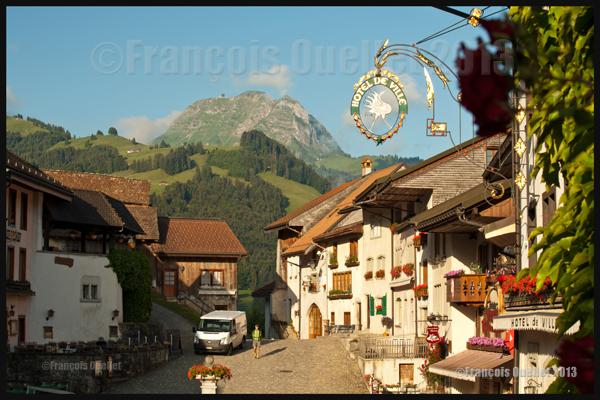
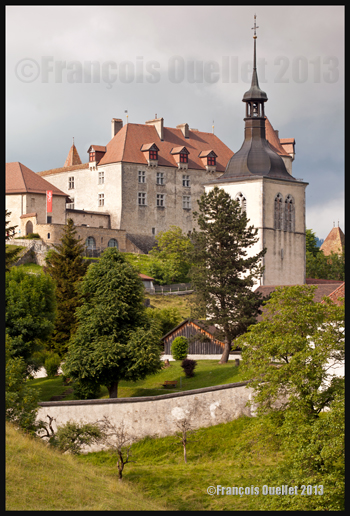
Gruyères and the Moleson in the background, Switzerland 2013
The city of Gruyères is located in the Prealps, in the Friburg County in Switzerland. It is a very charming small medieval town where cars are forbidden (the white van shown in the picture above is only used for morning delivery). In the city, one can visit the Gruyères Castle (Château de Gruyères), the H.R.Giger Museum (creator of the “Alien” in the movie Alien), the Tibet Museum, a cheese factory and boutiques. There are also some restaurants.
In the picture above, shot with a Canon 5D MKII, it is possible to see the Moléson in the background, a mountain that rises only 512 metres above the surrounding terrain but is still at more than 2000 meters above sea level. It is a tourist attraction that should not be neglected since it is very well equipped for all types of visitors, with a funicular and cable car. The visitors also have access to very interesting walking paths, for all ages and experiences.
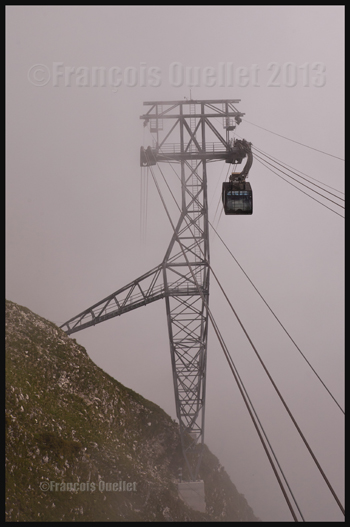
Moleson cable car, in the Gruyeres region, Switzerland 2013
When you use a cable car and do not see where it is leading due to the presence of clouds, you have to trust human engineering. But we are in Switzerland, so it should be all right!
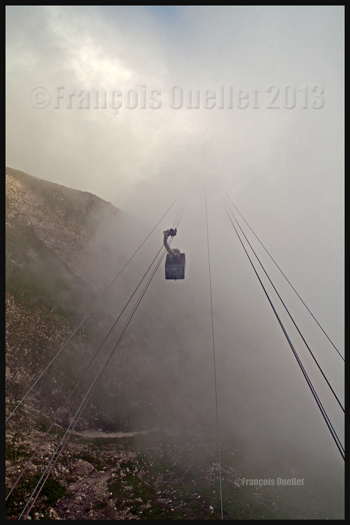
The Moleson cable car, Switzerland 2013
The Moléson summit offers superb views. The small cumuliform clouds visible in the morning around the mountain progressively lift up due to daytime heating and eventually become beautiful cumulus clouds that add life to any pictures.
Moleson summit in the clouds, Switzerland 2013
Once on top of the Moléson, it is possible to use a modern metal stairway to gain even more height and access a platform allowing an unobstructed panoramic view. The picture above was taken with a Canon EF 16-35mm f2.8L II USM wide-angle zoom lens equipped with a polarizing filter.
Metal stairs leading to an observation post on top of the Moleson, Gruyeres region, Switzerland 2013
When ready to go down the mountain, the visitor has two choices: travel with the cable car and funicular he used when coming up, or slowly walk along an easily accessible path through beautiful green landscapes. The more experienced trekkers might decide to walk along the crests of surrounding mountains. We chose to walk on paths covered with flowers.
Path on the Moleson, Switzerland 2013
Back to Gruyères, a visit of the Château de Gruyères and both museums is a must, as well as a tour of the cheese factory. You might want to spend some time in the boutiques too and try the local restaurants. It is also the moment to take a few pictures…
Inside the Gruyeres medieval city, Switzerland, 2013
The old architecture of the buildings in Gruyères as well as the neighbouring countryside allow for very interesting photographic compositions. A well-known photography technique consists in using an opening in a building and using it as a second frame (a frame within a frame). I made sure that the background was clear enough to improve the visual effect. An aperture around 16 allowed for an appropriate depth-of-field.
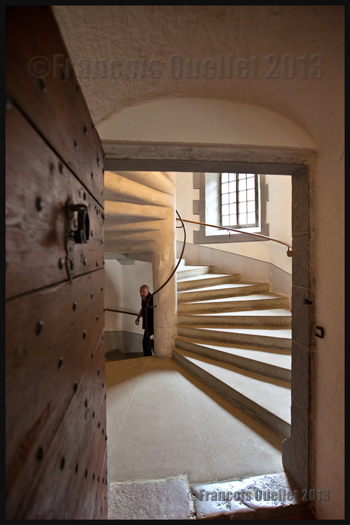
Spiraling stairs in the Gruyeres Castle, Switzerland 2013
The picture above shows a spiraling staircase inside the Château de Gruyères. I can barely imagine what the results would have been if I had had access to the new Canon 11-24mm wide-angle lens. But nonetheless, the Canon EF 16-35mm f2.8L II USM zoom lens did a good job.
The beauty of the full frame sensor mounted on the Canon 5D MKII DSLR is that a wide-angle shot taken at a 16mm focal will stay at 16mm while with a smaller sensor, like the APS-C, the photographer is facing a conversion factor of 1.5 or 1.6X, which transforms the 16-35mm wide-angle into a 24-52mm, in the best of cases. The APS-C sensor is interesting when used with a telephoto lens but a bit less when comes the time to take wide-angle shots.
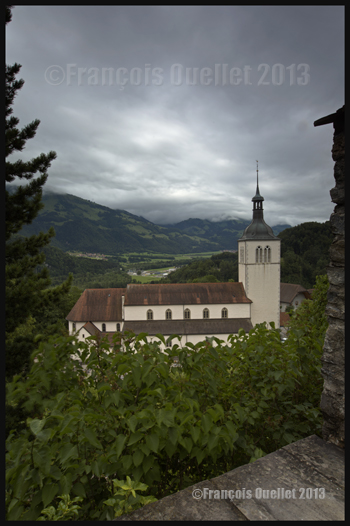
The picture below presents the Château de Gruyères seen from a neighbouring field.
Gruyeres old architecture, Switzerland 2013
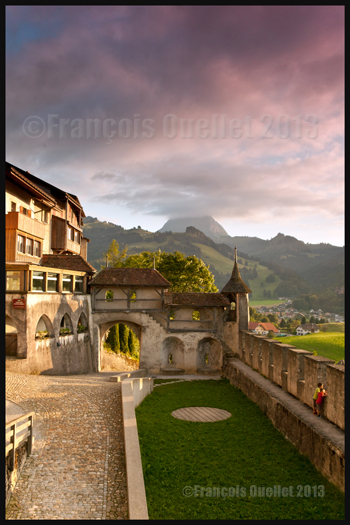
As the sun was setting down, I tried a shot from inside the castle. It was interesting to see the two little boys standing up alongside the wall and admiring the sunset. At the same time, it was possible to see the Moléson in the distance, its summit hidden in the clouds.
Due to the strong light contrasts, it was necessary to use a Hi-Tech ND graduated filter installed on my Canon 16-35mm wide-angle zoom lens. The Digital SLR Photography magazine, in one of its recent editions, made a comparison between ND grad filters and indicated that the Hi-Tech filter had a slight magenta coloration instead of a neutral grey. I think it is easily visible in the picture below. The photo could have been corrected with Photoshop but I thought of keeping it as it was since the scenery looked somewhat unreal already.
View from the Gruyeres Castle and the Moleson, Switzerland 2013
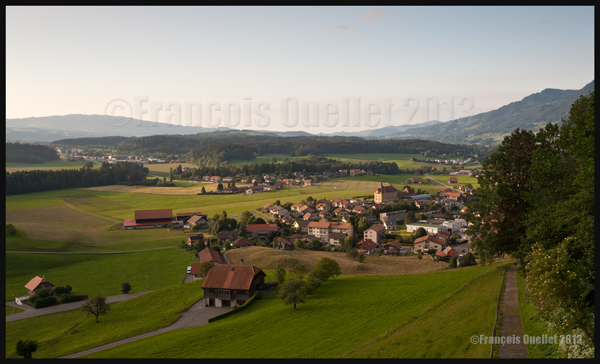
Once the sun was below the horizon, the more subtle colours gave a totally new look to the countryside. On the picture below, it is possible to see on the right a small path that a visitor can take to head down to the nearby village.
Gruyeres region in the sunset, Switzerland 2013
All the sceneries are not that easy to capture and it is sometimes necessary to use HDR photography to extend the dynamic range and take care of extreme light contrasts. The photo below needed five different exposures that were subsequently processed with the Photomatix image editing software. Useless to say, it was necessary to use the mirror lock-up function, a tripod and a remote control release.
View from the Gruyères Castle, Switzerland, in HDR 2013
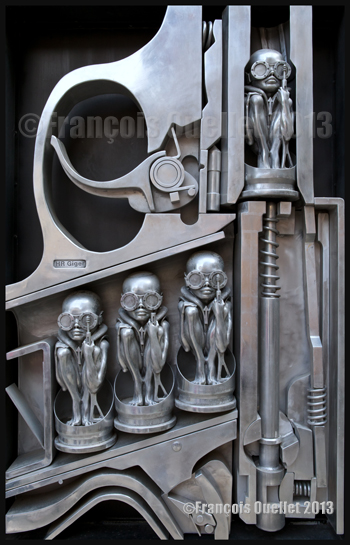
Here is, as the final picture, an idea of what is waiting for you at the H.R. Giger Museum. If there is a strange but very interesting museum, it is this one.
Artwork in front of the H R Giger Museum, Gruyeres, Switzerland 2013
Other pictures of Europe and around the world will be posted in the coming months…
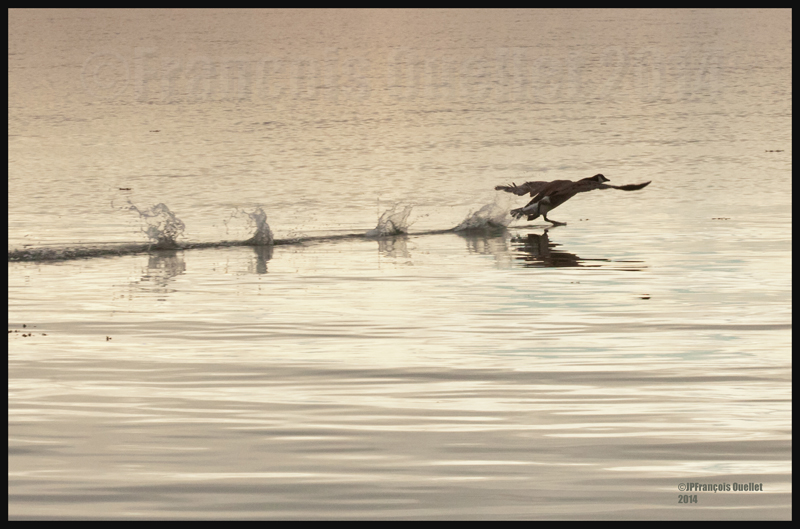
A Canada goose about to take off from Oak Bay, Victoria, British-Columbia in 2014
Obviously, the Canon 5D MKII is not the ideal camera for sport photography, but it still can offer very good results with its full frame sensor. You don’t get a high number of frames per second, but you get the benefit of a bigger image than one produced with an APS-C sensor. I was thus able to capture the full take-off run of this Canada goose in Victoria, British Columbia, while leaving enough space on the right side of the frame, which was essential for a balanced photographic composition.
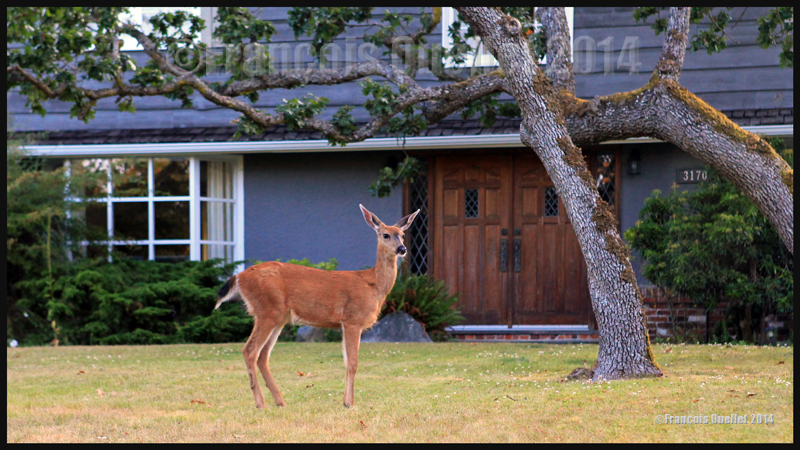
Deer on a private property in Uplands, Victoria, British-Columbia in 2014
Deer move freely in Victoria’s Uplands sector and you can easily find them on private property lots. Since they are so numerous and have no natural enemies, the city has imposed new regulations to control their ever growing number. The picture above was taken from my vehicle: it was only necessary to slow down and proceed quickly to capture the animal while it was looking at the car.
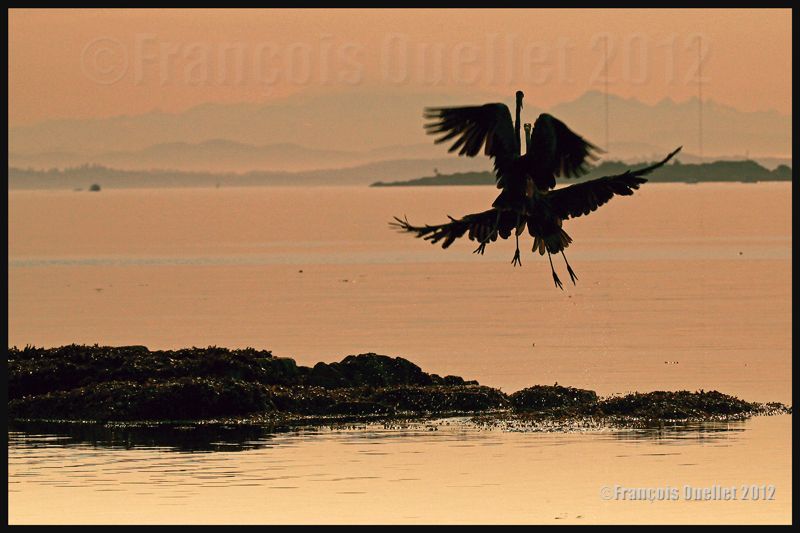
Heron in flight in Oak Bay, Victoria, British-Columbia 2012
There are numerous herons in Victoria’s Oak Bay sector. This picture was taken very early in the morning, while there was a mixture of mist and low clouds and the rising sun was still blocked by some low clouds. The wind was calm. A graduated filter was nonetheless necessary to tone down the contrasts caused by a horizontal light.
Fighting herons in Oak Bay, Victoria, British-Columbia in 2012
Every bird has to fight for its own territory and those two herons are no exception.
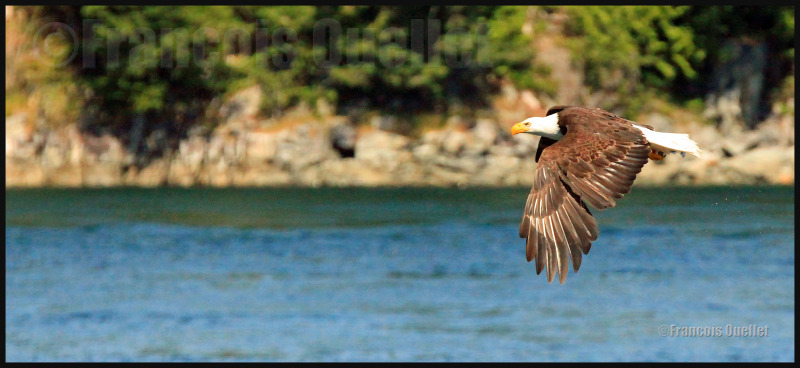
Eagle observed in the Campbell River region, British-Columbia, Canada. Summer 2012.
While taking a little scenic cruise in British-Columbia’s Campbell River area, we were able to see numerous eagles diving to catch fishes then climbing back up in high trees to deliver the catch of the day. Pictures were hard to take since the captain had to keep the boat at a good distance from the eagles to respect their hunting territory. Moreover, it was windy and the boat was constantly moving.
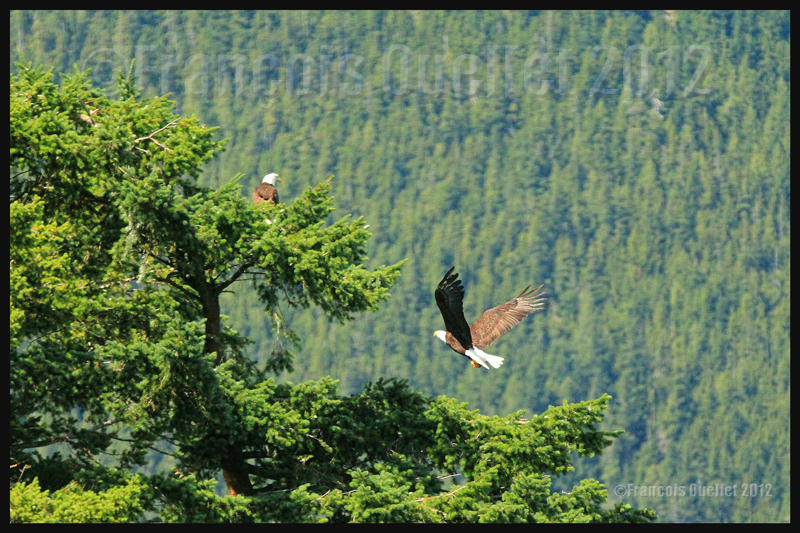
Two eagles near Campbell River, British-Columbia, Canada in 2012
The two pictures of eagles were taken with a Canon 5D MKII equipped with a Canon 70-200 f2.8L IS II USM telephoto lens. An extender (2X) was also added to increase the focal distance to 400mm. Even then, I had to crop quite a lot to bring the birds to an acceptable distance, which increased the digital noise. A quality APS-C equipped camera (like the Canon 7D MKII) would have been very useful here (10 frames per second and a reduced amount of cropping, if you are ready to compromise on the size of the image).
A full frame camera like the Canon 5DSr would have also been appropriate, with its 50.6 MP resolution, as long as a high shutter speed is selected. Due to all those pixels crammed on a regular full frame sensor (not a medium format), the slightest camera movement is recorded. But if you succeed in totally freezing a long distance shot, the exceptional resolution of the Canon 5DSr would allow you to greatly increase the size of the bird while protecting the sharpness of the image, especially now that the low pass filter has been neutralized in the model R.
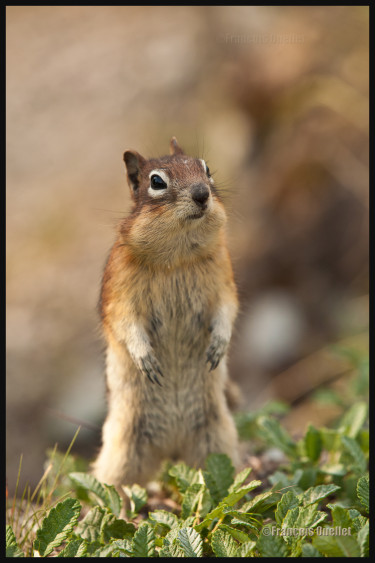
Chipmunk near highway 93 towards Jasper, Alberta
On the car ride between Lake Louise and Jasper, we had to stop on numerous occasions to take pictures in the fantastic Jasper National Park. At one point, a little chipmunk, familiar with rest areas, paid us a visit hoping to add something new to his diet. The picture’s depth-of-field has deliberately been adjusted to make sure the chipmunk would be easily visible, since both animal and background had the same colours.
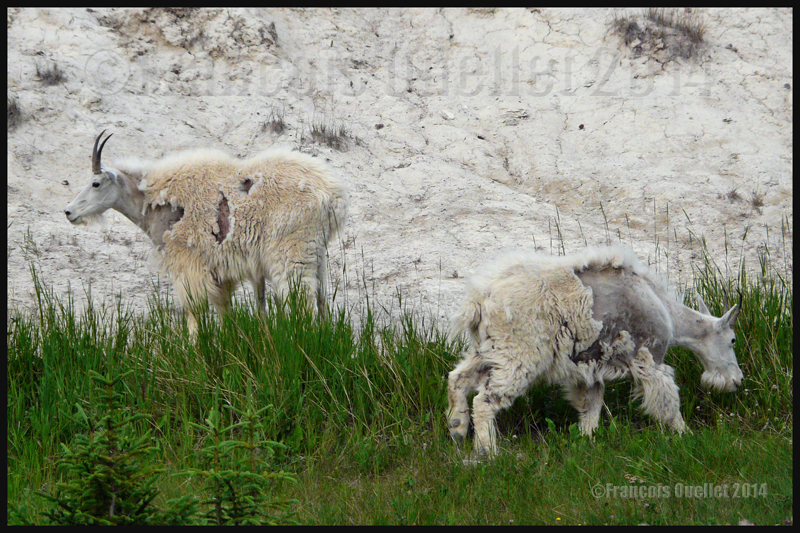
Mountain goats in the Jasper National Park, Alberta, Canada in 2014
It was hot, very hot, during summer 2014 in the Jasper National Park. The car’s thermometer was recording 38C between Lake Louise and Jasper. Numerous forest fires were raging. So much so that we had to delay our trip towards Jasper by 24 hours since Highway 93 had been closed by authorities. Mountain goats nonetheless had to endure part of their winter fur in that very high heat…
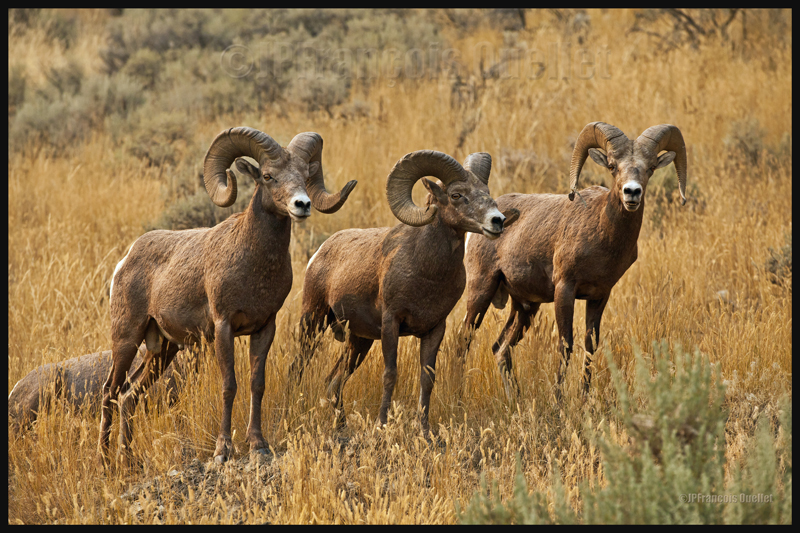
Canadian bighorns near Kamloops, Alberta, Canada in 2014
Near Kamloops, in Alberta, we were able to observe about twenty Canadian bighorns coming down from the surrounding mountains to help themselves from the cultivated lands in the valley. The picture above was taken with a Canon 70-200 f2.8L IS II USM telephoto lens, almost without cropping, the bighorns being close enough.
Brown bear near the Yellowhead Highway, Alberta, Canada in 2014
The picture above was taken alongside the Yellowhead Highway in Alberta. We saw the bear in a field and when he detected our presence, he changed direction and started moving toward us. Here, everything is about moderation and although I love photography, comes a time when a bear is big enough in the viewfinder to indicate that it is time to retreat…
Other pictures on Western Canada will be available in the coming months…
For more articles in the category « Photos of Canada », click on the following link : Photos of Canada
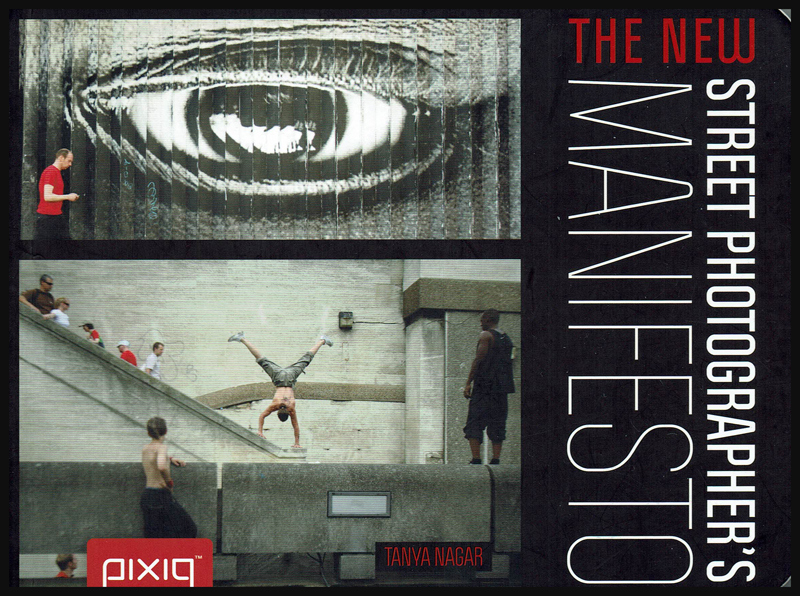
Livre de photographie: “The new street photographer’s manifesto” par Tanya Nagar
Tanya Nagar is an award-winning photographer from London. Her book, “The new street photographer’s manifesto” is perfect for those who aim to improve their street photography techniques. The present article is not a comprehensive critic of her book but an overview of what a reader will find. I also highlighted some tips in photography that will help to improve the street photographer’s performance.
Tanya’s manifesto not only contains technical advices helping a photographer to improve his shots but also some tips to avoid common mistakes. Subjects include: timing, composition, shooting portraits, framing and juxtaposition, perspective and angles, the choice between landscape and portrait, depth of field, shutter speed, exposure, night photography, rule of thirds, etc.
The book’s content is divided in six categories: 1. Street Photography 2. Where & What to Shoot 3. Seize the Moment 4. Equipment 5. Digital Processing 6. Showcase.
1. Street photography requires the ability to seize a life moment with precision and timing. It is about candid shots and does not have to include humans, as long as it fixes a moment in life. It certainly can include animals (in fact, animals are a very popular subject).
2. It is best if you use a light, discrete camera (even an I-Phone). Walking with a huge camera with big lenses makes you look like a professional photographer and people will see you coming. The trick is to avoid drawing attention. Coughing while clicking drowns out the sound of the camera. You might also think of “shooting from the hip” or “shooting blind”. Those techniques are explained in the book and can be mastered with a bit of practice.
3. It takes a bit of courage to photograph situations that include people since you never know what to expect when you raise your camera. Respect the different cultures and personal space and don’t be afraid to smile and explain what you are doing. If somebody refuses to be photographed, move on, don’t dwell on the situation.
4. In order to gain experience and a feeling of security at taking pictures of people on the street, start with protests or parades.
5. It is a good thing to know the laws pertaining to photography of the country you are visiting. Police officers in some countries might be tempted to order you to delete a shot while they actually don’t have the right to. Often, a misunderstanding by police or security guards of anti-terrorism legislation leads to different interpretations and subsequently to abuse towards a photographer. Just make sure you stay up to date with the country’s regulations.
6. You might think of shooting from within your vehicle to obtain interesting results (while respecting the country’s laws).
7. Use graffitis, signs, graphical billboards, text and advertising logos.
8. Use contrasts like big versus small, light versus dark, rich versus poor, etc.
9. Bear attention to details and look for second degree interpretation of a situation.
10. Look for amusing, funny and unusual captures.
11. Make sure you master your camera in order to be quick when the perfect opportunity comes. Set most of the parameters of the camera before actually arriving on a scene (you already have an idea of the light intensity in the area and the ISO setting that will be required to obtain the speed you desire).
12. Be cautious when it comes to taking pictures of children. Societies change and authorization from the child’s parents is required almost every time.
13. “The only way to avoid missing a moment is by carrying your camera at all times”. Therefore, get something small and light.
Endos du livre de photographie “The new street photographer’s manifesto”
The book holds a section dedicated to multiple types of cameras: rangefinders, SLR and DSLR, four thirds and micro four thirds, medium format, point-and-shoot compact cameras, camera phones, toy and pinhole cameras. Their advantages and disadvantages are clearly explained.
The reader will also find some information about lenses (the best for street photography and what to avoid) and the effects obtained through the use of different type of films (colored, black and white, expired).
The fifth section of the book relates to digital processing and the basic image editing techniques like cropping, rotating, the use of the “Curves” command, as well as dodging and burning.
The final section, “Showcase”, presents many well-known street photographers from around the world, including few photos taken by each of them to allow the reader to have an overview of each photographer’s personal style and creativity. Presented in order are: Antonio Navarro Wijkmark, Brian Quentin Webb, Charlotte Gonzalez, Claire Atkinson, Danny Santos II, Felix Lupa, Ferhat Çelik, Mustafa Abdulaziz, Ronya Galka, Seamus Travers and Severin Koller.
This is certainly a very interesting and practical photography book that will help you avoid costly mistakes (missed photo opportunities or buying the wrong photography equipment) while helping you to improve your knowledge on street photography as much as the quality of your shots.
Here is a link towards Tanya Nagar’s website: Tanya Nagar
« A hymn to beauty, this is what photography is for me »
Cover of Matthieu Ricard’s book “An Ode to Beauty”
Matthieu Ricard is a Buddhist monk who spent over forty-five years in the Himalayas. Throughout the years, he has produced many photography books. He is a man of immense talent and what he produces is of a very high quality. His new book “An ode to beauty” is no exception.
For thirty years, he photographed with two Nikon FM2 cameras and then switched to a Canon EOS-1Ds and a Canon EOS-5D. The Canon lenses used for his pictures range from a 12-24mm zoom to 100-400 mm. Landscape photography requires that he adds graduated neutral density filters to his lenses in order to reduce the contrasts between sky and earth.
When Matthieu Ricard comes back from a trip, he says: “I work on the images so that I can recapture the feeling, the emotion, the colors and the light that I saw with my own eyes”.
Like many experienced photographers, the author studies the work of other photographers in order to always learn something new. About Matthieu Ricard’s images, Henri Cartier-Bresson wrote: “Matthieu’s camera and his spiritual life are one, and from this spring these images, fleeting and eternal”.
“An ode to beauty” is made of human situations, facial expressions and the changing lights of landscapes. The composition is well thought through.
Matthieu Ricard is clearly an expert: technically demanding photos are very well executed. There are, on his images, numerous magical moments, where the photographer had only a very short time to react. It is the case, for example, of a photo where the sun rays hit an ideal part of a mountain chain at the same time as a rainbow colors the dark clouds in the background.
It is a unique book, made of exceptional images reproduced with great care. Most images demand a lengthy contemplation. There is no “Photoshop” effect and saturated colors here: everything is perfectly balanced.
Thanks to this book, the reader can look at the planet Earth in a very different way.