Categories
Photos of Europe

Photography in Europe: Gruyères and the Moléson in Switzerland

Gruyères and the Moleson in the background, Switzerland 2013

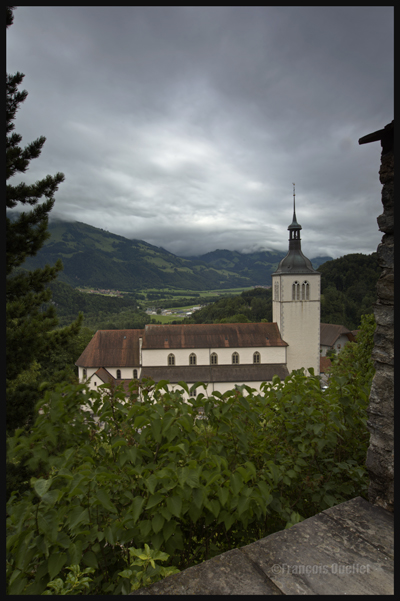
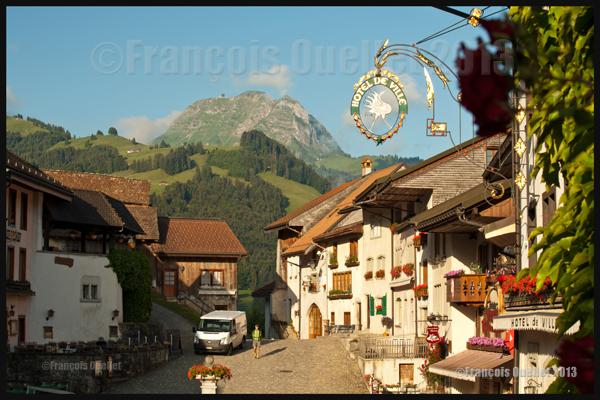
The city of Gruyères is located in the Prealps, in the Friburg County in Switzerland. It is a very charming small medieval town where cars are forbidden (the white van shown in the picture above is only used for morning delivery). In the city, one can visit the Gruyères Castle (Château de Gruyères), the H.R.Giger Museum (creator of the “Alien” in the movie Alien), the Tibet Museum, a cheese factory and boutiques. There are also some restaurants.

In the picture above, shot with a Canon 5D MKII, it is possible to see the Moléson in the background, a mountain that rises only 512 metres above the surrounding terrain but is still at more than 2000 meters above sea level. It is a tourist attraction that should not be neglected since it is very well equipped for all types of visitors, with a funicular and cable car. The visitors also have access to very interesting walking paths, for all ages and experiences.

Moleson cable car, in the Gruyeres region, Switzerland 2013

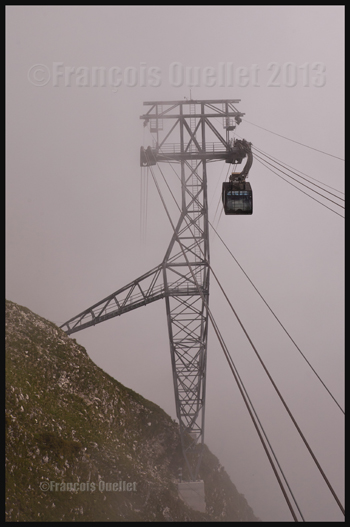
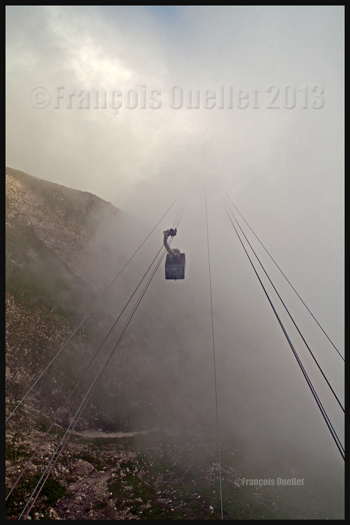
When you use a cable car and do not see where it is leading due to the presence of clouds, you have to trust human engineering. But we are in Switzerland, so it should be all right!

The Moleson cable car, Switzerland 2013

The Moléson summit offers superb views. The small cumuliform clouds visible in the morning around the mountain progressively lift up due to daytime heating and eventually become beautiful cumulus clouds that add life to any pictures.

Moleson summit in the clouds, Switzerland 2013

Once on top of the Moléson, it is possible to use a modern metal stairway to gain even more height and access a platform allowing an unobstructed panoramic view. The picture above was taken with a Canon EF 16-35mm f2.8L II USM wide-angle zoom lens equipped with a polarizing filter.

Metal stairs leading to an observation post on top of the Moleson, Gruyeres region, Switzerland 2013

When ready to go down the mountain, the visitor has two choices: travel with the cable car and funicular he used when coming up, or slowly walk along an easily accessible path through beautiful green landscapes. The more experienced trekkers might decide to walk along the crests of surrounding mountains. We chose to walk on paths covered with flowers.

Path on the Moleson, Switzerland 2013

Back to Gruyères, a visit of the Château de Gruyères and both museums is a must, as well as a tour of the cheese factory. You might want to spend some time in the boutiques too and try the local restaurants. It is also the moment to take a few pictures…

Inside the Gruyeres medieval city, Switzerland, 2013

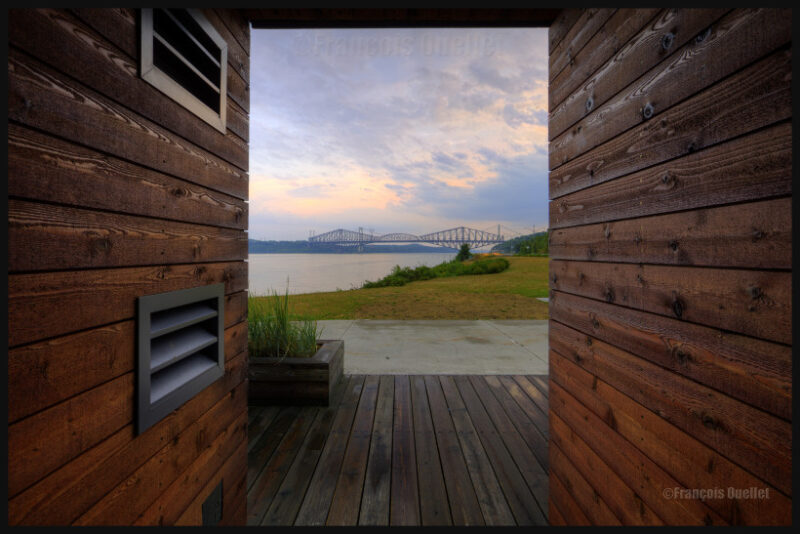
The old architecture of the buildings in Gruyères as well as the neighbouring countryside allow for very interesting photographic compositions. A well-known photography technique consists in using an opening in a building and using it as a second frame (a frame within a frame). I made sure that the background was clear enough to improve the visual effect. An aperture around 16 allowed for an appropriate depth-of-field.

Spiraling stairs in the Gruyeres Castle, Switzerland 2013

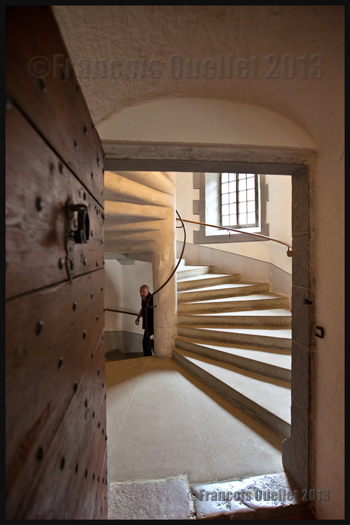
The picture above shows a spiraling staircase inside the Château de Gruyères. I can barely imagine what the results would have been if I had had access to the new Canon 11-24mm wide-angle lens. But nonetheless, the Canon EF 16-35mm f2.8L II USM zoom lens did a good job.

The beauty of the full frame sensor mounted on the Canon 5D MKII DSLR is that a wide-angle shot taken at a 16mm focal will stay at 16mm while with a smaller sensor, like the APS-C, the photographer is facing a conversion factor of 1.5 or 1.6X, which transforms the 16-35mm wide-angle into a 24-52mm, in the best of cases. The APS-C sensor is interesting when used with a telephoto lens but a bit less when comes the time to take wide-angle shots.

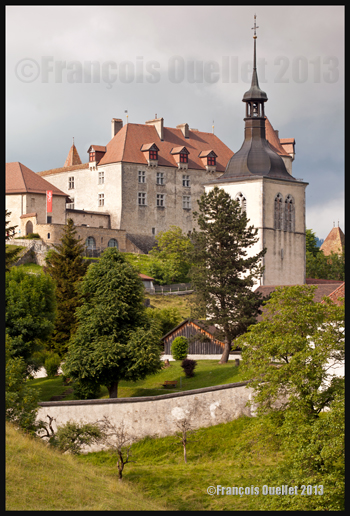
The picture below presents the Château de Gruyères seen from a neighbouring field.

Gruyeres old architecture, Switzerland 2013

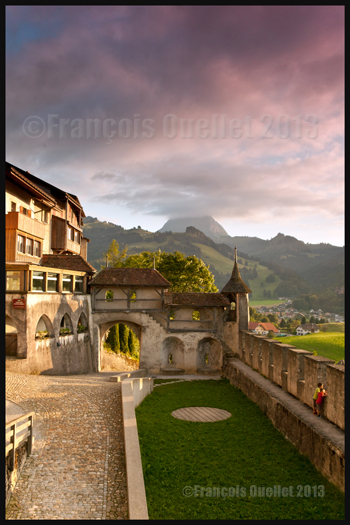
As the sun was setting down, I tried a shot from inside the castle. It was interesting to see the two little boys standing up alongside the wall and admiring the sunset. At the same time, it was possible to see the Moléson in the distance, its summit hidden in the clouds.

Due to the strong light contrasts, it was necessary to use a Hi-Tech ND graduated filter installed on my Canon 16-35mm wide-angle zoom lens. The Digital SLR Photography magazine, in one of its recent editions, made a comparison between ND grad filters and indicated that the Hi-Tech filter had a slight magenta coloration instead of a neutral grey. I think it is easily visible in the picture below. The photo could have been corrected with Photoshop but I thought of keeping it as it was since the scenery looked somewhat unreal already.

View from the Gruyeres Castle and the Moleson, Switzerland 2013

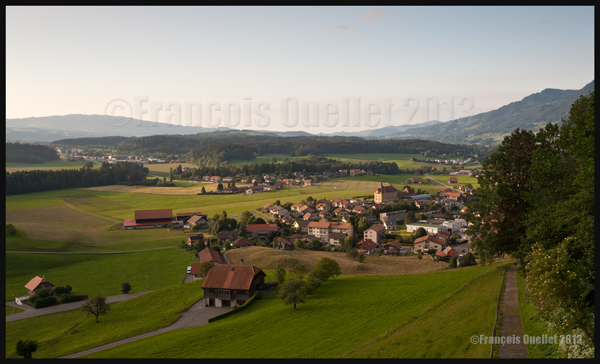
Once the sun was below the horizon, the more subtle colours gave a totally new look to the countryside. On the picture below, it is possible to see on the right a small path that a visitor can take to head down to the nearby village.

Gruyeres region in the sunset, Switzerland 2013

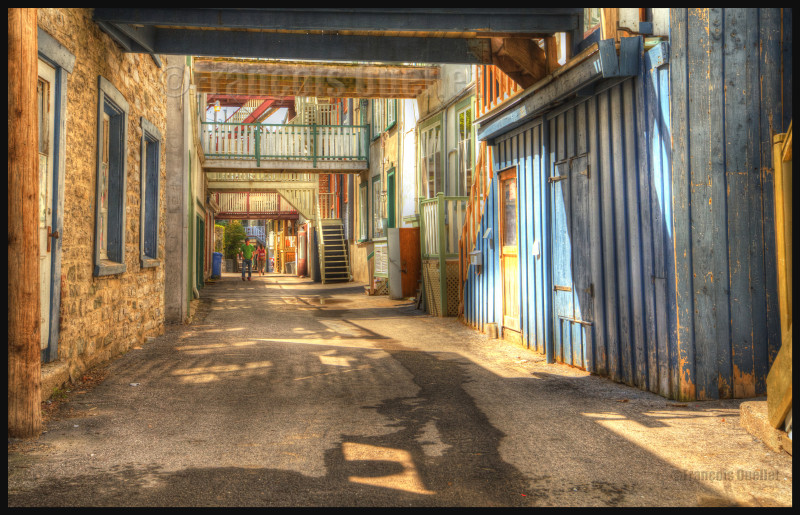
All the sceneries are not that easy to capture and it is sometimes necessary to use HDR photography to extend the dynamic range and take care of extreme light contrasts. The photo below needed five different exposures that were subsequently processed with the Photomatix image editing software. Useless to say, it was necessary to use the mirror lock-up function, a tripod and a remote control release.

View from the Gruyères Castle, Switzerland, in HDR 2013

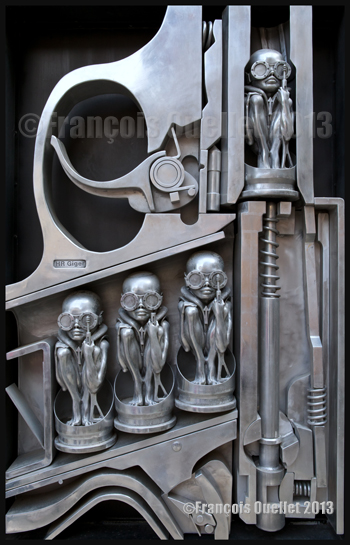
Here is, as the final picture, an idea of what is waiting for you at the H.R. Giger Museum. If there is a strange but very interesting museum, it is this one.

Artwork in front of the H R Giger Museum, Gruyeres, Switzerland 2013

Other pictures of Europe and around the world will be posted in the coming months…

Categories
Photography

HDR Photography

HDR (High Dynamic Range) Photography

Quebec Bridge, 2012.

1. A picture you would never have thought possible, because of extreme contrasts between brightness and darkness, is now accessible to you through HDR.

2. For a good HDR picture, you need at least 1) an interesting subject 2) an appropriate setting or background 3) the appropriate light and 4) a wide range in contrasts. That seems basic, but HDR will not save a picture that was not thought through.

3. You need a software like Photomatix, to transform several pictures taken at different exposures into one HDR picture. But this is only the first step. You will also need another editing software to improve the general result after Photomatix has been used.

4. A tripod is required to help Photomatix align the pictures and create the HDR effect.

5. As with your normal pictures, it is always better to try to use the lowest ISO as possible.

Gruyères, Switzerland, 2013.

6. It is safer to work with manual focus. This way, none of your shots will have been influenced by external objects without you noticing. It will always be the exact same focus throughout the HDR photo session. With automatic focus, you generally notice your blurred pictures when you’re back home and then it is too late (it will often happen under low light conditions).

7. The greater the contrast, the more exposures you need to take (up to nine) in order to match the dynamic range of your eyes.

8. The idea is to take each exposure at a different exposure setting. If you need seven exposures, an example of settings would be: -1, -2/3, -1/3, 0, +1/3, +2/3, +1. You might decide that three exposures only are necessary and go for -2, 0, +2 or -1, 0, +1. The choice is yours but you must take only the required number of exposures to avoid including too much noise in your shots.

Canon, 16-35mm, HDR format.

9. Throughout your HDR exposures of a specific scene, always keep the same aperture.

10. A scene is rarely perfectly balanced with light and shadows. If there are many shadow areas in the photo you want to take, then take more exposures over the recommended settings to ensure that you caught the whole dynamic range of the scene.

A house in Sainte-Pétronille, on Île d'Orléans, autumn 2012. HDR picture.
A house in Sainte-Pétronille, on Île d’Orléans, autumn 2012. HDR picture.

11. Inversely, if your scene has lots of highlight areas, take more exposures under the recommended settings.

12. Setting your camera to “automatic bracketing” is preferable because all the pictures are taken quickly thus avoiding to show any blurred picture in the final HDR picture. But if you want to show the movement of water in a creek, you don’t need bracketing: just take few shots with different time of exposure (in number of seconds). Just don’t overdo it otherwise it will give place to an uninteresting undefined white surface.

13. Check your LCD monitor so that none of the highlights are blown out. There would be a loss of details. For the same reason, you must avoid to block the shadows.

14. Always work with RAW files, it gives you better results. The RAW file already provides you with more f/stops then the JPEG file, and this before the transformation in HDR has even started).

15. Of all the lenses I’m using, the wide angle lens is my preferred one with it comes to HDR photography.

Spring light in the lower town of Quebec City

16. To improve the composition or enhance the general impact, crop the picture.

17. Not all pictures are appropriate for HDR transformation. If you want a dramatic silhouette as the final result, for example, HDR will not be appropriate. It will reveal too many details in the shadows and you will lose the high contrast effect that you were looking for. With practice, you will recognize where HDR is the most effective.

18. Whether you want a realistic picture or not, you can obtain surprising results with the combined effects of softwares like Photomatix, Topaz, Photoshop, Nik Software, Lightroom, Lucis Pro and so on. It’s only a matter of taking your time to experiment.

19. If you have only one picture on hand, like a shot you took years ago, and you would like to give it an HDR effect, you can use a software likeTopaz Adjust. There is an HDR effect section in that software that allows you to get a wide range of effects. But this is not going to be nearly as good as the real HDR resulting out of many pictures. The final editing step is, most of the time, done using Photoshop.

20. An unpretentious book about HDR is “Rick Sammon’s HDR Photography Secrets for Digital Photographers”. It is simple, colorful, well written and loaded with practical informations.

Eiffel Tower at night with HDR effect

Note: All the photos were taken with a Canon 5D MKII