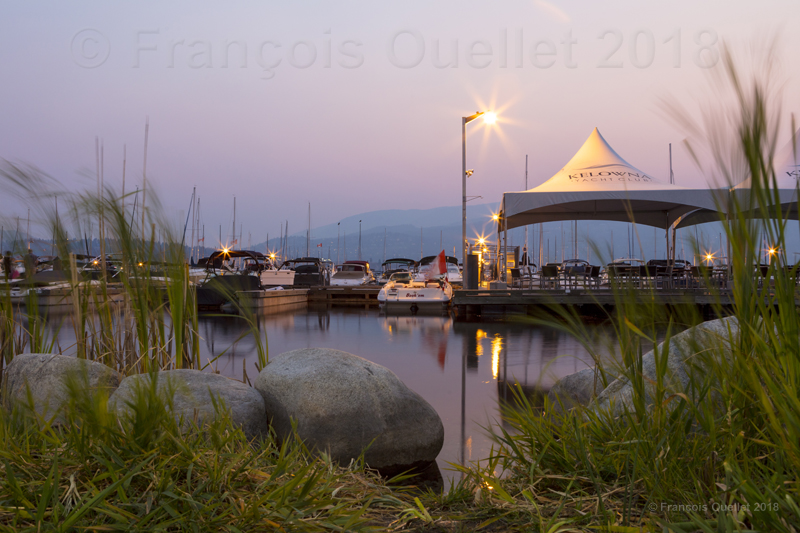
Categories
Photos of Canada Photos of Quebec

Montreal street photography: night reflections

In the middle of a public place in Montreal, I saw a chromed office furniture installation inside a plexiglass box. As interesting as it was, I thought that the scene would be more attractive if I waited for nightime.

Street Photography: Montreal night reflections

Darkness meant that nearby lamposts would be lit. The additional white light would contrast with the night and also help to improve the reflections caused by the chrome and plexiglass.

I only then needed a bystander to add a human presence to the scene. I waited for the moment he would stand still before taking the shot, since I was working with quite a slow speed.

We rapidly recognize three elements: the chair, the person and the rounded white lights. The rest comes after a brief moment of observation. The man attracts our interest as he makes us wonder what he is actually doing: he seems to be looking at the installation, yet he might also be reading some explanations about what he sees.

The viewing angle is wider, thanks to a Canon 14mm 2.8L lens. I did not need any tripod for this photo since the Canon 5D MKII was stabilized by being in contact with the plexiglass box. The only remaining aspect to take care of was to find a good angle to take the shot.

For other photos on the province of Quebec and also Quebec City, click on the following links from my blog:

Province of Quebec Photos
Quebec City and Île d’Orléans in Autumn
Quebec City and Île d’Orléans in Winter
Quebec City and Île d’Orléans in Spring
Quebec City and Île d’Orléans in Summer
Categories
Photography

Night Photography

Empress Hotel at dusk, Victoria Harbor, Canada 2014

1. Ensure you bring : tripod, remote cable, flashlight and timer.

2. Use of RAW (.TIFF) is highly recommended. There is a greater potential for corrections afterward, if something is not according to your taste.

3. Noise reduction activated on the camera.

4. If the winds are calm: ISO between 50 and 200.

5. If there are strong winds: ISO 400 might be useful to avoid a blurred picture caused by the continual small vibrations of the tripod due to a long exposure. That is why a heavy tripod is always preferable.

Trailing lights on boulevard Champlain, Quebec City

6. If you wish to take a picture of people moving at a normal pace, and you have access to quality lenses, it will often be necessary to use ISO 800 to get a clear shot. This setting could allow the shutter speed to be adjusted at about 1/200 which is plenty to obtain a picture that is not blurred; that is unless you are not using a long focal like 200mm or more.

7. For people shots, it is better to have your back to the remaining light on the horizon, unless your goal is to capture a silhouette.

8. For extended exposure, use the autofocus “one shot” setting until it stops working due to insufficient light. Then use manual focus. Or use manual focus all along, with Liveview, if you prefer it that way, for extra precision.

9. Mirror lock-up function must be activated to avoid vibrations caused by the shutter action.

10. Use a remote cable when taking the picture to avoid useless vibrations.

Old Québec at dusk
Old Québec at dusk.

11. If you wish, you might think of selecting a specific AF point to ensure a better focus if there is a small area that matters the most to you in the picture.

12. Do not use the FULL AUTO mode during night photography.

13. The three most important modes are 1. Aperture (taking care of slightly overexposing for surrounding lights) 2. Speed 3. Manual. There is one more reason to overexpose a bit if you work with the RAW format: there is more data information in light than in shadow, so once the picture is taken you have access to more data to play with to adjust the dark sections of the picture.

14. If you expect an exposure longer than 30 seconds, use BULB mode.

15. Night pictures are best taken using the camera bracketing funtion (-1,0,+1) and this, every two minutes.

A Christmas tree in Sillery

16. The best period for night shots is 15 minutes after sunset, until official night time, which you can find on the internet. As this period is quite short, it is important that you know in advance what is of interest to you and where you will position yourself when comes the time for the picture.

17. Total darkness is not what is the most favourable in night photography. But you can certainly obtain interesting results using black and white.

18. Beware of surrounding light reflection in your lens.

19. Histogram has to be reviewed to ensure that there is no serious overexposure.

20. It is preferable to choose an aperture between F11 and F16 for maximum sharpness as well as an adequate depth-of-field.

21. If shooting a subject against the remaining light over the horizon, there might be quite a contrast in lighting between where you stand and where your subject is positioned. You might think of using grad filters (3-6-9-10) to help correct this huge light difference, or you can transform the standard photo session into an HDR one. Or both! There are also filters specifically designed for sunrise and sunset periods that can improve your shots.

Paris, Le Marais 2013

All the photos were taken with a Canon 5D MKII