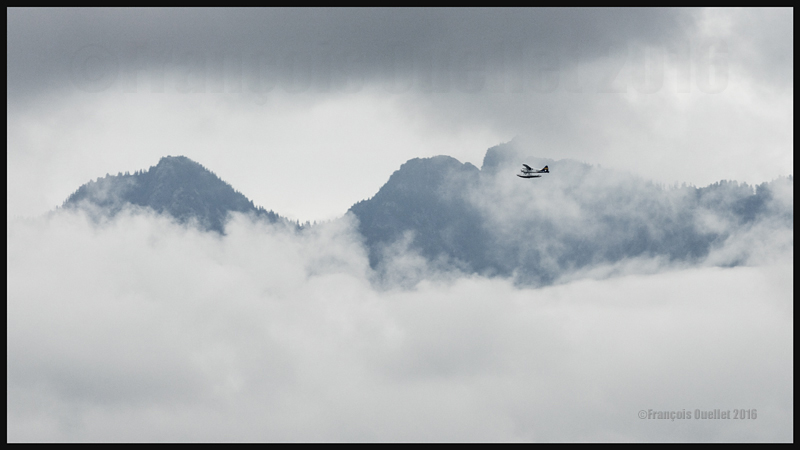
An Harbour Air DHC-2 Beaver floatplane is just airborne from Vancouver
The photo above portrays a Beaver floatplane belonging to Harbour Air. It is seen here a few minutes after its take-off from the Vancouver Harbour floatplane base in British Columbia. The picture was taken with a Canon 5DSR full-frame camera equipped with a Canon 70-200 f2.8L IS II USM telephoto lens.
The aircraft, quite small in the photo, could have been enlarged using the Canon 5DSR’ s 50 megapixel full-frame sensor. The image would still have been of excellent quality but I would have lost the effect I was initially looking for.
As opposed to what seems obvious at first sight, the scenery was not captured sitting in another plane but from the ground, while I was standing near the Harbour Air seaplane base. The morning’s constant precipitation saturated the air with moisture and helped create a low level cloud base.
An image editing software was then used to crop the scene. I used a non standard photo format to show the kind of flight the pilot was dealing with, between two cloud layers and with a mountain range on his right. It seems to me that a photographer does not have to feel obliged to follow an arbitrary format if the latter has a negative impact on the intended result.
Cliquez sur le lien pour d’autres photos d’avions sur mon blogue.
A crow in flight over the Georgia Strait in British-Columbia
This picture of a crow in flight over the Georgia Strait in British Columbia was taken with a Canon 5DSR full-frame camera. The aperture was set around 4.0. This allowed for a faster shutter speed. A reasonable ISO setting also kept the digital noise to a minimum.
In order to increase my chances of getting a precise photo of the crow, and to ensure that the background was blurred to limit distractions, I decided to follow as much as possible the exact speed of the bird with the camera. This is always risky as one can lose unique photo opportunities. But when it works, the picture is always interesting.
A significant cropping was then necessary to increase the size of the crow in the photo but this had no negative impact on the image’s quality since the initial ISO setting was quite low and I had access to the Canon 5DSR’s 50 megapixel full-frame sensor. Such a huge number of megapixels makes it easier when comes the time to enlarge pictures.
A bit of patience was necessary in order to capture an interesting subject but the wait was worth it. The specimen above landed about fifty feet from me on a Parksville beach. It started to look for small pieces of wood and, when satisfied of its finding, took-off for its nest.
For more articles in the category « Photos of Canada », click on the following link : Photos of Canada
Street photography: a rental opportunity not to be missed
Apartment to rent (à louer) : the renter has access to an antique multicoloured spiraling iron staircase. Wishing to protect the environment, the owner used wood as the material to insure the structure’s stability. The second floor’s floor is built with different types of wood, following the modern architectural trend. The building’s facade is boarded up to insure your privacy as well as your security. All those advantages for a ridiculous price. Call now!
For other street photography pictures posted on my site, click on the following link:
The photography book « Full Frame », by David Noton, was written in 2010 but the content is still totally pertinent today. It’s possibly the best photography book I’ve ever read. The images are fantastic and the text is loaded with practical and accessible information.
Photography book “Full Frame” by David Noton
The author is known as one of the best landscape photographer in the world. Every page of his book is divided in three sections: before, during, after. This means that you read about everything that the author had to deal with as he travelled around the world with his wife to capture landscapes: the preparation, technique, priorities, obstacles, successes, etc.
All along the book, I had the feeling that a friend was writing me since the text is written with a light and humoristic approach in mind, and certainly without pretend. Here are some of his remarks and advices:
“Luck is where preparation and opportunity combine.” (p.38) This certainly applies to everything we do in life.
“Stick with the full frame quality and crop as when required, keeping all the [sensor’s megapixels] information in reserve”.
“Sometimes a new lens or format will serve as a catalyst for a whole new way of looking. It’s all part of the evolutionary process.” (p.64)
Sharpen all digital images. Pictures are made of square pixels and need microadjustments.
To choose among your interesting similar photos which one is the best, start with a very good one and compare it with each other photo, one at a time, throwing away the ones that are inferior. You will save a lot of time.
A bit of blinking in the highlights is not terrible since RAW files can easily be adjusted. Don’t forget that the camera’s monitor shows an histogram adjusted for JPEG files.
Use a grad filter to control the contrasts only, not to add mood or create an artificial contrast.
There is no need to always show the tops of mountains.
“The best pictures are the simplest. Composition is the art of knowing what to leave out.” (p.71)
“Be flexible and strive to extract the most from seemingly adverse conditions.” (p.77)
“For wide angle views on the world, a full-frame sensor is imperative.” (p.93)
Back cover of the photography book “Full Frame” by David Noton
“Scout the location, analyse the options in different lighting situations, previsualize the image, plan the shoot then keep returning until it’s nailed.” (p.113)
“Location finding is everything; the photography is the easy bit.” (p.125)
“Don’t be afraid of “blinkies” in the brightest part of the sky where the sun shines through […]. We don’t expect to see detail there.” (p.138)
“Using movement is an essential technique in a photographer’s repertoire.” (p.143)
“The classic, golden rule of thirds is a good starting point, but it’s only a guideline to ignore at will.” (p.149)
“A camera’s sensor is not a linear device so the right half of the histogram contains far more information than the left. Those apparently overexposed images, when processed with the brightness brought back to the desired density, will have richer tones and less noise than a frame exposed to the left.” (p.153)
“We photographers can only continue to improve if we keep pushing ourselves.” (p.187)
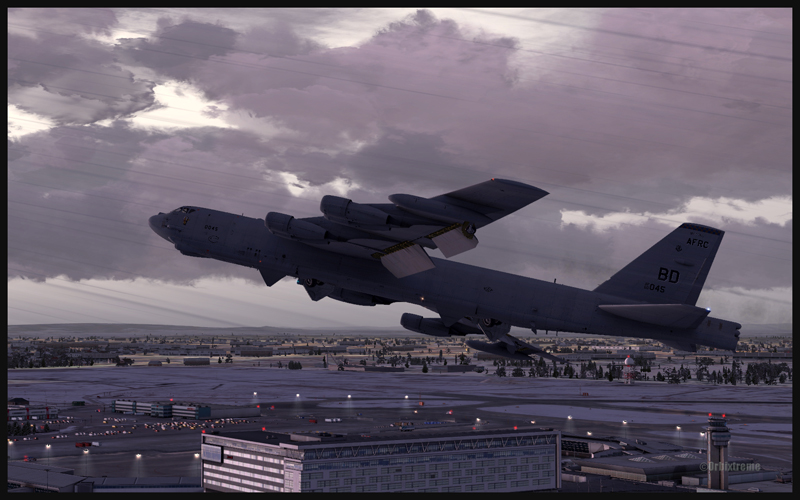
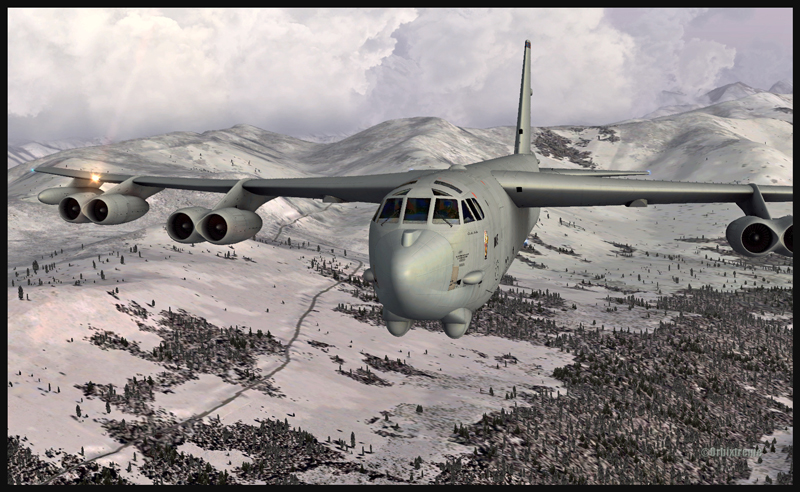
Boeing B-52 (FSX) airborne from Montréal Pierre-Elliott-Trudeau Intl to Anchorage, Alaska
Boeing B-52 (FSX) building up speed between Montréal and Anchorage
The Boeing B-52 is a Captain Sim creation and the Montreal airport is made by FlyTampa. The remaining scenery is designed by ORBX. Here are few basic informations for those of you who would be tempted to try a flight immediately after the download is completed. For the takeoff: pitot heat, 100% flaps down, YAW SAS Switch Engage, stabilizer trimmed, full throttle within four seconds, climb between 1500 and 2000 ft/min. The climb with flaps down is done at 180 kts. Adjust the thrust so that you have time to bring the flaps in totally; use 230 kts as maximum for zero degree flaps. Once in flight, brake to stop the wheels rotation then bring the gear up (although not before reaching 1000 ft agl).
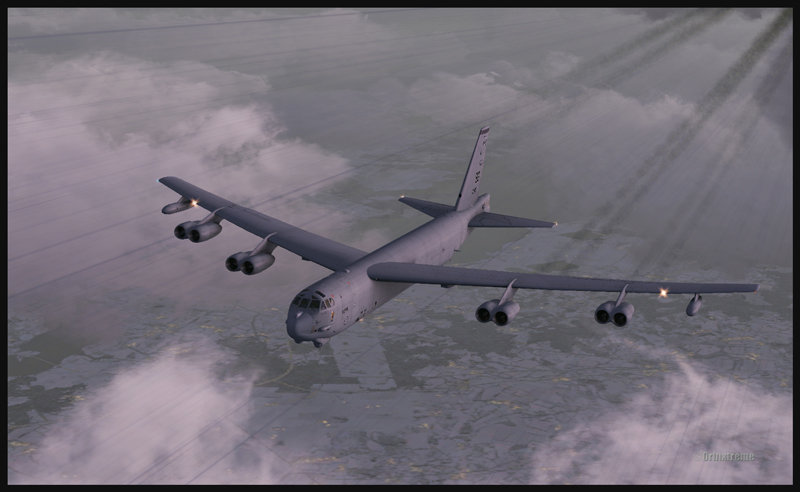
B-52 at cruising altitude (FSX)
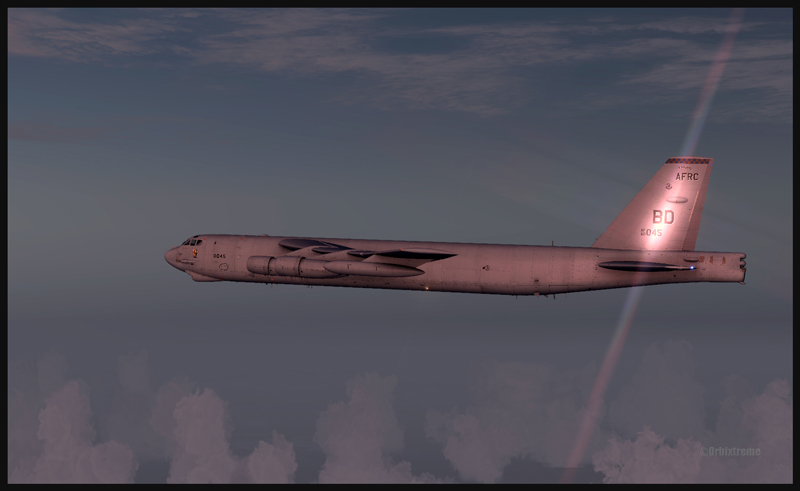
Boeing B-52 inbound to Anchorage, Alaska (FSX)
For a normal descent: (note: keep 20 kts in surplus of the proposed speed when the aircraft is turning). The descent is done at about 240 kts, with airbrakes 4, gear down, throttle to idle. À 220 kts, you may start applying flaps (they take 60 secondes to be fully extended). Once in downwind, use153 kts with airbrakes 4 (for 225,000 lbs). No more than 30 degrees turns. The rollout is done at no more than133 kts.
Boeing B-52 with flaps and gear out on the approach for Anchorage (FSX)
Boeing B-52 with runway in sight in Anchorage (FSX)
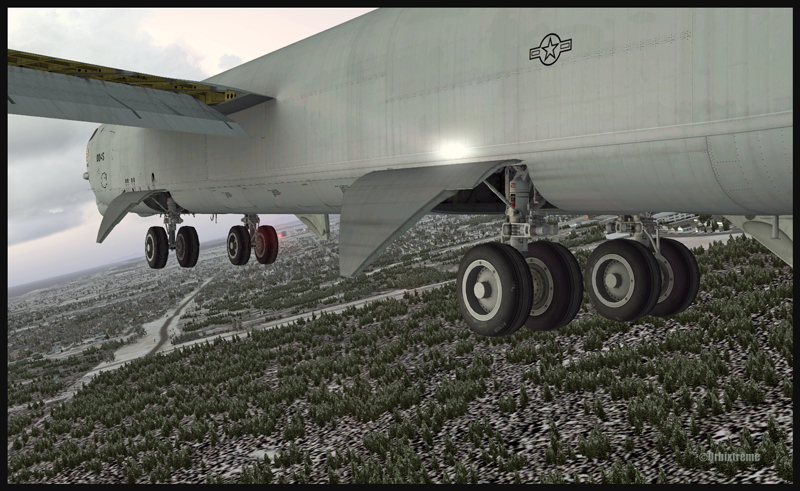
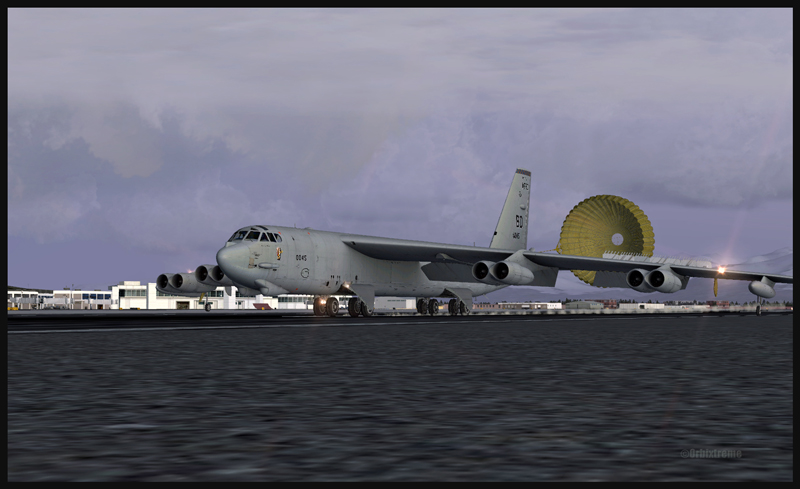
Boeing B-52 and the parachute on the arrival at Anchorage (FSX)
The touchdown with airbrakes full up is done at 110 kts IAS. The drag chute is then deployed (never above 135 kts). Keep a slight angle only, with the rear wheels touching first. When taxiing, turn the YAW switch and the airbrakes to “OFF”. Those are only basic infos. By the way, when the drag chute is deployed, you will not see a difference in the breaking distance; the chute is there only for “graphic” reality. Have a good flight!
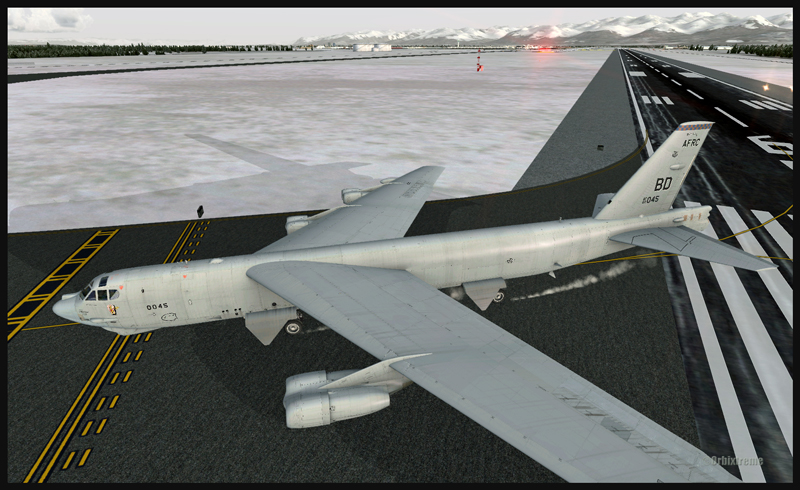
Boeing B-52 leaving the runway in Anchorage (FSX)
For more articles on flight simulation on my web site, click on the following link : Flight simulation
Sunset colors reflecting on an Air Canada Bombardier Q-400 in Toronto
The Air Canada Terminal installations at the Toronto Lester B. Pearson international airport are such that a voyager intending to do a flight from Toronto to Quebec has to walk outside the building to catch his plane. This has some advantages, especially when it is an evening flight and there is, at the time of boarding, a superb sunset.
But to directly photograph the sunset colors without any filter or tripod, while hand holding the camera, is a recipe for disaster. And a photographer cannot stay immobile for very long in that restricted area where security agents and passengers walking towards the DHC-8-400 demand that everyone move with the flow.
A practical method that offers very good results is to indirectly photograph the beautiful sunset colors by using the aircraft as a reflector.
First, it is better to use a camera lens that requires very little light. This will limit the grain size while allowing a shutter speed that is high enough to avoid a blurred picture. The scenery was thus captured with a Canon 5DSR full-frame camera equipped with a Canon EF 50mm f/1.4 USM lens.
Secondly, the photographer must crop the photography using an image editing software so that all useless details are absent from the final shot. There are two objectives: 1) it is obviously necessary to keep the aircraft parts that will best show the sunset colors and 2) do the best possible use of the elements presenting graphic interests for the viewer.
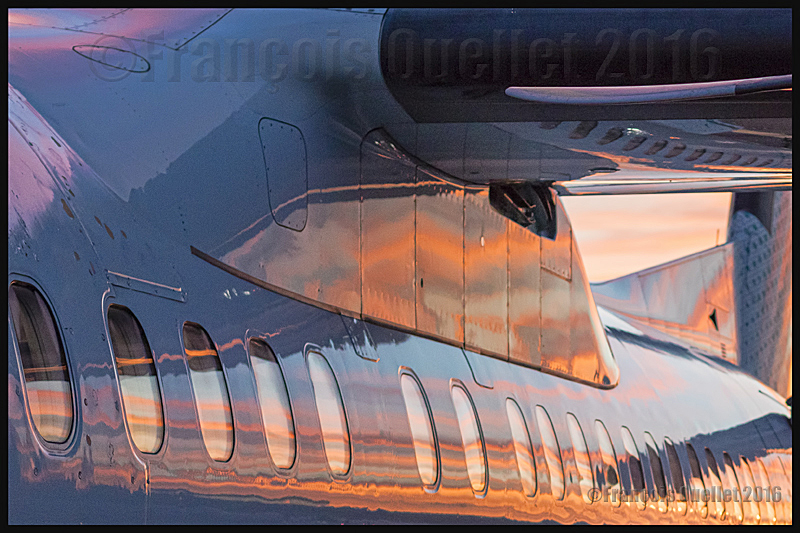
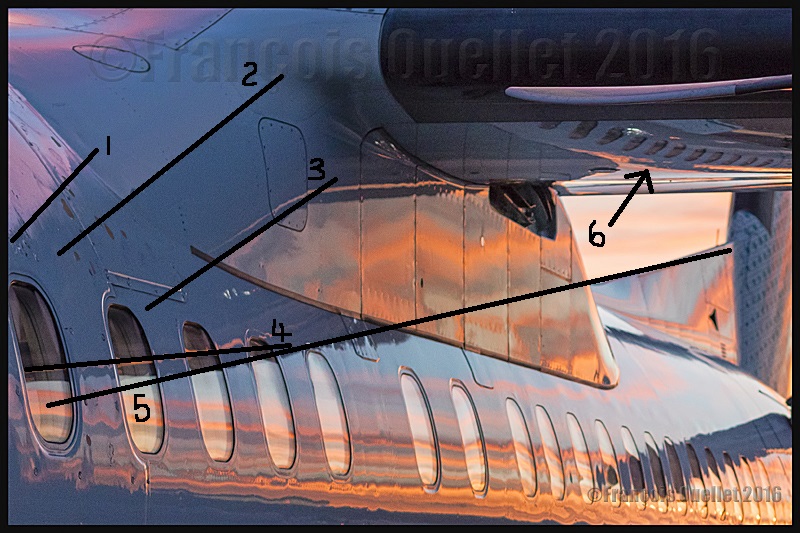
If I had kept only several oversized windows in order to show the superb sunset colours, there would have been only clear bright colours, without contrasts. That would have given an uninteresting photo. The advantages of protecting the shadowy top of the aircraft are that it adds a strong luminosity contrast, allows the inclusion of the Q-400 diagonal lines (1-2-3-4-5) and a reflection of the reflections themselves (6) under the aircraft’s wing. All this is highlighted in the photo below.
Photography theory: diagonal lines on a Bombardier Q-400 photo
The Queen Mary 2 comes twice a year in the Quebec Harbour during the autumn. It obviously always attracts a lot of onlookers. The vessel carries 2620 passengers who are prompt to visit Old Quebec upon arrival.
In order to take a picture of this superb ship and the architecture of Old Quebec’s houses, it was worth waiting until evening, when the colours were more subtle. I could have chosen to do a close-up of the Queen Mary 2, but by doing so the photo would have lost some of its dynamism since the quartier Petit-Champlain’s alleys and its pedestrians would have been absent from the scene.
There is only a small portion of the sky visible in the picture and this is voluntarily since it does not present any interesting details, especially when compared with the rest of the scenery. The front of the Queen Mary 2 has wilfully been located in the superior right corner of the photo since it is toward this part of the image that the eye ends its initial inspection.
There were quite a number of viewers installed on the Dufferin Terrace, most with a portable camera, trying to capture the scene. All those onlookers and photographers constantly moving on the wooden terrace were nevertheless creating vibrations: a tripod, usually the perfect tool to prevent any shaking of the camera, was only useful here providing that there was a shorter exposure time. The ISO had to be increased accordingly to respect the shorter exposure and avoid a blurred picture at low speed.
Still, the photo taken with a Canon 5DSR full-frame camera successfully portrays the mood in Old Quebec on that evening of autumn 2016.
For other ship photos posted on my website, click on the following link:
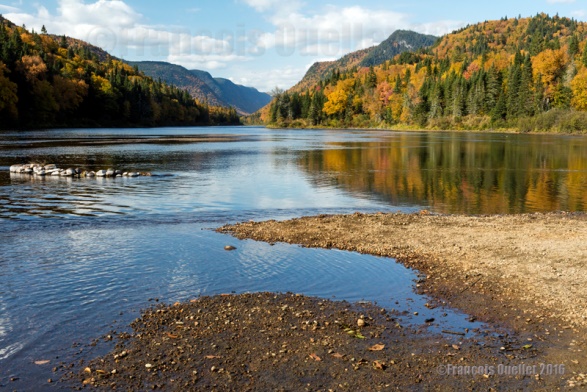
Autumn colors in the Jacques-Cartier National Park
The picture above was taken at the Jacques-Cartier National Park, in the Province of Québec, in 2016 with a Canon 5DSR full-frame camera. You can find this exact location by heading towards the “kilometer 10” inside the park, immediately behind the service center.
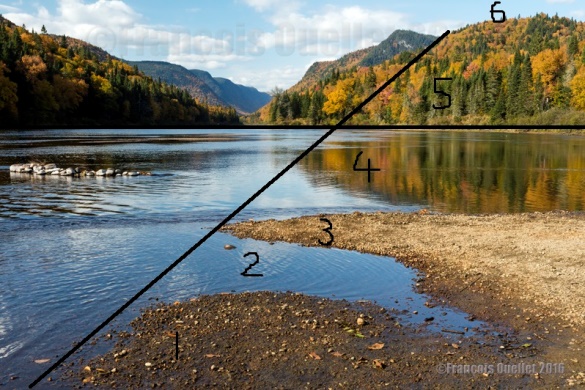
Even if the autumn colors were beautiful and would have deserved a close-up, there was also a possibility to include an interesting foreground. The natural shapes and alternance between the strips of land (1-3-5) [see the picture below] mixed with the water and sky (2-4-6) helped form a virtual diagonal that was used as a lead-in line until the eye meets the superior right corner of the photo.
The rule of thirds was easy to apply here and no compromise was necessary. I decide to cut most of the sky since the time of the day was not ideal as the light was too bright. But I also wanted to give precedence to the geometric shapes of the foreground. The skyline was relocated in the first third of the scenery, immediately at the base of the mountains. The main interest of the picture, which was the colorful forest, now rested in the upper right portion of the frame.
Jacques-Cartier National Park in the Province of Québec and photography theory
For other photos on the province of Quebec and also Quebec City, click on the following links from my blog:
This photo was taken in Stoneham, in Québec, during the autumn 2016. I considered it an interesting scene due to the trees and all the branches that seem to cut the photo in multiple parts, at the same time as the colour variations of the maple leaves give the impression of an explosion from the center of the picture.
The scene was taken using a Canon 5DSR full-frame camera equipped with a fixed Canon 14mm 2.8L telephoto lens.
Click on the link for more autumn photos on my blog.
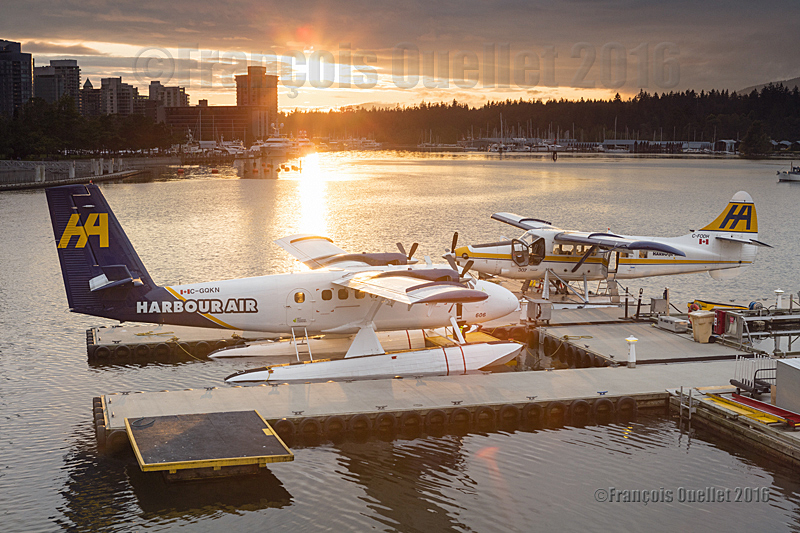
Harbour Air Twin Otter floatplane C-GQKN and Turbo Otter floatplane C-FODH in the sunset in the Port of Vancouver during summer 2016
The picture above has been taken with a Canon 5DSR full-frame camera in the Port of Vancouver, in British Columbia, during summer 2016. Following a very busy day of take-offs and landings, everything is now peaceful. The Harbour Air Twin Otter floatplane C-GQKN and Turbo Otter floatplane C-FODH are now parked for the night.
Pictures taken at dusk or dawn benefit from a unique light. Nonetheless, taking pictures of aircrafts against the light, with the last sunrays still visible, requires a special attention with regards to blown out highlights.
When contrasts are too important, it is possible to correct the situation by taking several pictures with different exposures and merging them using an image editing software like Photomatix (HDR photography). This is done in a few minutes only. Nonetheless, with floatplane aircrafts that are still slightly moving even when tied for the night, there is an increased risk of a blurred picture. The best way to proceed is to use a ND grad filter and to place it exactly where the light is the strongest. Naturally, there will still be some blown out highlights.
This being said, you still have a good margin of manoeuver, since there is no problem in showing a limited amount of over-exposed highlights in the brighter part of the sunrays, as there is not much details to lose there anyway. While purists would argue otherwise and spend hours in front of their computer trying to correct everything, you are making the best of another day of photographic exploration.
If the picture was taken using RAW files (or RAW with JPEG), it is possible to improve the scene even more by correcting some aspects like the contrasts, the brightness, the colours, the saturation and ambient light, etc. This also requires very limited time in front of the computer once you understand the basic principles of an image editing software.